Working with Embedded Wizard: Creating projects
To create a new project select in the menu the command New .... Thereupon the Create new project dialog appears where the project name, its location and the template to use for the new project can be selected. For the exact details about this task, see the description of the dialog.
Project content
After being created, the new project is opened instantly so you can start to modify its content. The following screenshot presents an example of how a typical new created project appears in the Composer window (the main editor area of Embedded Wizard):

As you can see, the new projects contains already various project members, which in this particular example have following function:
•On the left you see units of the Mosaic framework. You can consider these units as a kind of component library your application is built on. Generally, every Embedded Wizard project contains these Mosaic units.
•To the right you see a profile member, which serves to describe all configuration parameters for the target system. This includes in particular parameters determining the desired screen resolution and (very important) the Platform Package to be used for the code generation and the conversion of resources used within the application (e.g. images and fonts).
•The language members represent languages the application is localized for. In the usual case, the new created application contains only one member for the default language.
•Finally the unit named Application is intended to store your GUI components and all involved resources (e.g. images and fonts).
IMPORTANT
Please note, units belonging to the Mosaic framework are not intended to accommodate your project specific members. Although we don't prevent you actively from being able to modify the Mosaic units, the modifications will be ignored when you save the project. In any case, Embedded Wizard Studio will warn you if it detects modifications within one of the Mosaic units.
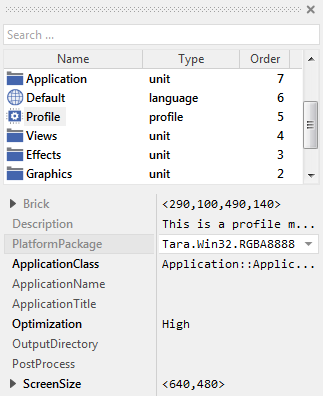
As explained in Basic concepts, Embedded Wizard Studio follows a visual programming approach. In this approach the project members are represented by so-called bricks. When you click on a brick, the corresponding member is selected. Thereupon its attributes appear in the Inspector window, where you can conveniently modify them as needed. For example, after selecting a profile member, the Inspector will show its attributes as demonstrated in the screenshot below:
Manage profiles
The profile member describes the parameters for your project, in particular the target specific configuration. A single project can contain several profiles, usually one for every target platform you want to generate the GUI application for.
With profiles you can also manage conveniently several variants of one and the same product. For example, one version for a HiDPI display and another one supporting multitouch capable displays, etc.
Usually, when you create a new project, the project contains already a profile configured for Microsoft Windows OS as the target platform. To generate code for your particular target system you will need to add and configure a new profile or you adapt the settings of the profile provided originally with the new created project.
Every project has to contain at least one profile.
Manage units
A new created project contains usually one unit called Application or Example. This unit is ready to accommodate your own created components as well as other project members.
In practice, however, you will add your own units to the project. For example, you can manage one unit where all widget components are stored and another one to accommodate GUI panels. The third unit, in turn, can be intended to store localized text resources, etc.
It's up to you how many units your project does finally contain. Ideally, the units should reflect the structure of your project and eventually the of your team. For example, you can organize that every developer works on his/her own units only, which eliminates the version conflicts when the project is modified simultaneously.
The unit Application or Example exists just for your convenience to start with the new project quickly. If not desired, you can delete it.
Besides the above mentioned units Application or Example, every new created project includes also units containing the implementation of the Mosaic framework. Please consider these units as a kind of component library not intended to accommodate your project specific members. Although we don't prevent you from being able to modify the Mosaic units, it is not the recommended approach. You should consider, that the modification may impact the function of the Mosaic framework. Moreover, next time when you update Embedded Wizard to a newer version, your modifications are lost.
Save project modifications
After modifying the project you have to save it. For this purpose you select in the menu the command Save or you simply use the shortcut CtrlS. You can also configure Embedded Wizard Studio to save the modifications autonomously. Use for this purpose the menu command Enable auto save.
Project files
Embedded Wizard Studio stores the project information in several files:
•Project main file: Contains all project related parameters and lists all units belonging to it. The project file is signed with the file extension .EWP.
•Unit files: A unit file contains the actual implementation of the corresponding unit within your project. A unit file can be compared with a C or C++ file. Within your project you can manage as many units as your particular application case it requires. Unit files are signed with the file extension .EWU. Please note, if the attribute Split of the affected unit is configured with the value true, the unit is managed as directory containing all enclosed project members as individual files signed with the file extension .EWUI (EWU include). This split mode is used typically when working with Embedded Wizard in a team.
•Setting file: Stores workspace related settings. When you open a project, Embedded Wizard Studio uses the information from this file to restore the workspace situation as it was just at the moment when the project was closed the last time. The setting file is signed with the file extension .EWS.
In its simplest form an Embedded Wizard project consists of two files, the .EWP project main file and one .EWU unit file. The .EWS file is not obligatory. If it is missing, Embedded Wizard Studio will start with an empty workspace.
All files contain human readable UTF-8 encoded text. You can thus easily compare the files and store them in your preferred version control system (VCS). You can even edit the files by using an external text editor.
TIP
If you create the project files .EWP and .EWU with an external tool or editor, please ensure that the files start with a correct UTF-8 BOM (Byte Order Mark) 0xEF 0xBB 0xBF. With UTF-8 you can encode all characters from the Unicode range 0x0001 .. 0xFFFF directly in the text. If BOM is missing, Embedded Wizard falls back in a compatibility mode and interprets the files as containing ASCII characters only. In such case all Unicode characters > 0x007F have to be coded by using the sequence \u followed by the character code in hexadecimal notation.