Working with Embedded Wizard: Integrating with the device
Embedded Wizard provides an environment to develop highly platform independent GUI applications. In practice, based on one and the same project you can generate code for any target system. This abstraction is made possible by the concept of a Platform Package and our programming language Chora designed to strictly conceal all platform specific constructs while being expressive and universal enough to allow you to formulate any application specific operation.
From this high claim for platform independence results the consequence, that applications developed with Embedded Wizard have per default no access to the underlying device, be it the hardware, middleware software or the operating system. You can consider the application as running enclosed in a box.
Except seldom cases such applications, however, don't make a lot of sense. When you create a GUI application for a machine you want to exchange information with it. You want, that the machine reacts when the user touches a button. Similarly when the machine changes its state, you want to notify the user about this alternation. It is thus necessary to exchange information in both direction from GUI application to the device and from the device to the GUI application.
If you ask yourself how to achieve it, this chapter introduces few concepts permitting you to communicate between the GUI application and your particular device despite the platform independent approach of Embedded Wizard.
Execute native code
The main purpose of a GUI application is to permit the user to control a device. For example, pressing push buttons on the touchscreen can cause an engine to start and stop. The code associated with such button needs thus a possibility to access and trigger the related device specific functionality. This is achieved usually by calling functions implemented in the device software or the underlying operating system. The functions, in turn, can be addressed from code formulated in the native syntax of your particular target system only.
Therefore the programming language Chora provides the statement native. With this statement you can integrate in-place a target specific code block. When generating code Embedded wizard takes over the content of the native statement as it is, without any changes, and arranges it at the corresponding location in the resulting code file.
The native statement can be used wherever a regular Chora statement is allowed. From the code nested in the native statement you can access the device specific functionality exactly as you would do when writing the application natively. To exchange operands between the Chora and the native world you simply use locally declared Chora variables and arrays.
For example let's assume, your target system supports the Can4linux driver to communicate with nodes on a CAN bus. Since Embedded Wizard has no idea what CAN bus is, you have to implement the code to send and receive CAN telegrams within a native statement. The data to send as well as the results are exchanged through locally declared variables:
// Local variable and arrays to exchange data with the native code. var int32 id = ...; array int32 data[4]; array int32 result[4]; // Prepare some data to send in the CAN bus telegram data[0] = ...; data[1] = ...; data[2] = ...; data[3] = ...; // Reset the 'results' array to avoid that Chora reports errors about // using of an unitialized array. result[0] = ""; result[1] = ""; result[2] = ""; result[3] = ""; // Execute following native code to send a CAN bus telegram and receive // some answer. The variable 'id' and the array 'data' provide information // to send via CAN bus. The array 'result' is intended to store the received // answer. In this simple manner you can exchange information between Chora // and the native world. $if !$prototyper native ( id, data, result ) { int fd; canmsg_t frame; fd = open( "/dev/can0", O_RDWR ); /* Prepare a CAN bus frame with the data provided in the variable 'id' and array 'data'. */ frame.id = id; frame.length = sizeof( data ); ((int*)&frame.data)[0] = data[0]; ((int*)&frame.data)[1] = data[1]; ((int*)&frame.data)[2] = data[2]; ((int*)&frame.data)[3] = data[3]; /* Send the frame */ write( fd, &frame, 1 ); /* Receive the answer */ read( fd, &frame, 1 ); /* Copy the result values back in the 'result' local array. */ result[0] = ((int*)&frame.data)[0]; result[1] = ((int*)&frame.data)[1]; result[2] = ((int*)&frame.data)[2]; result[3] = ((int*)&frame.data)[3]; close( fd ); } $endif // Again in Chora evaluate the results. if ( result[0] == 0x1234 ) { ... } else if ( result[1] == 0x1369 ) { ... }
The above CAN bus example demonstrates just the idea. In principle, with the native statement you integrate any target specific code. Accordingly, you can access your particular middleware APIs, operating system services or even modify CPU registers. How you achieve this, however, is not a detail of Embedded Wizard. You should know your target system, its middleware API and the functions to e.g. read or write CPU I/O pins.
Use inline code member
A further possibility to inject native code into the generated code is provided by the inline code member. This member is primarily intended to accommodate definitions or predeclarations the following native statements do depend on. In most cases you use the inline code member to add C #include "..." directives.
For example, in the native statement from the section above we access functions from the C library and use CAN bus specific data structures. These need to be declared before they can be used, otherwise the C compiler will report errors. With the inline code member we can include the necessary header files containing all necessary declarations:
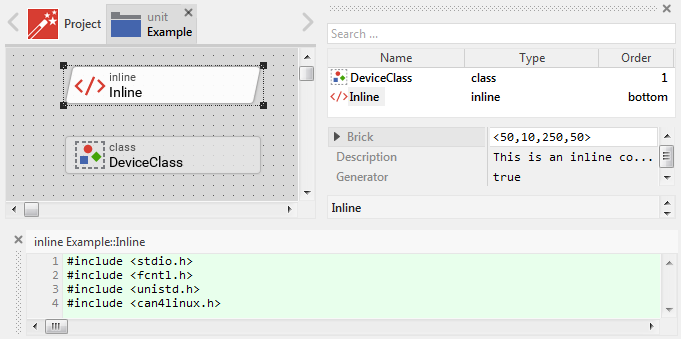
When generating code Embedded wizard takes over the content of the inline code member as it is, without any changes. Please consider, that all members are generated strictly according to the order as they are arranged within the unit. In the screenshot above you see, that the member Inline has a lower order than the class DeviceClass. Accordingly, the inline code member will be generated before the class. If necessary you can adjust the order of an inline code member.
Invoke GUI application code from device
During code generation every Chora method implemented and used in your GUI application is converted in a corresponding C or JavaScript function. If you are prudent, the software running in your device can call these functions and submit thus information directly from the device to the GUI application. For example, the device can notify the application about an important state alternation. Doing this, however, you must pay attention to some rules described below.
Let's assume, in your project you have a class named Application::DeviceClass. As its name implies, the class is intended to serve as an interface between the GUI application and the device. For this purpose it contains a method EngineStarted declared with one parameter aEngineNumber of data type int32. The idea, when the state of some engine changes, the device calls this method and informs the GUI application, that the engine with the given number has begun to work:

When generating code for a C target system, the method will be represented by the following C function. Please note the initial parameter _this. Here the function expects a valid Application::DeviceClass instance in which context the method should be executed. Furthermore please note the double underscore __ in the function's name. It identifies functions allowed to be called from the outside of the GUI application:
/* Wrapper function for the non virtual method : 'Application::DeviceClass.EngineStarted()' */ void ApplicationDeviceClass__EngineStarted( void* _this, XInt32 aEngineNumber );
Knowing this you can call this function from your device specific software. Before you can do this, however, you need is a valid instance of the Application::DeviceClass to pass it in the _this parameter. The recommended approach is to use for this purpose a global autoobject defined in your project. Let's assume, you have created such autoobject in the unit Application and named it DeviceObject. Then with following C code you can obtain access to the object and invoke its method EngineStarted with the operand 1369:
/* Obtain access to the global autoobject 'Application::DeviceObject' of the class 'Application::DeviceClass' */ ApplicationDeviceClass device = EwGetAutoObject( &ApplicationDeviceObject, ApplicationDeviceClass ); /* In context of the object invoke the method 'EngineStarted' */ ApplicationDeviceClass__EngineStarted( device, 1369 );
Similarly, when you generate code for a JavaScript compatible target system, the Chora method is converted in corresponding JavaScript method. Thus calling the JavaScript method results in the Chora method being executed. Here again you need a valid instance of the object in which context the method should be executed. And again, the recommended approach is to use an autoobject defined fro this purpose in your project:
/* Obtain access to the global autoobject 'Application::DeviceObject' */ var device = EmWiApp._GetAutoObject( EmWiApp.Application.DeviceObject ); /* In context of the object invoke the method 'EngineStarted' */ device.EngineStarted( 1369 );
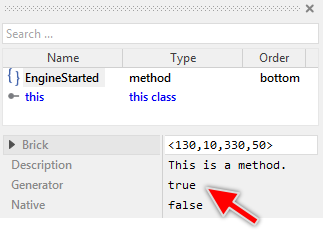
Please note, Embedded Wizard applies diverse optimization operations on the generated code. For example, project members not used in the application are per default eliminated. Therefore, if you intend to invoke a method from the outside of the GUI application you should absolutely configure the attribute Generator to the value true for all: the method itself, the class, the method is defined inside and the autoobject in which context you plan to invoke the method. This ensures, that these members are available in the resulting code. The following screenshot shows the right configuration for the method itself:
Usually, when calling a Chora method, all resulting updates are scheduled automatically during the runtime of the application. However, if the user implements extern code to e.g. receive data via WebSocket and then invokes a Chora method from the outside of the GUI application, no update is performed after the method is finished. In such case, you have to explicitly execute EmWiApp._RequestUpdate(); in order to trigger the update. For example:
/* Obtain access to the global autoobject 'Application::DeviceObject' */ var device = EmWiApp._GetAutoObject( EmWiApp.Application.DeviceObject ); /* In context of the object invoke the method 'EngineStarted' */ device.EngineStarted( 1369 ); /* Trigger the update of the GUI application */ EmWiApp._RequestUpdate();
TIP
If you are interesting in the documentation of the used C function EwGetAutoObject() you will find it in the following article. In case you generate JavaScript code for WebGL compatible target system, the used function _GetAutoObject() and _RequestUpdate() are documented inline in the module emwi_10_00.js you will get when generating code with disabled obfuscation.
Take care in multi-threading environments
Embedded Wizard created applications are NOT THREAD SAFE. Under no circumstances you should call Embedded Wizard functionality in context of other threads than the thread used to initialize the GUI application! Doing this will result in unpredictable behavior including very difficult to understand system crashes.
Of course Embedded Wizard doesn't forbid you to implement multithread applications. Threads are great technique to perform background activities. However, if you need to submit information from such worker thread to the GUI application, please use for this purpose operating system communication services like queues, pipes or events. In this manner the GUI thread can receive and process information synchronously. NEVER, NEVER, NEVER call an Embedded Wizard function from a foreign thread.
In simple, not time critical cases the worker thread can exchange information with the GUI application by using an ordinary global variable declared with the preceding volatile modifier. Here the worker thread writes a value to the variable while the GUI application reads it periodically. As long as you ensure that the variables are modified and read atomically this approach is safe.
Data types
When exchanging values between the GUI application and the device specific code you should understand the relations between Chora data types and their counterparts in your particular target system. Important in this context is to know how operands defined in Chora are represented when evaluating them in native code and in which form the operands should be provided when submitting information to the GUI application.
The following table provides an overview of data types most suitable to exchange information with the device together with their corresponding representation in code generated for C and JavaScript:
Chora data type |
C representation |
JavaScript representation |
|---|---|---|
typedef signed char XInt8; typedef signed short XInt16; typedef signed int XInt32; |
number clipped to 32-bit integer |
|
typedef signed long long XInt64; |
number precision limited to 52-bit |
|
typedef unsigned char XUInt8; typedef unsigned short XUInt16; typedef unsigned int XUInt32; |
number clipped to 32-bit unsigned integer |
|
typedef unsigned long long XUInt64; |
number precision limited to 52-bit |
|
typedef float XFloat; |
number |
|
typedef char XBool; |
boolean |
|
typedef unsigned short XChar; |
number clipped to 16-bit unsigned integer |
|
typedef XChar* XString; |
string |
|
typedef unsigned int XEnum; |
number clipped to 32-bit unsigned integer |
|
typedef unsigned int XSet; |
number clipped to 32-bit unsigned integer |
|
typedef int XLangId; |
number clipped to 32-bit integer |
|
typedef unsigned int XStylesSet; |
number clipped to 32-bit unsigned integer |
|
typedef unsigned long XHandle; |
any JavaScript type |
|
typedef struct { XInt32 X; XInt32 Y; } XPoint; |
[number X,number Y] JavaScript array with two numbers clipped to 32-bit integer |
|
typedef struct { XPoint Point1; XPoint Point2; } XRect; |
[number X1,number Y1,number X2,number Y2] JavaScript array with four numbers clipped to 32-bit integer |
|
typedef struct { XUInt8 Red; XUInt8 Green; XUInt8 Blue; XUInt8 Alpha; } XColor; |
number clipped to 32-bit unsigned integer The value red is stored in bits 0..7. The value green is stored in bits 8..15. The value blue is stored in bits 16..23. The value alpha is stored in bits 24..31. |
Knowing the data type relations and their target specific representation it is simple to e.g. evaluate in the native code a color operand received from the GUI application. Let's assume your device can control the light color and the luminance of a lamp through adequate C functions. Then, following native code would be able to setup the lamp according to the color specified in the GUI application:
// Some value to configure the color of a lamp. var color lampColor = ...; $if !$prototyper native ( lampColor ) { /* Predeclaration of functions to change the color and luminance of a lamp. */ extern void lamp_set_color( int aRed, int aGreen, int aBlue ); extern void lamp_set_luminance( int aLuminance ); /* Calling the functions will change the light color. The RGB color is taken from the variable 'lampColor'. The opacity of the color determines the luminance of the lamp. */ lamp_set_color( lampColor.Red, lampColor.Green, lampColor.Blue ); lamp_set_luminance( lampColor.Alpha ); } $endif
With the above presented data types you are practically able to exchange any information between the GUI application and the device. Other Chora data types (object, property reference, slot, etc.) are not recommended to be used for this purpose since their usage expects a good understanding of how Chora Runtime Environment works internally. However, if you are curious with the Professional edition of the Platform Package you get the source code of the Chora Runtime Environment. You find it in the delivered Platform Package or build environment. Analyzing the generated code is also helpful to learn more about how to integrate our technology with your particular device.
Be careful when exchanging strings
This section addresses special aspects when exchanging strings between the GUI application and the device specific code written in C. Since with target systems using JavaScript the strings are treated natively this section is irrelevant for JavaScript.
Similarly to the programming language C, Embedded Wizard manages strings as arrays of character codes with 0 (zero) code as terminator at the end of a string. Accordingly, when you implement native code you can access and evaluate the string content easily. You should however know, that in Embedded Wizard created applications the characters within a string are generally 16-bit wide. Moreover, empty strings can optionally be represented by a NULL pointer. Your implementation should thus be ready to handle the situation of a string being NULL. For example:
// The variable stores some short command to perform in target device. // Let's assume the characters in the string determine operations to // do. For example, character 'O' could mean 'open the door'. var string command = ...; // e.g. = "OL1"; $if !$prototyper native ( command ) { const XChar* src = command; /* Iterate through all characters in the string. If the string is empty (src == NULL) or (*src == 0) nothing happens. */ for ( ; ( src != NULL ) && *src; src++ ) { /* Evaluate the actual character as command. */ switch ( *src ) { case 'O' : device_open_the_door(); break; case 'C' : device_close_the_door(); break; case 'L' : { /* The command 'L' is in this example followed by additional '0' or '1' */ switch ( *++src ) { case '0' : device_switch_off_light(); break; case '1' : device_switch_on_light(); break; } } break; } } } $endif
The following table provides an overview of useful function you can access from the native code in order to evaluate a string or copy its content into your own memory area:
Runtime Environment function |
Description |
|---|---|
C Platform Package function to compare two strings. |
|
C Platform Package function to query the length (the number of characters) of a string. |
|
C Platform Package function to convert the wide-character (16-bit) coded string in an ANSI (8-bit) string. |
|
C Platform Package function to query the length of an UTF-8 string resulting from an Embedded Wizard string. |
|
C Platform Package function to convert a string in UTF-8 format. |
For example, with the above functions you can determine the actual length of a string and copy the string while converting its characters from 16-bit to C typical 8-bit format. This example shows also one very important aspect you should always keep in mind: never modify the original Embedded Wizard string or pass its pointer to functions which may store it for later usage. Instead copy strings in your own memory area:
// The variables store some text and the name of a file where the text // should be stored. var string text = ...; var string fileName = ...; $if !$prototyper native ( fileName, text ) { /* Query the length of the both strings */ int fileNameLen = EwGetStringLength( fileName ); int textLen = EwGetStringLength( text ); /* Reserve memory to accommodate the ANSI version of the strings. Note the additional zero-terminator sign. */ char* bufFileName = malloc( fileNameLen + 1 ); char* bufText = malloc( textLen + 1 ); FILE* file; /* Convert the strings from 16-bit character format in 8-bit ANSI */ EwStringToAnsi( fileName, bufFileName, fileNameLen, ' ' ); EwStringToAnsi( text, bufText, textLen, ' ' ); /* Open the file and write in it the given text */ file = fopen( bufFileName, "w" ); fputs( bufText, file ); fclose( file ); /* Finally release the temporarily reserved memory. */ free( bufFileName ); free( bufText ); } $endif
In the opposite direction you can submit a string from device specific code to the GUI application. In this case please use the functions from the table below to explicitly create the new string. Never submit pointers referring to string contents stored in your own memory, even if the string is stored in the right 16-bit per character format. Embedded Wizard wants to manage the string memory by itself otherwise it crashes. Use functions from the following table:
Runtime Environment function |
Description |
|---|---|
C Platform Package function to create a duplicate of a wide-character (16-bit) string. |
|
C Platform Package function to create a wide-character (16-bit) string from an ANSI (8-bit) coded source string. |
|
C Platform Package function to create a wide-character (16-bit) string from an UTF-8 coded source string. |
|
C Platform Package function to create a string filled with a character. |
The following example demonstrates the correct approach how the device specific code can transmit a string to the GUI application. In this example, the native code formats first a regular C string and stores it in a buffer. Then the function EwNewStringAnsi() is used to create from the C string an Embedded Wizard conform string copy. This resulting string can finally be exchanged with the GUI application. The original buffer is not necessary anymore:
// The variable should receive some device status information. var string status = ""; $if !$prototyper native ( status ) { char buf[256]; int temperature; int voltage; int current; /* Call some functions to get the status information of the device */ temperature = device_get_temperature(); voltage = device_get_voltage(); current = device_get_current(); /* Format a status message in the temporary buffer 'buf' */ sprintf( buf, "STATUS: %d Centigrade, %d Volt, %d Ampere", temperature, voltage, current ); /* From the ANSI string in 'buf' create Embedded Wizard string and return it in the variable 'status'. */ status = EwNewStringAnsi( buf ); } $endif // 'status' contains now the message as a correct string. return status;
Exchange array contents
Depending on your particular application case, your main software or the middleware may require its information to be managed in data arrays. This leads to the frequently asked question, how do you exchange array data between the device and the Embedded Wizard created GUI application?
Chora supports an array project member and a local array statement permitting you to store within your project information similarly as you do with C or JavaScript arrays. On the other side, however, Chora handles the arrays much more strictly compared with C or JavaScript preventing the creation of any pointer or references to an array.
From this arises the consequence, that passing a Chora array via pointer or reference as parameter in a method invocation is not possible. The array member can be accessed only in context of an object of the component, where the array has been embedded inside. In case of a local array, the local array is accessible even only within the implementation of the method containing the affected array.
This limitation results from the fact, that the actually simple data type system of Chora doesn't support the creation of array data types. Consequently, it is not possible to provide a Chora application with a reference to a C or JavaScript array.
The following sections present few scenarios, where the GUI application read and modify arrays existing in the main software or in the middleware. The following examples are focused on the presentation of diverse techniques valid primarily for applications running in C environment. Similar, however, can also be applied to applications running in JavaScript.
Case 1: Access individual array elements
In this case, the GUI application reads or/and writes array elements selectively, depending on the actual application state. Let's assume, the array is intended to store device parameters. The GUI application accesses only those array elements, which are of interest ignoring any other element. The communication protocol between the GUI application and the device can thus be reduced to a simple get and set command with parameters identifying the desired array element and the values to exchange.
Following code demonstrates the possible implementation of a native statement to read and write a single element of the array existing originally in the main software, middleware, etc.. In this example, we assume, the affected array stores C strings (zero terminated strings with 8-bit per character). To make it more complex, the C strings are allocated dynamically by using malloc() and free() functions of the C standard library:
// The index of the array element to access. var int32 valueNumber = 123; // Variable where to store the value received from the array. Initialize // the variable to avoid Chora errors about the usage of non initialized // variables. var string valueResult = ""; // Variable containing new value to transfer to the array. var string valueToSet = "Abc"; // The native statement encloses the C code section where we access // the array and exchange data with it. native ( valueNumber, valueResult, valueToSet ) { /* Declaration of an externally available array. In this manner the C compiler can access the array without warnings. */ extern char* YourDeviceArray[1024]; /* First read the string value stored in the array at the specified position. Since we return the string to Chora, we have to ensure that we get a copy of the original string. Never feed Embedded Wizard with foreign strings! */ valueResult = EwNewStringAnsi( YourDeviceArray[ valueNumber ]); /* Then replace in the array the old string memory by a new memory, which is large enough to take the new string. Please note the additional zero- terminator sign (+ 1) to take in account when we reserve the memory. */ free( YourDeviceArray[ valueNumber ]); YourDeviceArray[ valueNumber ] = malloc( EwGetStringLength( valueToSet ) + 1 ); /* Finally copy the new string content into the just reserved memory by converting the Embedded Wizard 16-bit wide characters in ANSI-C 8-bit codes. */ EwStringToAnsi( valueToSet, YourDeviceArray[ valueNumber ], EwGetStringLength( valueToSet ) + 1, 0 ); } // Use the value received from the array trace valueResult;
With the above example you read and modify the value of a single array element. You can implement this code within a method and instead of using the local variables valueNumber and valueToSet you can use method parameters. The value received from the array and stored in the local variable valueResult can be used as the return value when the method exits.
Case 2: Access multiple array elements
In the second case we assume, the application wants to exchange multiple array elements at once. In our example, the array manages configuration parameters of diverse production machines controlled by our device. For the sake of simplicity, the array stores for every machine 3 values. This means the elements 0 .. 2 determine the parameters of machine 1. The elements 3 .. 5 the parameters of the second machine 2, and so far. Thus, to exchange the parameters for the machine N, we read and write the array elements N*3 .. N*3+2.
The following code demonstrates how we write the machine parameters. To make it a little bit more complex, the values to exchange with the array are provided enclosed within a data object (similar to C data structure). For this purpose you create first in your project a new non visual component with variables to store the diverse parameters. Assuming, the parameters reflect the actual running status of the machine, its speed and the maximum allowed power consumption, the component could contain three variables: Running, Speed and MaxPower. All variables are simple 32-bit integers:
// 'parameters' refers to an object of the above described non visual // component containing the machine parameters var Example::MachineParameters parameters = ...; // The number of machine to write the data var int32 machineNumber = ...; // Copy the values from the data object to local variables to allow the // transfer with 'native' code. Accessing Chora objects from 'native' code // is not possible var int32 running = parameters.Running; var int32 speed = parameters.Speed; var int32 max_power = parameters.MaxPower; native ( machineNumber, running, speed, max_power ) { /* Declaration of an externally available array. In this manner the C compiler can access the array without warnings. */ extern int YourDeviceArray[ MAX_NO_OF_MACHINES * 3 ]; YourDeviceArray[ machineNumber * 3 + 0 ] = running; YourDeviceArray[ machineNumber * 3 + 1 ] = speed; YourDeviceArray[ machineNumber * 3 + 2 ] = max_power; }
Again, the above code can be implemented in a method using a method parameter instead of the local variable machineNumber. Also the parameters object could be passed as method parameter. In this manner you call the method with a number identifying the desired machine and an object containing the values you want to write to the array.
Reading multiple array values works similarly with the unique limitation, that Chora methods can't return more than one value. You can, however, create an object of the above used data component, fill it with all the parameters you have read from the array and return this object to the caller. The caller uses then the Object to access the values:
// The number of machine to read the data var int32 machineNumber = ...; // Local variables where the values read from the array are stored. Initialize // the variables to avoid that Chora reports errors about the usage of non // initialized variables. var int32 running = 0; var int32 speed = 0; var int32 max_power = 0; native ( machineNumber, running, speed, max_power ) { /* Declaration of an externally available array. In this manner the C compiler can access the array without warnings. */ extern int YourDeviceArray[ MAX_NO_OF_MACHINES * 3 ]; running = YourDeviceArray[ machineNumber * 3 + 0 ]; speed = YourDeviceArray[ machineNumber * 3 + 1 ]; max_power = YourDeviceArray[ machineNumber * 3 + 2 ]; } // Now create a new instance of the data object var Example::MachineParameters parameters = new Example::MachineParameters; // Fill it with the data received in the 'native' code section parameters.Running = running; parameters.Speed = speed; parameters.MaxPower = max_power; // And return the object enclosing the just read parameters to the caller return parameters;
If you plan to call the method to read the parameters very often, it could be reasonable to not create with every invocation new instances of the data object Example::MachineParameters. Instead the caller of the method could create the object and pass it in an additional parameter in the method invocation. Within the method you can access the object and store in its variables the values read from the array as demonstrated above. The step to create a new object can be omitted. The caller, in turn, can recycle the data object if several invocations take place.
Case 3: Access all array elements
In the last case we address the possibility to read or write all array entries at once. In this example, we assume, that the actual component contains an array member large enough to accommodate all entries of the counterpart array found in the main software or middleware. The implementation iterates through the both arrays and copies the entries one by one between the array in the device and the Chora array in the GUI application:
// Assume, all entries in the array 'SomeDataArray' should be filled with // contents from the array in the main software/middleware. var int32 noOfEntries = SomeDataArray.length; var int32 i; // Iterate through all entries of the array. Here the variable 'noOfEntries' // limits the loop. for ( i = 0; i < noOfEntries; i = i + 1 ) { var uint32 val; // Within 'native' code read the value 'i' of the array in your main software // or middleware. Store the value in the local variable 'val'. native ( i, val ) { /* Declaration of an externally available array. In this manner the C compiler can access the array without warnings. */ extern unsigned int YourDeviceArray[ THE_SIZE_OF_YOUR_ARRAY ]; val = YourDeviceArray[ i ]; } // Again in Chora, copy the value from the variable 'val' to an array // member existing in 'this' object SomeDataArray[ i ] = val; }
Once the for-loop is finished, the GUI application can access and evaluate the copied data in its own array SomeDataArray. Similarly, using such loop you can transfer values in the opposite direction from a Chora array member to an array existing within the main software or middleware.
Don't retain nor modify objects or strings
If your implementation of the native code handles with object, string, slot or property reference operands you should be very careful. Generally, accessing and evaluating such operands in-place is unproblematic. Storing them in variables for later usage, in turn, should be strictly avoided!
During the runtime Embedded Wizard tracks the relations between all dynamically created objects and strings and recognizes which of them are in use and which can be discarded. This occurs automatically so usually you don't need to take care about this garbage collection mechanism. However, when you store an object or string in a C variable, Embedded Wizard doesn't know about it. In the worst case, the garbage collection will discard the object or string leaving your variable with an outdated pointer. Being software developer you can imagine which bad things may happen when you access memory via invalid pointer.
The following example demonstrates it. The native code contains a static variable, which remembers its content between two invocations of the surrounding method. The variable is used to store a string, in fact a pointer to a memory area. Next time this native code is executed, the pointer is evaluated again. Depending on whether the string has survived or not the preceding garbage collection the pointer is or not valid:
var string command = ...; // Some native code to submit commands from the GUI application to // your device. native ( command ) { /* Static C variable to store a value permanently */ static XString lastCommand; /* Predeclaration of a function to perform commands in your device. Let's assume the function expects two string values. The first value contains the actual command as string. The second value contains the preceding command. */ extern void DoTransition( XString aCommand, XString aLastCommand ); /* Just call the C function and pass over the current and the last commands as strings. */ DoTransition( command, lastCommand ); /* Now remember the current command in order to be able to use it next time the operation is repeated. */ lastCommand = command; }
Therefore, our recommendation, please don't store objects, strings and other references received from Embedded Wizard application in global, static C or JavaScript variables. Instead if you want the referenced contents being used later, copy them into your own memory area.
Similarly modifying the received objects or strings may affect the stability of the application. In case of strings please limit to read the string contents. In case of objects please limit to invoke its methods. The best is you consider the Embedded Wizard resources as short-lived read-only data members you limit to access and evaluate only.
Error message: Unmanaged string found
Chora Runtime Environment contains an additional functionality to verify all strings existing actually in the GUI application. As described above in the section Be careful when exchanging strings, Embedded Wizard manages the strings as dynamically allocated memory areas. At the lifetime of the GUI application, the strings are created, used and if unnecessary released again.
To work correctly, Embedded Wizard depends on all the strings being created and managed by its own Runtime Environment. When you create a string by using functions other than these of Runtime Environment and you pass such string as parameter to Embedded Wizard application, the application will crash when trying to access, modify or release the string. Since the cause and the effect of such errors are temporally apart, the debugging of the problem can become laborious.
To avoid this, Embedded Wizard signs its own strings with a magic-number. Then at the runtime when a string is used, Embedded Wizard verifies whether it has the right magic-number. Should it be not the case, then the affected string is evidently created outside of the Embedded Wizard by not using the correct Runtime Environment functions. In this case, an error message Unmanaged string found 'XYZ' is reported on the console device and the application enters a fatal error state.
When you see the error message Unmanaged string found ..., please review your implementation where string values are passed between the C code and Embedded Wizard generated application. Please see the section Be careful when exchanging strings.
Conditional compilation
With the above described native statement and inline code member you can simply integrate target specific code into the GUI application. During code generation the affected code blocks are simply taken over into the resulting generated file without being modified. Finally, Embedded Wizard has no idea what this code does in practice mean.
By using the Chora conditional compilation directives this process can be controlled more exactly. When you enclose a code block between a pair of $if .. $endif directives, the corresponding code is taken in account only when the condition in the $if directive is fulfilled. Otherwise the affected code is considered as being not specified.
For example, let's assume you have a method containing native code to query hardware status from an I/O CPU pin. Your GUI application should also run on two different device versions, each with its particular CPU and software routines to read the pin data. In this case you will need to provide for each device an individually adapted native statement. Which version of the statement is used depends on the profile selected for the code generation:
var bool status = false; // If generating code for the profile named 'Device_RevA'? $if ( $profile == Device_RevA ) native ( status ) { status = ( digitalRead( PIN_13 ) == HIGH ); } $endif // If generating code for the profile named 'Device_RevB'? $if ( $profile == Device_RevB ) native ( status ) { int value; if ( gpio_read( PIN_41, &value )) status = ( value != 0 ); } $endif return status;
Managing individual profiles for every device version permits you to simply adapt the native, target specific code in your application to the peculiarities of the respective devices. Similarly, by evaluating the built-in macro $prototyper you can suppress a native statement from being evaluated during prototyping. This is insofar important, as the Chora interpreter is not able to understand the native code. During a prototyping session, the native statements are simply ignored and warnings are reported in the Log window. In order to avoid the warnings you can exclude the native statement when the code is executed in a prototyping session:
var bool status = false; // If not prototyping and the current profile is 'Device_RevA'? $if !$prototyper && ( $profile == Device_RevA ) native ( status ) { status = ( digitalRead( PIN_13 ) == HIGH ); } $endif // If not prototyping and the current profile is 'Device_RevB'? $if !$prototyping && ( $profile == Device_RevB ) native ( status ) { int value; if ( gpio_read( PIN_41, &value )) status = ( value != 0 ); } $endif return status;
Implement a dedicated Device Interface
In this chapter you have learned the techniques to communicate between a GUI application and the underlying device. In principle, the code for the communication can be implemented wherever you want in your application. We recommend however to put the device specific code into a single so-called Device Interface class. How to do this is describe in the chapter Implementing a Device Interface.