Working with Embedded Wizard: Implementing component interface
In the preceding chapters you have learned how to create a new GUI component and how to compose its appearance. Now we will focus on the component interface. In simple terms, the interface permits to exchange data with the component. Without the interface the component would act like a kind of GUI black box. Through the interface the component can be configured, instructed to perform an operation, its current state can be queried or one component can communicate with other components.
Let's imagine a simple push button component displaying a text label. The label should inform the user about the function of the respective button within the application, e.g. one button Cancel and another one Continue. Unless you implement individual push button components for all the possible label variants, you will need a way to configure every button with its individual label. This can be achieved through the component interface.
Since GUI components are ordinary classes, the interface is implemented from adequate project members by simply adding them to the component. The sections below introduce the respective project members intended to implement the interface. Knowing this you will be able to decide by yourself which technique is the most suitable for your particular application case.
Properties
With a property the component is able to store a parameter. Thus recalling the above mentioned push button component with a label, the property is ideal to configure the label text. Superficially considered, the property acts just like a variable, it stores a value (e.g. the current label text). The practical thing about the property, however, is the possibility to associate with it the onset and onget methods.
Every time, the property is modified (e.g. a new label text is assigned to it), the onset method is executed automatically. Within this method the component can react to the alternation and e.g. adapt the displayed label. Similarly when you implement the associated onget method, you can determine dynamically the value the property will present when it is evaluated within an expression.
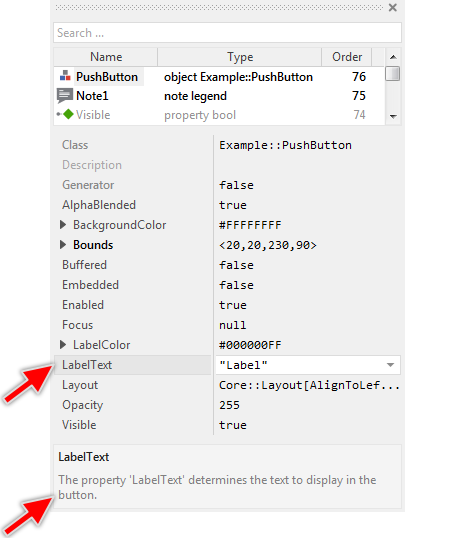
Generally, when you implement a GUI component you should add to it for every parameter you plan later to configure dynamically a corresponding property. The convenient thing about this approach is, that all the properties you have added to the component are automatically listed in the Inspector window when you select an instance of this component. The properties can then be inspected and modified easily. Moreover, if you have left some description for the property, this description appears in the bottom area of the Inspector window:
The following example demonstrates how you can implement a simple push button component with properties to configure its label text as well as the label color:
Please note, the example presents eventually features available as of version 8.10
Methods
With a method the component can implement an operation to execute every time this method is invoked. The method can evaluate and modify the current state of the component similarly as it is possible with the above described properties. Unlike properties, however, when using methods to implement the component interface you are able to pass at once more than one value in the method invocation. This is possible through the method parameters. If you are not familiar with object-oriented concepts, simply consider the method as a function or sub-routine. Thereupon one GUI component can invoke (call) the method (function) of another object and so exchange data with it.
Slot methods
The slot method provides another possibility to design the component interface. Similarly to the above described regular methods, slot methods can also evaluate and modify the state of the component. However, unlike regular methods, slot methods are never invoked directly. Instead to execute a slot method a signal has to be sent to it.
With the concept of signals, the sender object doesn't necessarily need to know the identity of the receiver object. For the sender it is sufficient to know only the slot method itself. This is possible since the slot method can be stored within properties (or other data members) leading to a kind of indirection. By evaluating the data member the sender object can access and signal the slot method. The following figure demonstrates the idea. Here the Object A sends a signal to Object B knowing only the slot method, which is stored in Property of Object A:

With this signal-slot technique two components can communicate easily with each other without that the sender component has to know anything about the receiver component. Accordingly the both components seem to act decoupled. Moreover, at the runtime the connection can be dissolved and later new connection with another slot method can be established. The connection is established by simply assigning the slot method to the data member. For example:
// The local variable 'complete' is initialized with the slot named // 'onComplete' existing in the object 'SomeObject'. var slot complete = SomeObject.onCompleteSlot; // However, if the following condition is fulfilled, the variable is // modified to refer to the slot 'onAbort' existing in another object. if ( someCondition ) complete = OtherObject.onAbort; /* Later .... */ // Signal the slot method. Which one is executed does depend on the // actual value of the variable 'complete' signal complete;
As such slot methods are ideal to implement event handlers. Let's imagine an ordinary push button component. Every time the user touches the push button, the component can send a signal to a slot method stored in its own property (named e.g. OnAction). You can thus connect the button with any slot method. Even you can add several buttons and every button can be connected with its own slot method. In the implementation of the slot methods your application can react to the button activation.
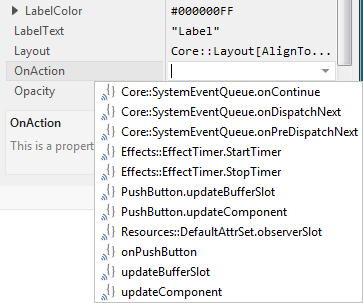
Very convenient in this context is, that all actually available slot methods are listed in the Inspector Assistant window when you edit the initialization expression for a data member declared with slot data type. In this manner you can select the desired slot method easily:
Please note, that with slot methods you can't exchange parameters as it is possible with regular methods. Per default, when executing a slot method only the identity of the object, which has originally sent the signal is provided in the hidden parameter sender. Also unique to a slot method is the possibility to defer its execution, so that several signals sent to one and the same slot method are accumulated resulting in the method code being executed only one time. If you are interesting in this functionality please see the statements postsignal and idlesignal.
The following example demonstrates how a slot method is connected with above mentioned push button components to handle the events after the user has activated one of the buttons:
Please note, the example presents eventually features available as of version 8.10
Outlet properties
The programming language Chora allows the property to be accessed indirectly through so-called property reference. Similarly to the above described approach of how two components communicate by sending signals to their slot methods, property references permit one component to access the property of another component without knowing anything about its actual identity. In this manner the both components can interact decoupled.
In practice, the reference to a property is stored in a data member. By evaluating and dereferencing the data member the property can be accessed and thus read or modified indirectly. The following figure demonstrates the idea. Here the Object A modifies the Object B knowing only its property, which is referenced in the data member Outlet of Object A:

Well, what is it good for? Let's imagine a slider widget. In the usual case, when the user touches and pulls on the slider's thumb, the slider changes its current numeric value. As described in the section above, such situation can be handled easily within a slot method implemented particularly and connected to the slider. Typically the slot method will evaluate the slider's current value and e.g. adjust a property of another component. In this case the slider and the other component interact together through the implementation of the slot method.
In turn, with this here presented approach you can connect the slider component directly with the affected property. Now, when the user pulls on the slider's thumb, the slider itself can access and adjust the referenced property without using the intermediate slot method. In other words, when your components provide such interfaces you can assemble from them a working application without writing a single line of code. Used with prudence, such interfaces can increase the software modularity and simplify the implementation of applications. This can in particular be essential if you implement for your customer component frameworks and you want to simplify the usage of the framework as far as possible.
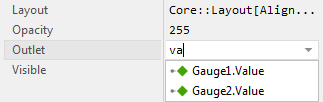
We call this technique Outlet properties, because the mentioned data members to store the property references are usually themselves properties and these properties act like component outlets. Very convenient in this context is, that all actually available and compatible properties are listed in the Inspector window when you activate the Assistant for such outlet property. In this manner you can select and connect the component with the desired property easily:
The following example demonstrates this technique. It contains two components: a slider component and a gauge component. The components are connected together through the here described property reference technique. There is no intermediate code necessary:
Please note, the example presents eventually features available as of version 8.10
Notifications and Observer
The programming language Chora provides a sophisticated communications concept permitting one component to react to notifications triggered by another component. In this approach we distinguish between an observer and the notification. The observer is an ordinary slot method you register explicitly with a predetermined property or object. As soon as this property or object is the subject of a notification, the registered slot method is signaled.
With this technique you can manage multiple slot methods registered as observer with one and the same property or object. When the property or object is notified, every observer is signaled individually. And again, all involved components don't need to know anything about each other to communicate. They are decoupled. This approach is often used together with the above described outlet properties. Here you can register a slot method to be signaled as soon as the property referenced in the outlet is notified.
To register an observer Chora provides the statement attachobserver. To trigger a notification, the statement notifyobservers is available. The following figure demonstrates the idea of notifications. You see here three components implementing the above described outlet property as interface to connect them with properties of other components. All three components register additionally slot methods as observer for the property referenced in outlet. Now, if one of the components (here Object C) triggers the notification, all three slot methods are signaled:

In the typical application case, the notifications are triggered after one component has modified the referenced property. Thereupon other components connected eventually to the same property have the chance to update themselves. Let's imagine an application with two sliders, both connected with one and the same property. When the user interacts with one slider the value of the property changes. The other slider component, however, remains per default unaffected.
Now, thanks to the described observer technique the active slider can notify all other components associated with the same property about its alternation. The other slider can thus react and adjust its thumb position to the new property value. The following example demonstrates this application case with several sliders controlling one and the same property:
Please note, the example presents eventually features available as of version 8.10
The technique to register observers and deliver notifications is a core feature of Chora permitting the development of applications following the model-view-controller (MVC) programming pattern. Please note, that the observer are not restricted to be attached to properties only. You can attach an observer also to an object and react when this object is subject of the notification. Also possible approach is the usage of global observers not attached to any property nor object. For more details please see the section attachobserver.
Variables and Arrays
Variables and arrays provide a further way to exchange data between objects. By using a variable, you store in a GUI component (or more generally in an object) some value. With an array you can store multiple values and read/modify them individually.
Variables and arrays are thus ideal to store internal states of a component. Another components can thereupon access, evaluate or even modify these values. However, unlike the concepts explained above, accessing or modifying variables or arrays will not cause any operation to be executed in context of the affected object. There is no methods associated to those members. As such you can consider variables and arrays as primitive data members. These concepts are very common to what you surely know from other programming languages.
Another limitation of variables and arrays is, that these are not exposed in the Inspector window as properties are. Instead variables and arrays are more intended to be accessed and modified from the Chora code. For example, the following example creates an instance of an object intended to store some client data and initializes its variables and arrays with the respective information:
// Create a new instance of the DataClass. var Application::DataClass data = new Application::DataClass; // Store some information in the variables and arrays of the // instance. data.Case = 1234; data.Info[0] = "Location"; data.Info[1] = "Munich"; data.BusinessClient = true; // Add the data record to some 'data-base' component DataBase.AddData( data );
Communication between components
Each application consists at the runtime of many different objects. Some of them represent visual components like push buttons or labels. Other objects have the function to store data, implement business logic of the application or mediate between it and the underlying device. From this arises the question, how one object can access another one and read some data stored inside it or trigger the object to perform an operation?
In the preceding sections from this chapter we explain diverse concepts of how to create an interface of a component. You learned there about properties, methods, etc. By using these members it is easy to read a value or to trigger an operation in context of the target object. To achieve this, however, the target object has to be known. In other words, if you intend to access a push button component to change its caption, you have to know this push button instance. You can imagine, a complex application can consist of hundreds of push buttons. The interesting question thus is, how to obtain the right instance?
The following enumeration provides a short overview of the most reasonable approaches how one object can access another one:
1.If the target object is embedded inside another one, the owner object can access the nested one by simply using its name. See also Use the object.
2.In case of visual components, the owner component can also use diverse methods to enumerate and find the right embedded component. Please see also the section Understand the view tree and the Owner relationships.
3.In the opposite direction, the embedded objects can evaluate the variable parentthis to access the superior object they are embedded inside. See the section parentthis.
4.In case of visual components, the component can access the superior owner component by evaluating its own variable Owner. Please see the section Understand the view tree and the Owner relationships.
5.All visual components are stored within so-called view tree starting with the root object (the instance of the application class). Knowing this, the accessing component can access the root object and starting with it traverse the entire tree of views and find the right one.
6.If you are working with Dialogs, you can find the interesting dialog component by using diverse methods. Please see Enumerate and search for existing Dialogs.
7.Two objects can establish a 1:1 connection. For this purpose one object manages a variable or property where the second object (precisely a reference to it) is stored. Through this reference the accessing object can read/modify data members of the target object as well as invoke its methods. When creating the instance of the accessing object ensure that its variable is initialized with the instance of the target object.
8.You can use global autoobjects where common data is stored. All other objects can access this object and the data stored there.
Which of the above described approaches is ideal for your individual application case is difficult to say. Important is: exchanging of data between GUI components or/and other data object is not a problem. As in other programming languages, the developer is free to create the proper interfaces and establish the relations between the objects. This task is usually individual for each project.