Basic concepts
Embedded Wizard is a mature technology that enables you to create modern, state of the art, smartphone-like graphical user interfaces (GUIs) for industrial, consumer electronics, automotive, medical and home appliances. Almost every kind of application that requires the display of graphical contents can be realized with Embedded Wizard.
The following sections list features, requirements and concepts related to this technology. If you are new to Embedded Wizard, we highly recommend you to read this chapter in order to understand the technique as good as possible. If you are done with this step, the chapter Quick Tour - a Tutorial offers a closer, more technical look at Embedded Wizard technology.
Editions and License Models
Embedded Wizard is a bundle of following two parts which can only be used together. To create a GUI application you always need both consequently:
Part |
Description |
|---|---|
Embedded Wizard Studio is the authoring tool to create, edit and test GUI applications directly on your Windows PC. In simplified terms, you use Embedded Wizard Studio to compose the appearance and the functionality of the GUI application. |
|
Platform Package acts as an abstraction layer to the used chip, graphical subsystem and operating system (if any) of your embedded system. In simplified terms, in order to run a GUI application on a particular target system all you need is the corresponding Platform Package. |
Embedded Wizard Studio (the authoring tool) can be used on a desktop PC running Microsoft Windows 8 or higher. If you are working on a Linux or macOS machine, we would recommend you to install Embedded Wizard Studio within a virtual machine (e.g. VMWare or Parallels Desktop). In case of Linux operating system we have adapted Embedded Wizard Studio 11 to be able to run with the WINE environment. Embedded Wizard Studio is available in following two editions:
Edition |
Description |
|---|---|
Free |
Embedded Wizard Studio Free is intended to get familiar with the technology and to evaluate it on real target systems. It can be used for private usage and prototyping if you are creating small GUI projects. All features are available within this edition, only the complexity of your GUI application is limited. In such case the actual complexity level is reported and the tool warns you if the project gets too complicated. |
Pro |
Embedded Wizard Studio Pro is the full-featured license for professional projects without limitations. The usage of the Pro edition is protected by license keys which require an Internet connection to contact our license management servers. |
The Platform Package code to run in your device is provided as source code or as compiled library depending on your license. In particular no source code is contained in the Evaluation edition of the Platform Package. Similar is true if you have licensed the Small Business edition. The library provided for Evaluation edition can additionally be watermarked. This means, a small Embedded Wizard logo (so-called watermark) does appear from time to time on the screen.
TIP
To download Embedded Wizard and for more details concerning the different editions please have a look to Embedded Wizard License Overview - The Editions.
Platform Independence - Platform Package
Embedded Wizard provides an environment to develop platform independent GUI applications. Based on one and the same project you can run the resulting GUI on any target system. Actually we support more than 60 platform configurations. This abstraction is made possible by so-called Platform Packages, which are individually optimized for each target system. A Platform Package is a bundle of at least following four components:
Component |
Description |
|---|---|
Code Generator |
Code Generator takes care of the right translation of the platform independent GUI project in the code valid for the particular target system. Accordingly, the results of the code generation are files you can integrate directly into your target specific development system. For example, you can add the files to the Keil MDK-ARM environment or simply to a GCC makefile. |
Resource Converters |
Resource Converters take care of the conversion of image assets and font files used in the GUI application in a format or code valid for the target system. Depending on the target this may include color reduction, dithering and compression of resource data. Similarly, font glyphs may be pre-rasterized if the target system does not contain a proper TrueType font engine. |
Runtime Environment (RTE) |
Runtime Environment is a library providing common functions necessary to run GUI applications implemented in Embedded Wizard. You can consider the Runtime Environment as an interface between the generated code and the target system. |
Graphics Engine (GFX) |
Graphics Engine is a library implementing functions to perform graphical operations, like drawing lines, filling rectangles, copying or 3D transforming images, printing formatted text or rendering vector graphic. All graphical operations support alpha-blending and can be performed with an additionally specified color or opacity gradient. The library is optimized to use graphics hardware acceleration, if such is available in the target system. Otherwise the drawing operations are performed by optimized software routines. |
For example, in order to create from an Embedded Wizard project a GUI application for the STM32 target system, you use the appropriate STM32 Platform Package. If you later decide to change your development to e.g. i.MX NXP target, it is sufficient to switch the Platform Package. You don't need to modify the project nor redesign the GUI application. The project remains platform independent.
We are continually creating new Platform Packages to support new target systems. The chapter Build Environments provides an overview of the already supported platforms. If your desired target is not yet included, dedicated Platform Package can be developed. Following are the prerequisites to support a new target system:
★32-bit CPU or 64-bit CPU using the I32LP64 data model
★At least 16 kB RAM
★At least 80 kB ROM
★Optional non CPU addressable ROM for images and fonts
★Access to the frame buffer
★Frame buffer formats: 8-, 16-, 32-bit RGBA, RGB, monochrome and CLUT based
★If available, access to the graphics hardware accelerator (2D, 3D GPU)
★If available, access to the graphics API (e.g. OpenGL ES, VGLite)
★Timer with at least 10 ms resolution for animations
★Interface for debugging outputs, e.g. printf()
★C or C++ compiler for the target system
★An operating system is optional. Embedded Wizard can run on bare-metal targets
Supported Operating Systems and Targets
The choice of an operating system is more than flexible: Embedded Wizard created GUI applications can be used on targets without any operating system (so called bare metal) as well as on targets with operating systems like Embedded Linux, FreeRTOS, Nucleus, Win32, WindowsCE, Android, iOS, macOS and other.
For the most common targets (like STM32Fxxx Discovery and Evalboards, NXP dev kits, Microchip, Raspberry PI, ...) we provide so-called Build Environments that contain a ready-to-use display adaptation. Please follow the instructions found in the chapter Build Environments.
With the Embedded Wizard JavaScript/WebGL Platform Package it is also possible to run an embedded GUI entirely within any common web browser as a single page application. You can then use your GUI directly as a remote web UI for your device - without developing an additional web application. For more details please see Getting started with JavaScript/WebGL.
IMPORTANT
The authoring tool Embedded Wizard Studio itself can be used on a desktop PC running Microsoft Windows 8 or higher. If you are working on a Linux or macOS machine, we would recommend you to install Embedded Wizard Studio within a virtual machine (e.g. VMWare or Parallels Desktop). In case of Linux operating system we have adapted Embedded Wizard Studio 11 to be able to run with the WINE environment.
Supported Frame Buffer and Bitmap Formats
The color formats suitable for bitmaps (assets, images) within a GUI application depend on the color format used for the frame buffer. The larger the available color space the higher the quality of the resulting graphical outputs. Each Platform Package is thus optimized for the respective target specific frame buffer color format. It's up to you to select the appropriate Platform Package. Following configurations are supported:
Frame buffer format |
Bitmap formats |
Description |
|---|---|---|
RGBA8888 |
RGBA8888 RGB565 Index8 Alpha8 |
The framebuffer is stored in 32-bit per pixel format RGBA8888. Bitmaps (e.g. assets) support following formats: 32-bit per pixel (RGBA8888), 16-bit per pixel (RGB565), 8-bit per pixel with an associated CLUT (Index8) and 8-bit per pixel opacity only (Alpha8). The order of RGBA and RGB channels can be configured flexibly. In case of the RGBA8888 color format, the RGB (color) channels can optionally be pre-multiplied by the corresponding A (alpha) value. |
RGB888 |
RGBA8888 RGB565 Index8 Alpha8 |
The framebuffer is stored in 24-bit per pixel format RGB888 without any opacity (alpha) information. Bitmaps (e.g. assets) support following formats: 32-bit per pixel (RGBA8888), 16-bit per pixel (RGB565), 8-bit per pixel with an associated CLUT (Index8) and 8-bit per pixel opacity only (Alpha8). The order of RGBA and RGB channels can be configured flexibly. In case of the RGBA8888 color format, the RGB (color) channels can optionally be pre-multiplied by the corresponding A (alpha) value. |
RGBA4444 |
RGBA4444 Index8 Alpha8 |
The framebuffer is stored in 16-bit per pixel format RGBA4444. Bitmaps (e.g. assets) support following formats: 16-bit per pixel (RGBA4444), 8-bit per pixel with an associated CLUT (Index8) and 8-bit per pixel opacity only (Alpha8). The order of RGBA channels can be configured flexibly. The RGB (color) channels can optionally be pre-multiplied by the corresponding A (alpha) value. |
RGB565 |
RGBA8888 RGB565 Index8 Alpha8 |
The framebuffer is stored in 16-bit per pixel format RGB565 without any opacity (alpha) information. Bitmaps (e.g. assets) support following formats: 32-bit per pixel (RGBA8888), 16-bit per pixel (RGB565), 8-bit per pixel with an associated CLUT (Index8) and 8-bit per pixel opacity only (Alpha8). The order of RGBA and RGB channels can be configured flexibly. In case of the RGBA8888 color format, the RGB (color) channels can optionally be pre-multiplied by the corresponding A (alpha) value. |
LumA44 |
LumA44 Index8 Alpha8 |
The framebuffer is stored in 8-bit per pixel format LumA44. This format is intended for monochrome displays. Bitmaps (e.g. assets) support following formats: 8-bit per pixel (LumA44), 8-bit per pixel with an associated CLUT (Index8) and 8-bit per pixel opacity only (Alpha8). The order of LumA channels can be configured flexibly. The Lum (luminance) channel can optionally be pre-multiplied by the corresponding A (alpha) value. Please note: the format Index8 is not available for bitmap resources (image assets). It can be used only for bitmaps created dynamically at the runtime of the application. |
Index8 |
Index8 Alpha8 |
The framebuffer is stored with 8-bit per pixel using additional global color look-up table (CLUT) to translate the 8-bit value in real RGBA color. The global CLUT is optimized individually for every application. When performing alpha-blending operations Embedded Wizard ensures to map quickly the resulting RGBA color value to the corresponding CLUT index. Thus you don't need to worry about the CLUT. Bitmaps (e.g. assets) support following formats: 8-bit per pixel with an associated CLUT (Index8) and 8-bit per pixel opacity only (Alpha8). |
Memory Requirements
Embedded Wizard is designed to address low-end target systems. A simple Hello World GUI application requires only 80 kB ROM. In practice, real applications will occupy more ROM depending on the number and size of used image assets, fonts, multi-lingual strings, GUI components, etc. How much ROM is required, will in fact depend on your concrete application case.
When generating code for a particular target system, Embedded Wizard evaluates the project information and optimizes it as well as possible presenting finally a Code Generation Report with the corresponding ROM usage estimation. With this feature you always keep an eye on the ROM usage at any point during the development of your application and avoid nasty surprises.
The ROM intended to store the program code, application logic and GUI components has to be addressable by the CPU. In turn, bitmaps (image assets), fonts and multi-lingual strings can be located within a non directly addressable ROM area. Embedded Wizard provides in such case a flash area reader interface permitting chunks of non directly addressable ROM data to be loaded temporarily into RAM.
Embedded Wizard is also well optimized concerning the RAM usage. A simple Hello World GUI application requires only 16 kB RAM. In practice, real applications will occupy more RAM depending on the complexity of the GUI components. With the Memory (RAM) usage window you can evaluate your application already at the design time and track its RAM usage. Additionally, you can track the RAM usage directly in the target system by using the EwPrintProfilerStatistic() function.

Tracking RAM usage at the runtime of the application
When looking at RAM usage you should also consider the amount of memory required for the frame buffer. Depending on the target system, it may be necessary to reserve memory sufficient for the entire frame buffer. Other targets, in turn, work with small so-called scratch-pad buffers to render the screen contents strip by strip. The entire RAM usage depends thus also on the mode how frame buffer is used in the concrete target system.
Please note, the memory requirements depend also on the used C/C++ compiler, its optimization settings, standard libraries and the CPU architecture. For more details concerning the memory usage please see the chapter Memory Footprint.
Performance Expectations
As we started the development of Embedded Wizard (more than 20 years ago) the then common target systems weren't really powerful. In order to offer performant screen updates, we optimized all drawing routines and implemented efficient algorithms to detect, reduce or even eliminate unnecessary drawing operations. Additional caches and other sophisticated tricks help to get the best performance out of the target system. Also, the code (the functionality) of the GUI application is executed natively in the target system. No interpreters nor just-in-time compilers are used. Embedded Wizard generates code optimized for the concrete target system, this is for example C code.
Nevertheless, the performance depends very much on your concrete GUI design. The more complex the design and more semi-transparent contents shown simultaneously, the more time-consuming the screen update. In most cases, the resulting performance is simply limited by the available band width of the used RAM and ROM chips as well as by the CPU clock. It's thus up to you to find a balance between the expected performance, the GUI design and the capabilities of your target system.
Embedded Wizard can very well take advantage of dedicated graphics acceleration hardware. If such 2D or 3D GPU is available in the target system, all affected drawing operations are redirected to use the GPU. With modern 3D GPUs even all drawing operations can be accelerated. Our Platform Packages support:
★Proprietary 2D graphic cores like STM DMA2D, NXP PXP, etc.
★Standardized graphics APIs like OpenGL, OpenGL ES 2.0, VGLite, JavaScript WebGL, etc.
★In case of a drawing operation not supported natively by a GPU, Embedded Wizard falls back to use its own optimized drawing routines
★A version of drawing routines optimized to use the ARM NEON instruction set is available
Safety
Embedded Wizard implements diverse features to detect and prevent possible error sources. GUI Applications created with Embedded Wizard run stable on the target system. The safety concepts include:
★Automatic code generation improves the code quality
★Unsafe programming concepts like pointers, open arrays, etc. are avoided
★Automatic garbage collection to reclaim unused memory
★Caching and reloading bitmaps and font glyphs to reuse memory
★Optimized memory manager to reduce heap fragmentation
★Runtime checks
Component Based, Object-Oriented Development
The workflow principle of Embedded Wizard Studio is component based. As developer you create components and then you use them to assemble more complex components. For example, you create first some push button component. This push button can then be used within an alert screen component. Once developed components can be used wherever needed within your project, even simultaneously. The push button, for example, can be used within two different alerts and within a settings screen. If you edit later the appearance or the functionality of the push button, all superior components using it are automatically updated. Adapting the screens manually is not necessary.
We distinguish generally between visual and non visual components. The visual component (e.g. a push button) has its own appearance to display on the screen and it can react to user interactions. The non visual component, in turn, implements pure functionality, e.g. it serves as the interface to exchange information between the GUI application and the device or it contains some business logic important for the application.
Technically seen components are classes implemented in the Embedded Wizard own object-oriented programming language Chora. Similarly to other object-oriented development systems, Embedded Wizard supports single inheritance and polymorphism. Within a class you can define data members (e.g. variables) and implement functionality (e.g. methods). At the runtime you can create objects (instances) of a class, access its data members and invoke its methods. If necessary, you can create multiple instances of one and the same class.
The object-oriented approach permits large and complex GUI applications to be well structured. For example, if you plan to develop a menu system, you create first a GUI component for a generic menu. From this component (technically seen, from its class) you derive new components (one for each concrete menu) and fill them with the corresponding menu items. Since the derived menus inherit the functionality found in the generic, base menu component, this code is well reused reducing the entire code size of the application and making its maintaining easier.
Low Code
Embedded Wizard follows the approach of a low code tool where many operations require less code to be implemented. In many cases it is even sufficient to arrange and configure the desired components without writing a single line of code. For example, if your GUI application requires some scrollable list, you arrange a List view and a Slide Touch Handler and then connect them together.
Supported Graphics Features
Embedded Wizard provides an environment to create modern, state of the art, smartphone-like graphical user interfaces. The Graphics Engine supports following graphics features:
Supported Views and Widgets
In order to speed-up the development process, Embedded Wizard provides an extensive set of ready to use visual and non-visual components. In practice, when developing your own GUI application you assemble it from the available components similarly to how you put Lego building blocks together:
★Views are simple, general purpose visual components
★Lists are simple components for scrollable contents
★Widgets are more complex visual components
★Timers and animation effects are non-visual components to drive animations
★Keyboard handlers are non-visual components to handle user keyboard inputs
★Touch gesture handlers are non-visual components to handle user touch screen inputs
If the available set of components is not sufficient (for example, you need a special kind of a gauge widget), you create your own components based on the best suitable GUI component template.
Multiple Screens and Screen Transitions (Dialogs)
Except very primitive cases, most GUI applications consist of more than one screen. During the runtime, the user interacts with the application and switches between the diverse screens forth and back. At any time this dialog may be interrupted by new screens the application presents in order to inform the user about important events or to ask the user how to proceed with the actually performed action. Such alerts may be modal, so that in order to continue with the main dialog the user has obligatory to confirm or decline the alert notification.
In order to avoid confusion with the term screen representing the display hardware itself we prefer the denomination Dialogs. Following list provides an overview of the corresponding dialog functionality. For more details please see Managing dialogs (multiple screens):
★In Embedded Wizard the dialogs are ordinary GUI components similar to push buttons or sliders.
★The dialogs don't necessarily fill the entire screen. The dialog may occupy a part of the screen.
★Multiple dialogs can be presented simultaneously.
★Top-level dialogs automatically prevents the dialogs in the background from being able to handle user inputs.
★When presenting, dismissing or switching dialogs, dedicated animations (dialog transitions) can be specified.
★The per default provided animations include opacity fading, sliding and scaling.
★If the provided set of animations is not sufficient, you can configure your own animations.
Model View Controller (MVC) Design Pattern
Embedded Wizard follows the Model View Controller (MVC) software design pattern, however, it does not enforce it. The selection of the appropriate application architecture is finally up to you. Generally, the MVC design pattern divides the application in following three parts:
★Model manages the data and eventually logic of the application.
★Views take care of the presentation of the data found in Model.
★Controllers react to user inputs and update the data within the Model.
All widgets provided per default in Embedded Wizard support the MVC design paradigm. In practice you manage in your application a global object where all application relevant data is stored. This object serves as Model. The widget can then be connected to a value existing within the object and display the related information. The widget acts as View. When the user interacts with a widget (e.g. drags on a slider) the corresponding value in the associated object is updated. The widget acts in this case as Controller:
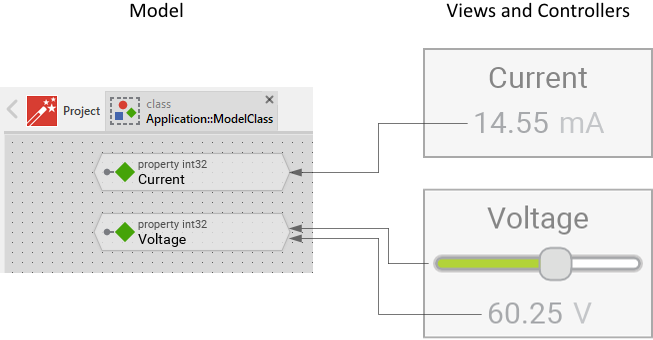
Mode View Controller in Embedded Wizard
If there are several widgets associated to the same value, all affected widgets are automatically triggered to refresh their appearance just in the moment when the value changes. You don't need to take care of this mechanisms. The MVC approach is used often when implementing a Device Interface (interface between the GUI application and the underlying device, the middleware, databases, etc.). The Device Interface in this case acts as the Model. The GUI components with their widgets, in turn, have the function of Views and Controllers.
WYSIWYG Authoring Tool
Embedded Wizard Studio is an authoring tool with it you compose the appearance of the GUI application from available views by simple Drag & Drop them. The resulting composition is what you finally will get at the runtime of the application: What You See Is What You Get (WYSIWYG). For more details see Embedded Wizard Studio.
The typical workflow with Embedded Wizard starts in the Gallery Templates window where you select the desired view or any other suitable software entity. Then you Drag & Drop it into the Composer window. By using the mouse you can thereupon move and resize the just added member. In the Inspector window you can finally verify and modify its attributes (properties). For example, you can add a Filled Rectangle view and configure its color to semi-transparent yellow:
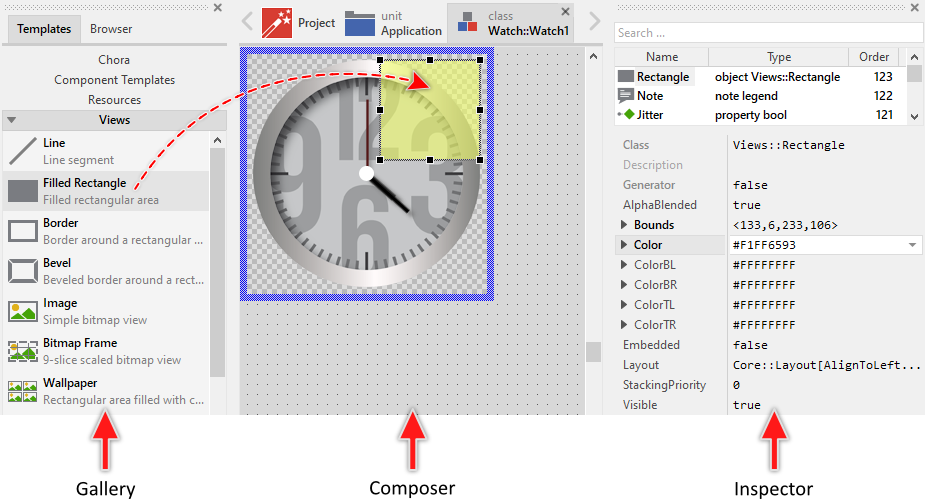
Typical workflow to compose the appearance of the GUI application
Visual Programming Approach
Embedded Wizard Studio follows the idea of visually aided programming, where software entities are arranged and connected with the mouse by simple Drag & Drop them. From our point of view it was self-evident to combine the visual programming and the GUI application development – the both concepts complement each other. In this manner, you compose the appearance of an application as well as implement its functionality. Further development tools (e.g. external code editors) are not needed.
For this purpose, all non graphical members are represented by so-called bricks. The shape, the icon and the text color of the brick do reflect its particular function within the application. For example, bricks with pointed sides represent entities of data (e.g. variables) and bricks with beveled sides represent entities of logic (e.g. methods):

Non-graphical, functional members are represented by small 'bricks'
The typical workflow to add non-graphical members starts in the Gallery Templates window where you select the desired software entity. Then you Drag & Drop it into the Composer window. By using the mouse you can thereupon arrange the just added member. In the Inspector window you can finally verify and modify its attributes. For example, you can add a new Variable and configure its data type to store 32-bit integer numbers:
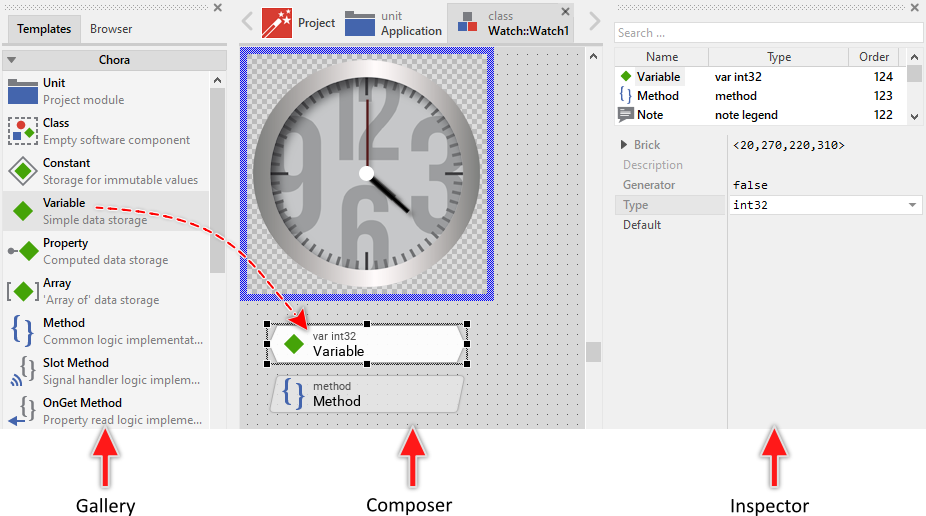
Typical workflow to compose the functionality of the GUI application
Programming Language Chora
In its core Embedded Wizard Studio is based on a specially for this purpose developed programming language called Chora. Chora is a universal, target system independent programming language permitting you to implement the complete functionality of a GUI application without being reliant on any further development tools (e.g. external code editors and compilers).
When designing the Chora we were geared to the very popular programming languages C, C++, Java and JavaScript making the syntax of Chora similar to its great role models. With it we kept the entry threshold and the training effort for all new users as low as possible. If you are familiar with the above mentioned programming languages, using Chora will not be a problem for you.
Although not directly apparent, Chora is omnipresent in Embedded Wizard Studio. Every software entity that you can arrange in a visual manner, conceals a piece of real Chora source code. The Chora syntax serves also as the medium format in which all Embedded Wizard projects are saved. Despite its importance, the direct contact with Chora syntax is limited to the code you implement in the Code Editor window and to expressions you enter in the Inspector window:
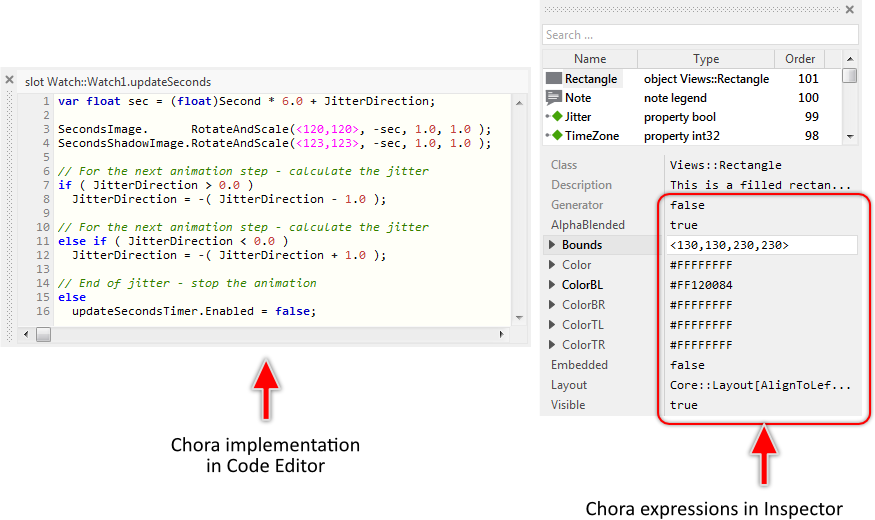
Chora code in the Code Editor and Inspector windows
Chora gives you the ultimate flexibility to implement in your GUI application whatever you expect it should do. The list below describes the most important characteristics of this programming language. For more details see Programming language Chora reference chapter.
★Chora was designed with the focus on being optimized for a visual aided programing environment. Consequently, many language constructs are concealed by so-called bricks you can visually select and interact with. The shape, the icon and the text color of the brick do reflect its particular function within the application. For example, bricks with pointed sides represent entities of data (e.g. variables) and bricks with beveled sides represent entities of logic (e.g. methods):

Many Chora language constructs are represented visually by bricks
★The syntax of Chora is largely based on the programming languages C, C++, Java and JavaScript. It is easy to use whenever you need to edit the Chora code directly.
★Chora is a compiled language. All statements and expressions implemented in Chora are compiled and converted in native code of the particular target system. At the runtime no interpreters are needed. This results in the maximum possible performance.
★Chora ensures high safety. The support of potentially ambiguous or even dangerous language elements is limited. Open arrays and pointer arithmetic popular in e.g. C++ are completely absent in Chora.
★Chora implements a strict type system. The data type of an expression is predetermined and verified at the compilation time. The type system includes most common data types like integers, floating-point values, boolean, characters, strings, enumerations, sets. The types are used mainly when declaring data members like local variables or local arrays:
var int32 number; var string text; array bool flags[16];
★Besides the common data types, Chora also introduces few new types useful and needed in the GUI development to e.g. represent colors, positions, rectangular areas, bitmap and font resources, etc.. To simply create corresponding operands, dedicated literal syntax and so-called instant constructors are available:
var int32 x = 12; var int32 y = 51; // Literal <x1,y1,x2,y2> results in a 'rect' operand. var rect area = <0,0,100,200>; // 100x200 pixel large area // Literal #RRGGBBAA results in an operand of 'color' type. var color clr = #FF000080; // 50 % semi-transparent red color // Instant constructor 'point()' results in a 'point' operand. var point pos = point( x, y ); // pos = <12,51>
★Chora provides a rich set of build-in operators, you use to form arithmetic-logical expressions. The exact function of an operator depends on the data types of the operands involved in the operation. For example, the + (plus) operator will compute an arithmetic addition when used with two int32 operands, and a string concatenation when used with two string operands:
var int32 a = 12; var int32 b = 51; var int32 sum = a + b; // sum = 63 var string text = "The sum is " + string( sum ); // text = "The sum is 63"
★The available data types provide diverse convenience instant properties and instant methods. By using them the corresponding value can be evaluated or modified easily:
var rect bounds = <10,20,110,220>; var string text = "Hello world!"; // Use the instant properties 'w' and 'h' to calculate the area // occupied by a rectangle. var int32 area = bounds.w * bounds.h; // Use the instant property 'origin' to change the position // of a rectangle stored in the local variable 'bounds'. bounds.origin = <50,70>; // bounds = <50,70,150,270> // Use the instant method 'middle()' to get a sub-string from // the 'text' variable. text = text.middle( 4, 3 ); // text = "o w";
★Like its counterparts C++ and Java, Chora is an object-oriented language. It supports classes with single inheritance and polymorphism. Within a class you can define data members and implement methods. At the runtime you can create objects (instances) of the class. The object-oriented approach permits large and complex GUI applications to be well structured. Please note, as global entities classes are identified by their complete name including the unit the class is defined inside (e.g. Views::Text):
// The variable 'textView' is intended to store a reference to // an object of the Views::Text class. var Views::Text textView = GetSomeTextView(); // Invoke a method provided by a text view to query how many text // rows does it display. var int32 noOfRows = textView.GetNoOfRows(); // Based on the number of rows adjust the position for the text // view: textView.Bounds.origin.y = 240 - ( noOfRows * 32 );
★Whenever the data type of the operand can’t be used directly in the expression, or when ambiguities exist in the possible evaluation of the expression, dedicated type conversion operators can be used. For example, an addition of an int32 and float operand results in floating point value. By using the floating-point and integer conversion the result can be converted in an integer value. Similarly, the object runtime cast operator is used to check at the runtime of the application whether an object does descend from a particular class. Once the ancestry of the object is verified, the object can be accessed safely:
var int32 a = 78; var float b = 12.33; // The addition 'a + b' results in a floating-point value. // By using type cast operator (int32) the result is converted // in the integer: trace a + b; // trace: 90.33000183 trace (int32)( a + b ); // trace: 90 var object someObject1 = GetSomeTextViewObject(); var object someObject2 = GetSomeNonTextViewObject(); // Using the type-cast operator to test the ancestry of an object. var Views::Text textView1 = (Views::Text)someObject1; var Views::Text textView2 = (Views::Text)someObject2; trace textView1; // trace: @12345678 (some valid object) trace textView2; // trace: null
★Chora supports all typical control flow statements known from other programming languages. These are if..else conditions, switch..case..default selections, for, while, do..while loops. Thus the complete behavior of the GUI application can be formulated directly in Chora. For example, you can iterate over all text views existing within a GUI component and change their color to red:
var Core::View view; // Iterate over all views existing within the GUI component while (( view = FindNextView( view, Core::ViewState[])) != null ) { // Try to type-cast the view to a text view. var Views::Text textView = (Views::Text)view; // Was the type-cast successful? Then it is a text view. // Change its color in such case. if ( textView ) textView.Color = #FF0000FF; }
★The memory management of Chora is based on a garbage collection. It detects unused memory and releases it automatically. The classic errors such as the access to already released memory or memory leaks are excluded. Chora objects can be created dynamically at the runtime of the application by using the new operator:
// Create anew object of the 'Views::Text' class. var Views::Text textView = new Views::Text; // ... initialize the object to use a large font and green // color. Also the position and the string to display is // specified here: textView.Bounds = <0,0,320,240>; textView.Font = Resources::FontExtraLarge; textView.Color = #00FF00FF; textView.String = "Hello World!"; // Add the just created view to the GUI component making // it visible in this manner. Add( textView, 0 );
★Chora is a highly platform independent programming language. Applications developed with Embedded Wizard have per default no access to the underlying device, be it the hardware, middleware software or the operating system. You can consider the application as running enclosed in a box. To integrate the GUI application with functions available in the particular target system, it is necessary to enclose the respective code sections in a native statement. For example, you can add an invocation of a C function. This code section is then taken as it is during the code generation:
var int32 batteryStatus; // Following code section is target specific. It takes care // of the initialization of the local variable 'batteryStatus' // with a value obtained from the device. native ( batteryStatus ) { /* Some C extern function declaration */ extern int GetBatteryStatus( void ); /* Call the C function */ batteryStatus = GetBatteryStatus(); } // Again in Chora evaluate the obtained value ... if ( batteryStatus < 10 ) ...
★Chora integrated preprocessor permits you to control which code sections should be evaluated. For example with $if .. $endif directives you include or exclude code depending on the actually selected Platform Package, similarly as you do in a C code with the #if .. #endif directives:
$if $platform == Tara.Win32.* trace "Compiling for Microsoft Windows target."; trace "No matter what color format."; $endif $if $platform == *.RGB*888* trace "Compiling for a target with color format RGBA8888 or RGB888."; trace "No matter what target system."; $endif $if $platform != Tara.Win32.* trace "Compiling for any target system except Windows."; $endif
Framework Mosaic
Besides the programming language Chora a further level of abstraction is represented by the Mosaic framework – a library of ready for use components for the typical, in every GUI application emerging tasks. These components encapsulate all graphical operations, coordinate the screen update, perform animations or dispatch and process the user inputs. In short, they provide the infrastructure of a GUI application. In practice, when developing your own GUI application you assemble it from the available Mosaic components.
From technical point of view, Mosaic is a class library, completely object-oriented designed and implemented in the platform independent programming language Chora. A GUI application inherits this functionality and if necessary extends or overrides it. Consequently the Mosaic and the application conflate together. For example, all GUI components used within the application are direct or indirect descendants of the Mosaic class Core::View. This base class implements an infrastructure for the derived components, capacitating them to perform screen updates and to process user inputs.
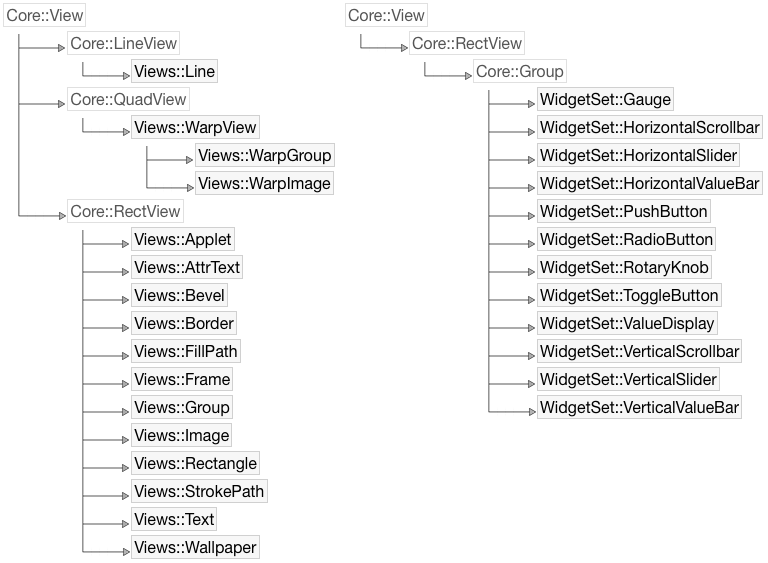
Excerpt from the Mosaic framework with diverse ready to use views and widgets
When designing the Mosaic we were geared to various existing and modern GUI frameworks. Users who are already familiar with other GUI frameworks should recognize the established concepts in Mosaic easily. For more details see Framework Mosaic reference chapter.
Component Templates
In order to simplify the development of your own GUI components, Embedded Wizard Studio provides an extensive set of pre-implemented component templates. Thus instead of creating every new component from scratch you can create it from the appropriate template. For example, if you want to create a new slider component you use the slider template for this purpose. Once created, you can edit and adapt the component according to your particular design and function expectations. Moreover you can create your own templates and reuse them later.
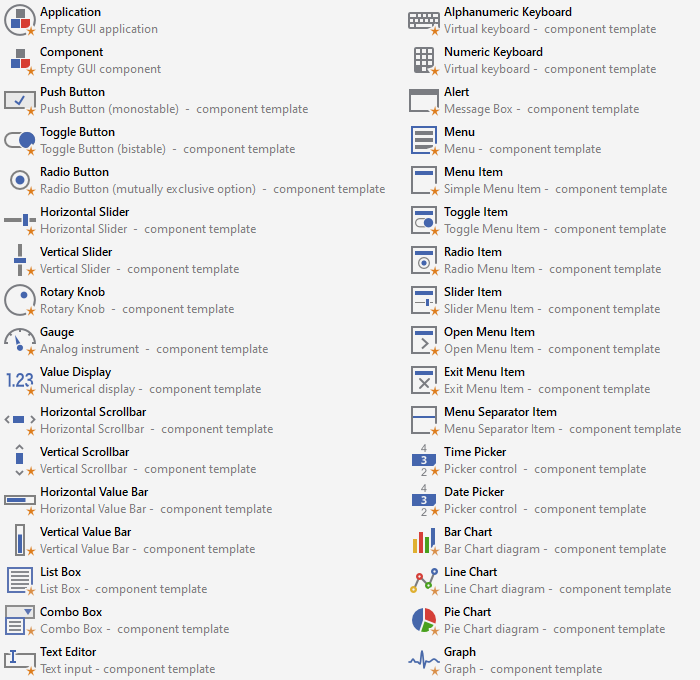
Excerpt from the available component templates
Instant Prototyping
Embedded Wizard Studio contains an integrated prototyping environment that makes it simply to test the function of your implemented application instantly while you work on your project and without needing to upload the application into the target device. In the case, the implementation doesn't behave as expected the prototyping environment helps you also to debug and analyze the reasons for the incorrect functionality.
When you start the prototyping, Embedded Wizard opens the Prototyper window. You can imagine, this window represents the display in your final product. Now you can interact with the Prototyper by using the keyboard and mouse device similarly as you will do with hardware buttons or touchscreen available in your product. If the application implements animations, the animations are executed accordingly:
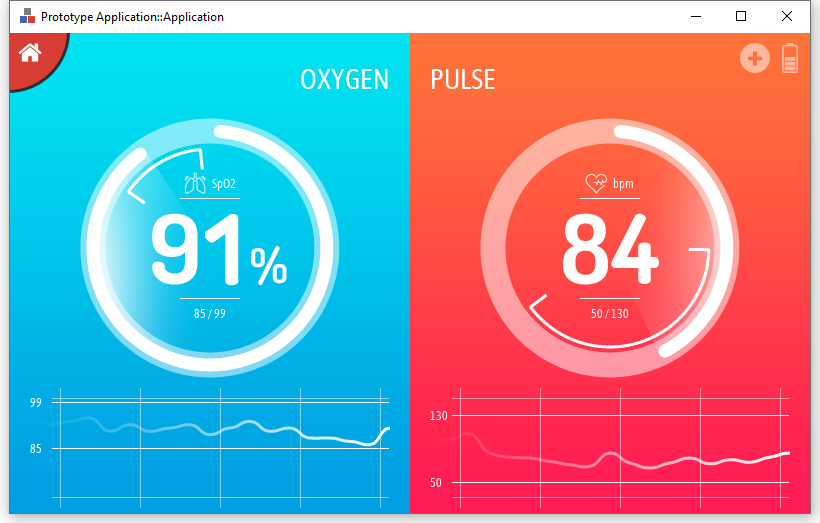
GUI components or the entire application can be tested within the integrated Prototyper
Chora is a highly platform independent programming language. Applications developed with Embedded Wizard have per default no access to the underlying device, be it the hardware, middleware software or the operating system. You can consider the application as running enclosed in a box. This is also true when you test the application within the Prototyper. As consequence, the tested application can neither access files on your desktop PC nor exchange data via network.
Thus to perfect the Prototyping experience you can implement so called Intrinsic Modules where you put all the platform specific code (e.g. C). During Prototyping your GUI application can access this code similarly to how it does in the real device. For example, you can create an Intrinsic Module able to access an external data base. The GUI application can thereupon display the data even during the Prototyping session. For more details see the chapter Implementing Prototyper intrinsics.
Integrated Debugger
With Embedded Wizard Studio you can implement complete functionality of the GUI application without depending on any other external development tools. If your implementation does not work as expected you can set breakpoints within Chora code, execute the code step by step, inspect variables, objects and the call stack. Embedded Wizard integrates all tools needed to debug your application already at the design time.
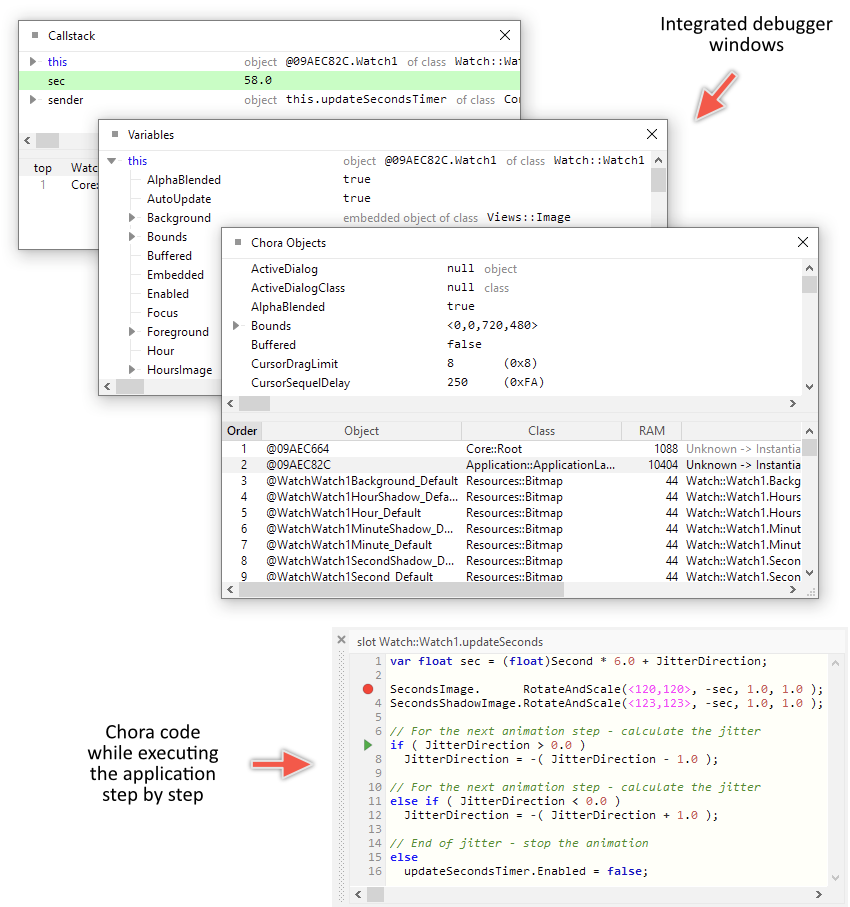
With the integrated Debugger the application can be tested step by step
Assets Management (Bitmaps, Fonts, Strings)
Modern GUI applications require images, fonts and constant strings to be displayed at the runtime on the screen. These assets are represented in Embedded Wizard by so-called resource and constant members. In practice, for each individual image, font or string you add to the project one of the corresponding members:
With a Bitmap resource member you refer to original PNG, JPG, GIF, BMP, ... file. At the code generation time, the affected file is evaluated and converted for your particular target system in the best possible manner. This includes color reduction, dithering and compression. Embedded Wizard also supports motion JPEG (MJPEG) files as source format what is ideal to add small animations or short instruction videos to your application. |
|
With a Font resource member you refer to a TrueType font installed on your desktop PC. At the code generation time, the affected TrueType font is evaluated and all glyphs specified in the font resource member are rasterized as small bitmaps ready to use in your target system. In this case no TrueType font engine is required in the target device. However, if your target device contains already a TrueType font engine, we can provide a Platform Package optimized to rasterize the glyphs directly at the runtime by using the available font engine. |
|
With a Constant member you add strings, predefined color values, constant position/size information and other immutable data relevant for the function of your application. |
Each resource and each constant member can optionally be localized for multiple language and each member can be adapted for different product/device variants. The selection of the right language or variant can be controlled at the runtime of the application.
Language Management and Localization
Embedded Wizard supports intrinsically the development of localized, multilingual GUI applications. In practice, you can manage in every constant or bitmap resource several, language specific contents. For example, a constant can contain English, Spanish, German and French strings. Similarly, a bitmap resource can contain different, language specific images. The selection of the right content occurs automatically.
Furthermore, you can configure your GUI components to automatically update their appearance every time the user changes the currently selected language. Thus implementing a localized GUI applications able to switch the language dynamically at the runtime doesn't require a single line of code.
From technical point of view Embedded Wizard supports following language and script specific features:
★Text with code points from UNICODE plane 0 (0x0000..0xFFFF).
★Support of Left-To-Right languages, for example Chinese, English, French, German, Greek, Italian, Portuguese, Russian, Spanish, Turkish and others.
★Support of Right-To-Left languages, for example Arabic, Hebrew. For printing Arabic strings, contextual shaping and mandatory ligatures are supported.
★Bi-directional text (BIDI) output with text mixing left-to-right (LTR) and right-to-left (RTL) text writing direction according to the Unicode Standard Annex #9 Unicode version 10.0.0.
Variant Management
Variants provide a unique and powerful feature permitting a simple customization of the GUI application. By using variants you can adapt and extend the functionality of existing GUI components without the need to modify their original implementation. Similarly, constants, bitmap and font resources found already in your project can be adapted retrospectively and exist simultaneously in multiple versions.
Technically seen, the feature variants is based on the object-oriented concepts to derive and override project members. With this concept you create a new variant by simply deriving it from an existing project member. The variant inherits thus implicitly the entire functionality of its original member. Now you can edit the variant and adapt (override) the inherited functionality. The particular thing about this feature is that unlike the classical one-way inheritance, the modifications in the derived variant do affect the original member.
At the code generation time or during the runtime of the application you activate or deactivate the variants individually. In this manner, you switch the look and change the functionality of the GUI application. As example, with variants you can adapt the GUI application to use different themes (e.g. day and night). Also, variants make possible to manage multiple product/device versions within one and the same project.
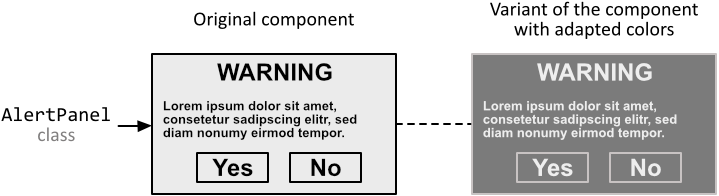
Usage of variants to adapt the appearance of a GUI component
Alpha Blending
Per default all Embedded Wizard drawing operations are performed with alpha blending. In such case new semitransparent contents are mixed with the contents existing already in the background. If an operation is performed without alpha blending, the existing contents in the background are simply overwritten:

A drawing operation with and without alpha blending
Vector Graphics
Embedded Wizard supports vector graphic views to fill and stroke paths, Bézier curves, arcs, etc.. To conveniently compose and store the path information at the runtime dedicated Path Data and Arc Path Data objects are available. The path information can also be provided as SVG string. The vector graphic rasterization routines of Embedded Wizard are performed with or without anti-aliasing:

Vector graphic outputs
Texture Mapping - Scaling, Rotating, Mirroring Images
With texture mapping, the content of an image can be scaled, stretched, rotated, mirrored and perspective correctly distorted. This allows diverse 2D and 3D visual effects. The corresponding functionality is exposed by the both views Warp Image and Warp Group. The shape of the view can be freely adjusted or you let the view calculate the desired transformation. The texture mapping is performed with or without bi-linear filter:
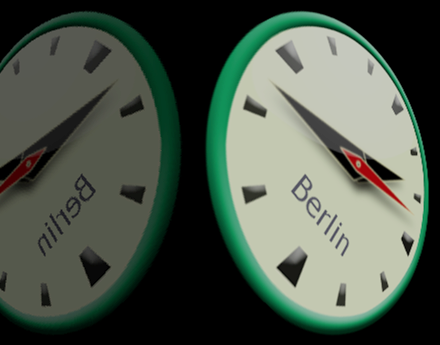
Rotating, mirroring and perspective correct image transformation
You can perform the texture mapping operations also on GUI components. For this purpose you use the Warp Group view. In this manner multiple images of the original component can appear simultaneously at various screen locations, every with a different 2D or 3D transformation. The copies can also react to user touch or mouse inputs similar to how the original component does.
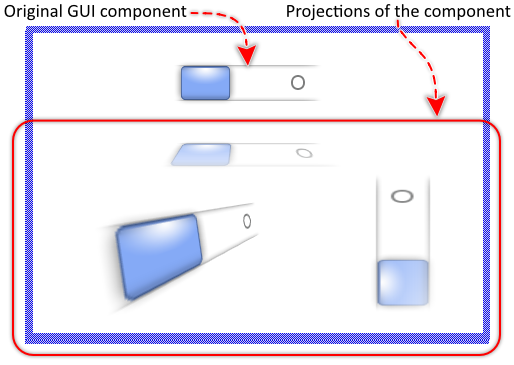
Transformations can also be applied on the image of a GUI component
Support of Attributed Text
Besides the regular text rendering Embedded Wizard also provides an Attributed Text view specialized to display text enriched by attributes to control the text output. Similarly to HTML these attributes determine the alignment, the colors and fonts to print the text. The text can be arranged in paragraphs and columns. Also, it can be combined with images and hyperlinks can be defined. This feature is suitable to display user manuals and help pages within your application:
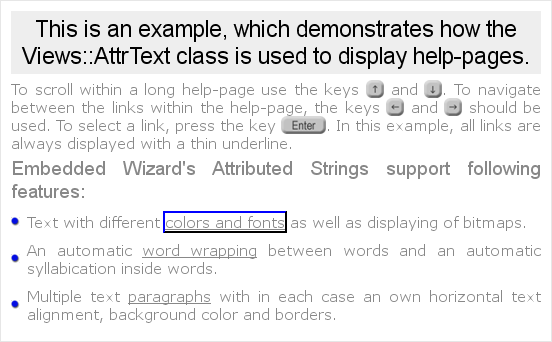
Text layout with attributes and images
Layout Constraints
GUI components are composed of views. If the size of the GUI component changes at the runtime of the application, the views existing inside it need to be rearranged accordingly. In one case the views have to be moved. In other case the views have to be resized. You can configure for each view individual Layout Constraints:
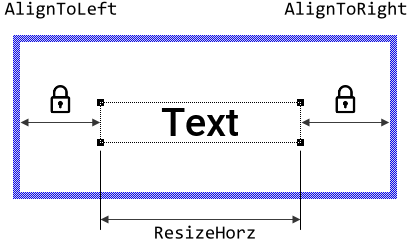
Usage of layout constraints to center and resize a view
Handling Keyboard Inputs, Virtual Keyboards
GUI applications created with Embedded Wizard can be controlled by keyboard events, hardware buttons or an IR (infrared) remote control very well. The user can thus interact with the device even if there is no touch screen nor mouse device available. For your convenience a dedicated Key Handler is available. Similarly to desktop or web applications, Embedded Wizard implements the concept of a focus path to determine which GUI components are actually able to receive the keyboard events.
If your device does not provide a dedicated keyboard hardware and you need to support text input in your application, you can add a virtual keyboard. Embedded Wizard provides for this purpose component templates you can use as starting point for your own virtual keyboard development.
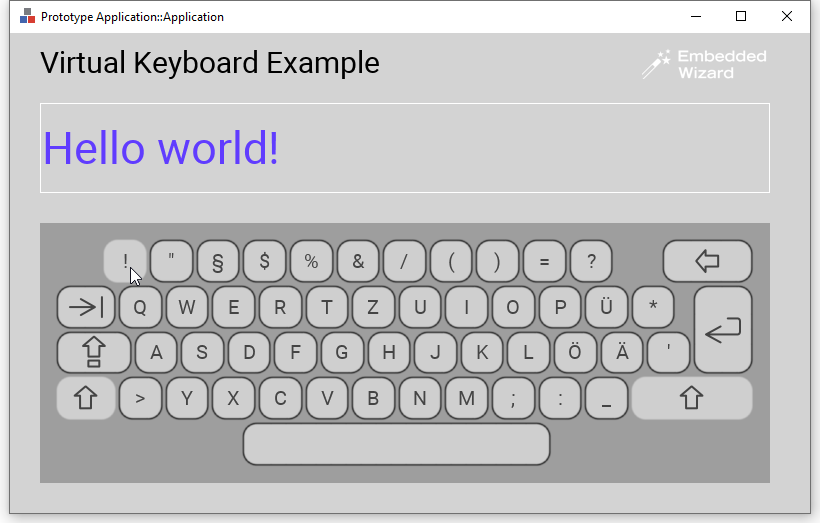
Keyboard input in Embedded Wizard by using a virtual keyboard
Handling Touch Screen Inputs, Multi-Touch and Gestures
GUI applications created with Embedded Wizard can be controlled by a touch screen or a mouse device. Embedded Wizard supports multi-touch interactions involving up to 10 fingers. In this manner the user can simultaneously control separate widgets within the application (e.g. move two sliders at the same time) or perform multi-touch gestures like pinch, zoom, etc.. Following ready to use Touch Handlers are available::
★Simple Touch Handler to process touch or mouse events at low-level
★Wipe Touch Handler to process swipe gestures
★Rotate Touch Handler to process rotation gestures
★Slide Touch Handler to support scrolling
The multi-touch interactions and gestures can be tested already at the design time of your application directly in Embedded Wizard. If your desktop computer does not include any appropriate touch screen, the interactions can be simulated by the mouse device. In this case you can arrange, move, rotate or pinch simultaneously up to 5 simulated fingers. You can, for example, test what happens when at the same time the user scrolls several lists in your application:
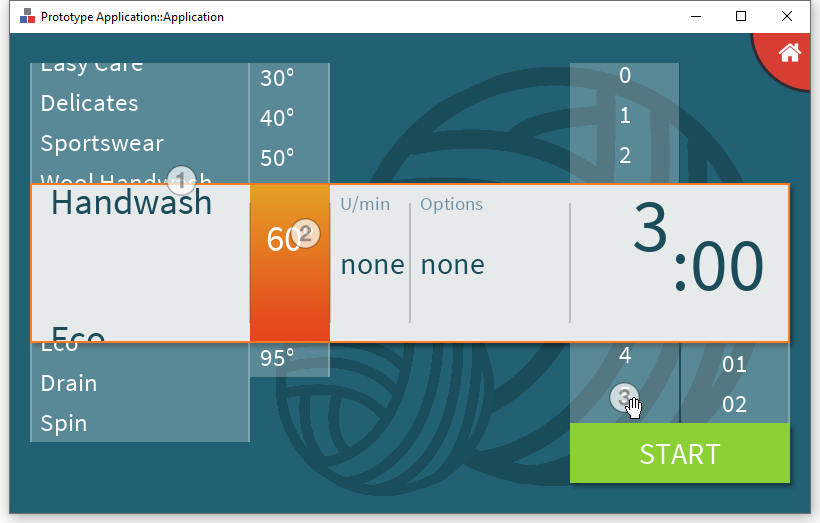
Simulating a multi-touch interaction with 3 fingers
Timers and Animation Effects
Embedded Wizard implements an extensive set of timer and effect objects to enrich the GUI application with animations. In practice, you connect an effect object with a property of the affected view you intend to animate. The object thereupon adapts the value of the property autonomously. The duration and diverse timing parameters can be configured. Furthermore, to create more sophisticated animations multiple effect objects can be connected in chains. The effect objects support many different timing functions (so-called easings).
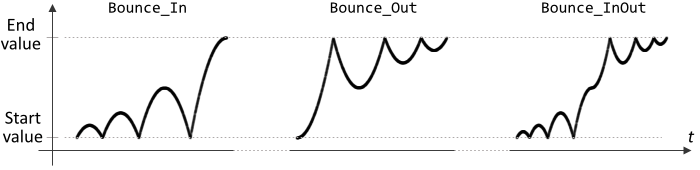
Time course of e.g. bounce animation
Interfaces to Communicate with the Device
Embedded Wizard is a platform independent technology. Applications developed with Embedded Wizard have per default no access to the underlying device, be it the hardware, middleware software or the operating system. You can consider the application as running enclosed in a box. To integrate the GUI application with functions available in the particular target system, it is necessary to handle the respective operations individually. Following chapters help you to understand these tasks:
Support of Runtime Loaded Images and TrueType Fonts
Images (assets) and TrueType fonts needed for the function of the application are usually determined and processed at the design time. They are represented by concrete bitmap and font resource members. To use images or fonts obtained dynamically at the runtime of the application (e.g. loaded from an SD card or received from a network adapter) Embedded Wizard provides dedicated Extern Bitmap and Extern Font components.
Integration of External Applications
In special cases you want the Embedded Wizard created GUI to be combined with another, already existing application. This can be, for example, a 3D viewer, video player, web browser or even some computer game you want to integrate within the GUI application. For such purpose Embedded Wizard supports the Applet interface.
Support for JavaScript WebGL as Target System
Thanks to the high platform independence of Embedded Wizard, you can generate from one and the same project the code for very different target and operating systems. This includes the support of WebGL capable web browsers. The resulting application code can then be executed natively within a web browser similarly to how you load an HTML page.
This feature is very convenient for presentation purpose or to simply allow your device to be remote controlled via web browser. On our Demos web page you can find many of the per default provided Embedded Wizard examples running there as real WebGL GUI applications.
Intrinsic Modules
Applications developed with Embedded Wizard have per default no access to the underlying device, be it the hardware, middleware software or the operating system. You can consider the application as running enclosed in a box. This is also true when you test the application within the Prototyper. As consequence, the tested application can neither access files on your desktop PC nor exchange data via network.
Thus to perfect the Prototyping experience you can implement so called Intrinsic Modules where you put all the platform specific code (e.g. C). During Prototyping your GUI application can access this code similarly to how it does in the real device. For example, you can create an Intrinsic Module able to access an external data base. The GUI application can thereupon display the data even while you are testing the application directly in the Embedded Wizard Studio. For more details see the chapter Implementing Prototyper intrinsics.
Automatic CLUT Optimization
Target systems storing frame buffer contents in the Index8 format depend on a well prepared CLUT (color look-up table). The better prepared the CLUT the better the graphical outputs of the application. The CLUT should also contain semi-transparent color values to allow alpha-blending. Embedded Wizard can analyze the colors used within the application and generated from this information a CLUT optimized for target systems. For more details please see Generating application specific CLUT.
Documentation Extraction
Embedded Wizard is able to automatically extract from your project the available documentation and to store it as a single help file in Microsoft format CHM (Compiled Help Module). This feature is as such a useful supplement if you want to share your development with other members of your team or your customer expects the software being delivered with the corresponding documentation. For more details please see Extracting project documentation.
Available Examples
Embedded Wizard is delivered with a rich set of available example projects. These examples are universal and independent from the supported target systems. Additionally, each Build Environment contains diverse examples ready to be used on the concrete platform.