Project members: Unit
Units provide the space where you can put GUI components and associated bitmap and font resources as well as all other project relevant members. As such, units can exist only at the root level of the project. Unit members are represented in Composer by following bricks:

From technical point of view, every unit member is associated with its own particular project file, Embedded Wizard automatically loads when you open the project and stores when you save the project. In accordance to other programming systems, the unit and its project file can be considered as a software module, a kind of library providing components. The unit project files are named after the unit name and have the file extension .EWU.
Each Embedded Wizard project can contain any arbitrary number of units, whereby the following few units are obligatory in every project, as they implement the essential core functionality of the Mosaic framework:
Core, Resources, Graphics, Views, Effects
IMPORTANT
Please note, units belonging to the Mosaic framework are not intended to accommodate your project specific members. You should consider, that the modification may impact the function of the Mosaic framework. Moreover, next time when you update Embedded Wizard to a newer version, your modifications are lost.
Concept of namespaces
Every unit serves as a namespace for all included project members. This avoids potential name conflicts between homonymous members existing in different units and helps you to flexibly structure large projects. Dividing the project in several units helps also to simplify the development process in a team of several developers.
All members defined within a unit has a global character - they can be accessed from everywhere within your project. To address a member defined within a unit, you must always use its full name, which is composed of the unit name and the member name, both separated by :: (double colon). For example, the component Button defined within the unit Application is addressed by its full name Application::Button.
Add new empty unit
★First switch to the Composer containing the project main page.
★Then, in the Gallery window, ensure that the folder Chora is opened.
★Look in the folder for the template named Unit.
★With the mouse, select the template and drag it into the Composer.
★Drop the template within the Composer.
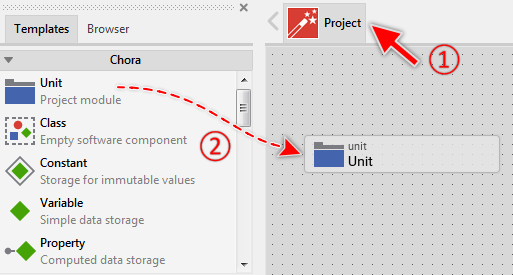
Adding a new unit member.
Name the unit
★First ensure, that the unit member is selected.
★Press the key F2 or select the menu item .
★Enter the new unit name in the Inspector window.
Specify the unit directory
Per default, all newly added units store their associated project files directly in the directory of your project. With the attribute Directory you can explicitly specify another location where the unit will store its files.
Resolve file name conflicts
When you rename a unit or specify a new unit directory, it is possible that the unit directory already contains a unit file matching the unit name. In such case Embedded Wizard will show the following warning in the Log window:
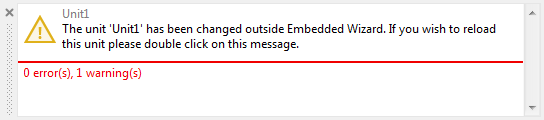
Now its up to you, how to resolve this conflict. Depending on your intention you have following two options:
•You want to retain the current content of the unit. In such case you simply ignore the warning. Next time, when you save the project, the existing file will be overwritten. In other words, the contents of the existing file are lost.
•You want to use the content of the existing file. In such case you have to double click on the message and in the next following message dialog confirm explicitly, that you really want to replace the current content of the unit with the content of the file. In other words, the current contents of the unit in Embedded Wizard are lost
Determine the file format of the unit
Per default, a single unit is stored in its corresponding .EWU project file. With the attribute Split you can explicitly override this behavior, and force the particular unit to store its content as a set of files - one file for every project member contained within the unit. This is useful, when you edit the unit simultaneously together with other developers.
Open the unit for editing
Every unit can contain any arbitrary number of other project members. To add a new or edit existing members open the unit in a new Composer page:
★First ensure, that the unit member is selected.
★Press the key ENTER ...
★... or double click on the unit member with the mouse.
Duplicate an existing unit
You can create a copy of an already existing unit member.
★First ensure, that the unit member is selected.
★Press the keys CtrlC and CtrlV in succession ...
★... or hold the key Ctrl pressed while you drag and drop the selected unit member.
★Finally rename the just duplicated unit member.
Please note, when you copy a unit member, the members included within the original unit are not copied. The new unit is empty. You can, however, select and copy the members between the both units in a separate step.
Automatic unit inclusion
When you add a widget from the Gallery and the widget is implemented in a unit currently not included in your project, Embedded Wizard will automatically add the unit to your project. The following message appears in the Log window:

Include an existing unit
To add an already existing unit file to your project:
★First add new unit member to your project as described above in Add new empty unit.
★Then rename the unit member so its name matches the name of the unit file without the file extension .EWU.
★If the unit file is stored in a directory different to your project directory, specify the directory explicitly.
Shortly afterwards, a message will appear in the Log window asking you, whether Embedded Wizard should reload the content of the file:
★Double click on the message and confirm in the next following message dialog the reload operation.
Alternatively you can add existing units by conveniently drag-and-drop the original unit files (*.EWU) directly from the MS-Windows file explorer into a Composer containing the project main page. Accordingly, Embedded Wizard adds for every unit file a new unit member automatically. The unit members are already configured to refer to the location where the original unit files are found, so you don't need to specify the unit directory manually. To add new unit members by drag-and-drop do following:
★First switch to the Composer containing the project main page.
★In the MS-Windows file explorer select all interesting unit files.
★With the mouse, grab and drag the selected files into the Composer.
★Drop the files within the Composer.
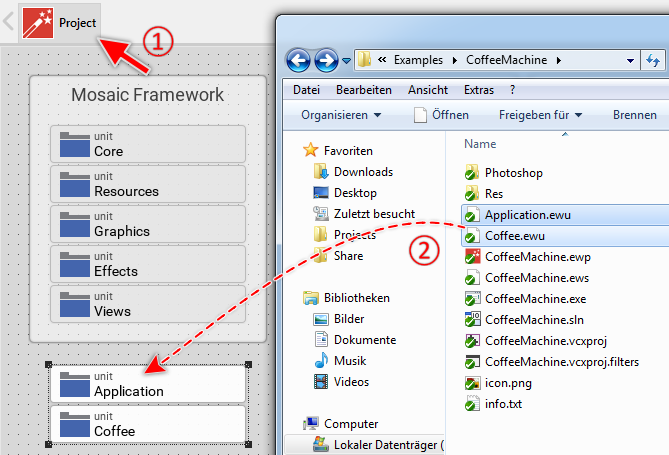
Adding new unit members by drag-and-drop the original unit files from MS-Windows file explorer.
Shortly afterwards, a message will appear in the Log window asking you, whether Embedded Wizard should reload the content of the affected files:
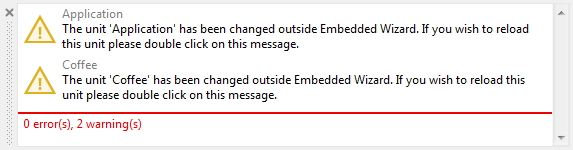
★Double click on every message and confirm in the next following message dialog the reload operation.
Reload an externally modified unit
If the content of a unit file has been modified by another Embedded Wizard instance, or an external application (e.g. after getting the latest file version from a SVN or GitHub system), a message will appear in the Log window asking you, whether Embedded Wizard should reload the content of the file:
★Double click on the message and confirm in the next following message dialog the reload operation.
Delete a unit
★First ensure, that the unit member is selected.
★Press the key DEL or select the menu item .
Attributes of a unit
The following table shows the complete list of attributes provided by the unit member:
Attribute name |
Short description |
|---|---|
Determines the position and the size of a unit member brick within the Composer window. |
|
Contains the description for the unit member. |
|
Determines the directory for unit project files. |
|
Determines the storage format of the project files associated to a unit member. |