Embedded Wizard Studio: Inspector
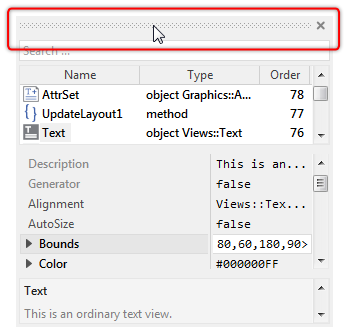
The Inspector window provides an alternative, attribute oriented view on the content of the currently active Composer page. You use it to examine and modify properties and attributes of project members while assembling your application components in the Composer window. The Inspector is arranged per default in the right area of Embedded Wizard Studio:
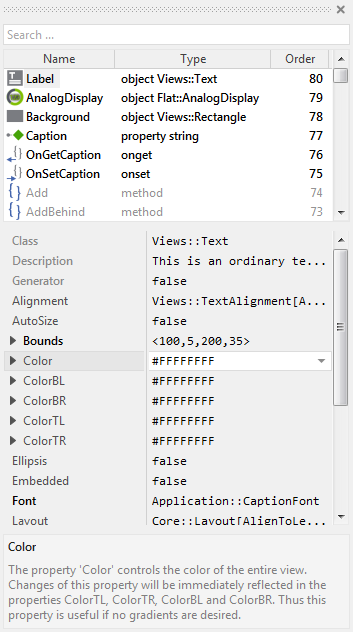
Inspector window
Show the Inspector window
Usually the Inspector window is visible all the time. However, if you have hidden the window unintentionally, you can show it again:
★To show the Inspector window select the menu item .
★or use the keyboard shortcut Alt3.
Using the described menu item or the shortcut while the Inspector window is already visible causes the window to become focused only. Subsequently you can interact with the Inspector window by using the keyboard without the necessity to previously click on it with the mouse.
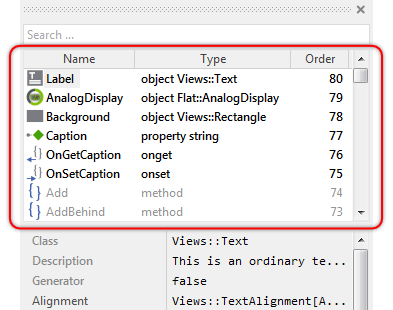
Members area
The upper part of the Inspector window is occupied by the members list. The content of this list corresponds to the of the current Composer page. Within this list you can select, copy and delete the project members similarly as you do in the Composer window. However, unlike the Composer window, the Inspector shows the complete list of all existing members including also those members, which are inherited and not overridden:
The Inspector and the Composer windows are coupled together. Selecting and modifying members within one window forces the other window to update its displayed content implicitly. You can consider the members list of the Inspector as an alternative view on the members from the Composer window and vice versa. The members list is composed of the following three columns:
Column |
Description |
|---|---|
Name |
The name identifying uniquely the respective project member. If the member is represented in the Composer window by a brick, the brick displays also this name. |
Type |
Type or origin information for the respective project member. If the member is represented in the Composer window by a brick, the brick displays also this type or origin information. |
Order |
The order in which the project members are converted in code for the target system and eventually initialized at the runtime. This column determines also the stacking order (the Z-order) of graphical project members (members displayed within the canvas area). Members having higher order do overlay other remaining members with lower order. |
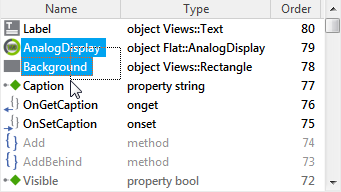
Since a class inherits all members from its base class, the listing of all those members in the Inspector window would quickly become confusing. Therefore, the members are presented with different fonts and colors. Per default, new members are displayed with bold, black font. In turn, members inherited from an ancestor class appear with thin, gray font. If an inherited member is overridden within the actual class, the item is displayed with bold, gray font. Knowing this, you can easily distinguish between newly added, inherited and overridden members:

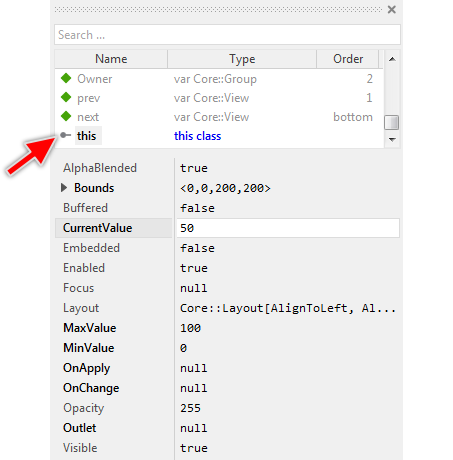
If you are current editing a class or class variant, the members list includes an additional entry this representing the actual class. Inspecting this entry provides you an alternative access to the properties existing within the class as if you were editing an instance of the class. For example:
Attributes and properties area
The middle area of the Inspector window displays a list with attributes and properties belonging to the members currently selected in the above members list. Here you can configure the members and specify initialization expressions for their properties:
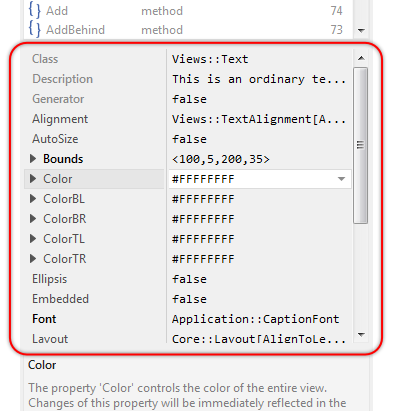
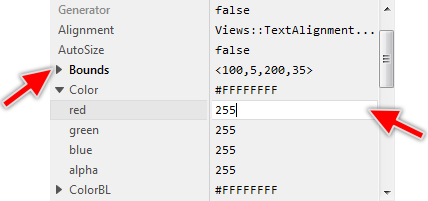
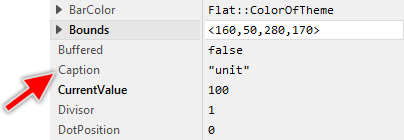
The list is composed of two columns displaying the names of attributes or properties on the left and the corresponding values on the right, both separated by a splitter bar you can drag with the mouse if you want to resize the columns. Within the white in-place edit field you edit the currently selected value. The small triangle icon  on the left of a name indicates, that there are subordinated values you can inspect and modify:
TIP
It is worth mentioning, that if at the same time two or more members are selected, the Inspector displays only the attributes and properties which are common to all those members. Modifying such attributes or properties applies then at once to all selected members.
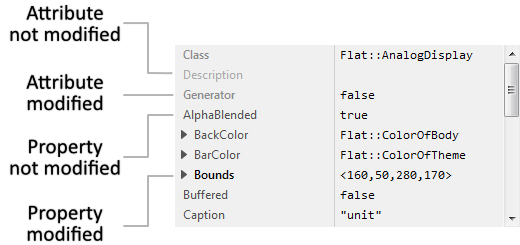
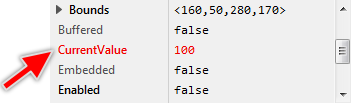
Please note the different fonts and colors used to distinguish the entries. All attributes affecting primarily the configuration of a member are displayed with gray names. In turn, initialization attributes (e.g. Default, Items, etc.) and properties belonging to an object are displayed consequently with black names. Furthermore, the names appear bold, if the corresponding values are modified:
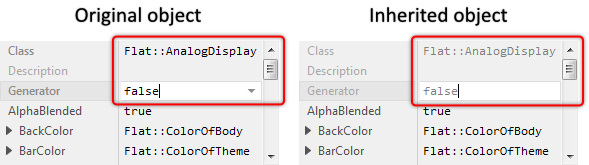
Similarly, the values in the right column are displayed with black or gray colors depending on whether it is permitted to modify them or not. This affects particularly attributes, which can be specified only in the original definition of a member. For example, the attribute Class determines the identity of an object member. This, in turn, applies not only to the object itself, but also to all objects derived from it. Changing this attribute retrospectively when you edit an inherited object is thus not possible. Similar occurs with the attribute Generator. Such attributes can be inspected only:
Please note, that the order in which this Inspector area displays attributes and properties is predetermined. First appear all attributes sorted alphabetically. Then follow all properties, again, listed in alphabetic order. Knowing this, you can locate desired attributes and properties more easily.
Short info area
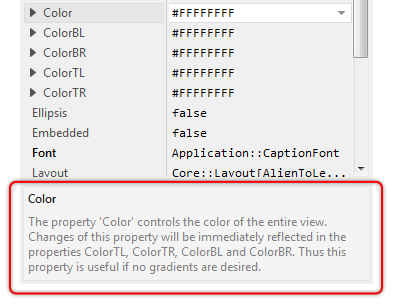
The lower part of the Inspector window displays the available description of project members, their attributes and properties. Each time, you select a member in Composer or Inspector, or you select an attribute or property in the attributes and properties area of the Inspector the displayed description is automatically updated to provide you information about the selected entity:
Except the description for the built-in attributes, the information is taken from the text you can individually specify for every member in your project by using its attribute Description.
Erroneous members, attributes or properties
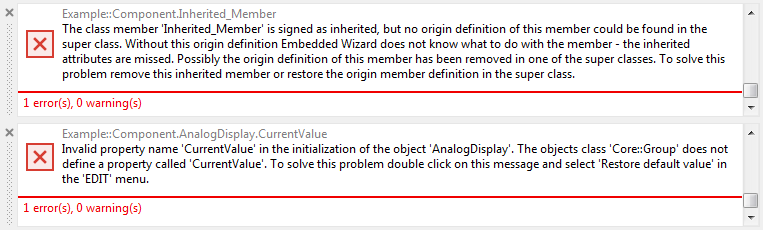
In case of errors in the inheritance of project members, the Inspector highlights the affected items in the members area or in the attributes and properties area with red font. In this manner you can recognize, that there is a problem with a particular project member. For example:

Please note, that Embedded Wizard Studio reports the corresponding error messages in the Log window including tips of how to solve the problem:
Navigate between areas
As long as the Inspector is an active window, you can toggle between the members area and the attributes and properties area by using the shortcut CtrlTab.
Sort members
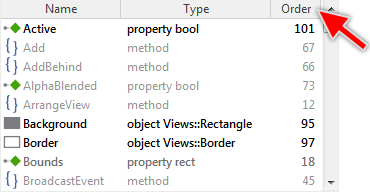
Initially, when you switch to a Composer page, the Inspector displays the members list sorted according to the stacking order of the existing members. Later when you add new members, delete or reorder, etc. existing members, the list is not automatically re-sorted. If you want the list to refresh the sorting, you have to click on the caption of the column by which you want to sort the content. For example, if you want to re-sort the list by the stacking order, then click on the Order caption:
The following table provides a description of the sorting algorithms processed when you click on the caption of a column:
Column |
Sorting effect |
|---|---|
Name |
The list is sorted alphabetically according to the text in the column Name. However, if you click this column caption twice, the members are sorted first by inheritance and then by their names. If sorting by inheritance, the list displays first all new members, followed then by all inherited and overridden members. Finally at the end of the list appear all remaining inherited but no overridden members. |
Type |
The list is sorted alphabetically according to the text in the column Type. The content of other columns is ignored. |
Order |
The list is sorted strictly according to the stacking order of the members. The item at the top of the list corresponds to the last (topmost) member while the first (back-most) member is displayed at the bottom of the list. |
Filter members
You can apply a filter pattern to the content of the members list and thus find the desired member in a more convenient way. For this purpose the Inspector window provides in its upper area the Search ... edit field. With the active filter function, the Inspector displays only those members, which in fact do match the specified filter pattern. Other members are hidden:
★Click on the Search ... edit field.
★In the edit field enter the text you want to use as filter pattern:
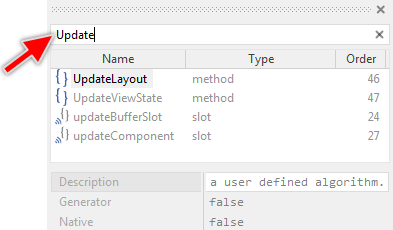
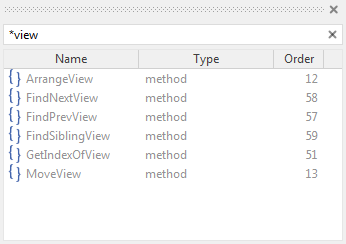
A more advance approach is the usage of wildcard signs ? and * in the entered filter pattern. Here, the sign ? is assumed as representing exactly one arbitrary character within the member name. In turn the sign * can represent any arbitrary number of characters including even an empty text.
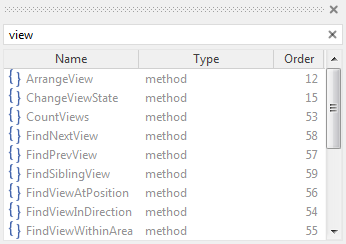
Please note, when using the wildcard signs, the member has to match the complete specified pattern in order to be listed in the Inspector window. For example, the pattern *view matches only members ending with the text view and starting with any arbitrary or even none text. In turn, the pattern view (without any wildcard signs) matches all members containing the text view regardless of its position:
TIP
It is not absolutely necessary to click on the Search ... edit field in order to enter the filter pattern. If the members list is already focused, the Search ... edit field is automatically activated as soon as you start entering the text. Moreover, you can toggle between the Search ... edit field and the list view by pressing the key Tab.
Reset the filter
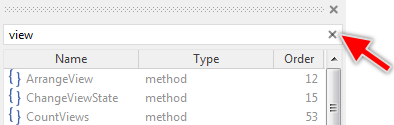
If desired you can reset the filter pattern again:
★For this purpose, click on the button  on the right of the Search ... edit field:
★... or simply press the key Escape if the members list is currently focused.
Add new members
The simplest way to add a new member is to Drag & Drop the corresponding template from the Templates window into the Composer or Inspector window. Embedded Wizard Studio includes per default an extensive set of templates for all project members and further templates for various application cases. For more details, see the description of the Templates window.
You can also Drag & Drop an existing member from the Browser into the Composer or Inspector window and thus duplicate or derive it. With the Browser window, Embedded Wizard Studio provides you a kind of auxiliary view on your project structure so that you can access project members and use them for various copy and derive operations. For more details, see the description of the Browser window.
Select members
The members area shows a list with all existing project members. You can navigate in the list, and select the members analog as you do with items in e.g. Microsoft Windows file explorer:
★To navigate in the list and select one member use the keys Up and Down.
★Alternatively you can select one member by simply clicking on its name with the mouse.
★To select a range of consecutive members use the keys ShiftUp and ShiftDown
★... or click with the mouse on the final member of the range while holding the key Shift pressed.
★To select the members individually click on them in succession while holding the key Ctrl pressed.
★To select all members use the menu item or press the key CtrlA.
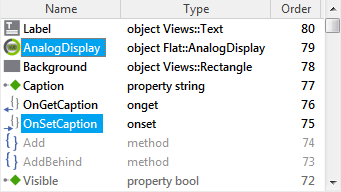
Per default the names of the selected members appear highlighted with blue background color. For example, the following screenshot demonstrates the situation with two selected members: an embedded object and an onset method:
★To deselect a single member from a group of selected members click on it while holding pressed the key Ctrl.
★To deselect all members simply click on the background of the members area somewhere outside the displayed names and icons
★... or press the key Escape.
Alternatively you can select members by dragging a rubber band around them. For this purpose:
★To start the selection click within the members area and hold the mouse button pressed (please avoid clicking on the names or icons).
★Now drag the mouse and enclose the names of all members you intend to select inside the displayed rubber band.
★Finally release the mouse button:
★Similarly you can deselect members by dragging the rubber band around them while holding pressed the key Ctrl.
Since Inspector and Composer windows are coupled together, selecting members within the Inspector affects implicitly the selection in Composer window and vice versa. Also please note, that the total number of existing project members as well as the number of currently selected members is displayed in a dedicated pane of the Status bar:

Rename a member
★First ensure that the member in question (and only this member) is selected.
★Press the key F2 or select the menu item .
Just after performing the above operation an in-place edit field appears where the current member name is displayed:
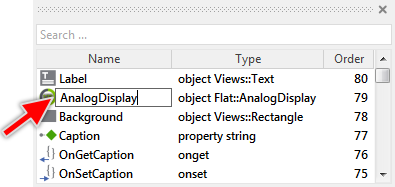
★In the edit field enter the new name for the member.
★Finally confirm the modification by pressing the key Enter
Renaming a member causes the entire project being reevaluated instantly in order to replace all occurrences of the old name by the new one. To suppress this automatic refactoring confirm the modification by using the key ShiftEnter instead of Enter alone.
To be valid, the member name must start with a letter a..z or A..Z followed by any further letters, digits 0..9 and _ (underscore) signs. Moreover, please note, the name of an inherited project member can't be changed retrospectively. To do this, you should navigate to the first ancestor of the member and change its name.
Open a member
Depending on its type, a project member can provide further contents enclosed inside it. For example, a class can contain methods, properties, variables. etc. In turn, methods are destined to accommodate implementation source code. Before you can see and modify those contents you have to explicitly open such member:
★First ensure, that the member in question (and only this member) is selected.
★Then press the key Enter or select the menu item .
★Alternatively you open a member by simply double-click on its name with the mouse.
The content of the affected member appears either in a Composer page or in the Code Editor window depending on the type of the content. Now you can inspect and edit this content. To navigate between the opened Composer pages use the Navigation bar found above the upper edge of the Composer.
Select and open a member while Drag & Drop
If during a Drag & Drop operation the mouse pointer rests over the name of a member for a period longer than 1 second, the affected member is automatically selected. Now the Inspector displays the attributes and properties of the member so that you can release the dragged content directly over the desired attribute or property.
If the mouse pointer rests for a period longer than 2 seconds, the affected member is opened showing its enclosed content. In this manner you can navigate easily within your project during an active Drag & Drop operation until you reach the target location where you want to release the dragged content. Please note, that during an active Drag & Drop operation you can also switch between various Composer pages by using the Navigation bar.
Reorder members
When working with Embedded Wizard Studio, the resulting succession of how members are initialized and converted in code for the target system is determined by the respective stacking order. Generally, members having lower order are initialized and generated before all other remaining members with higher order. The actual order of a member can be verified in the column Order of the members area. If necessary, you can restack the members:
★First ensure, that all members you want to restack are selected.
★To restack up the members (to increase their order) press the key CtrlUp.
★To restack down the members (to decrease their order) press the key CtrlDown.
★To restack top most the members press the key CtrlShiftUp.
★To restack back most the members press the key CtrlShiftDown.
You can perform the above operations also by using the corresponding commands from the menu Arrange.
TIP
Beyond the Inspector, the order also affects the resulting composition of project members (in particular graphical objects within the canvas area). Generally, members having higher order do overlay other remaining members with lower order.
Copy & Paste members
The members area supports various Copy & Paste operations permitting you to duplicate and derive members by using the clipboard an keyboard shortcuts. To perform a Copy & Paste operation, do following:
★First ensure, that all members in question are selected.
★Press the keys CtrlC or use the menu item to copy the selected members into the clipboard.
★Eventually switch to another Composer page where you want to paste the just copied members.
★Now, depending on the desired operation use one of the following keyboard shortcuts or select the equivalent menu item:
Shortcut |
Menu item |
Description |
|---|---|---|
CtrlV |
Adds new members as exact duplicates of the members in the clipboard. |
|
CtrlShiftV |
Add new classes by deriving them from the classes in the clipboard. See also: |
|
CtrlShiftAltV |
Add new variant members by deriving them from the members in the clipboard. See also: Create new bitmap resource variant |
|
CtrlAltV |
Add new autoobject or embedded object members (instances) from the classes in the clipboard. See also: |
By duplicating a member you create an exact copy of the original member including all associated attributes and properties. Thus, after the copy operation you would usually move, resize and modify the duplicated members accordingly to your desired application case. You should also rename the members in order to keep your project tidy. Per default, new members retain the name of the original member by appending an additional unique and consecutive number.
Drag & Drop members
The members area supports various Drag & Drop operations permitting you to duplicate and derive members by simply using the mouse. As such, Drag & Drop is a convenient complement for the typical clipboard functions. To perform a Drag & Drop operation, do following:
★First ensure, that all members in question are selected.
★Depending on the desired Drag & Drop effect press and hold a combination of the modifier keys Ctrl, Shift and/or Alt.
★With the mouse click on the name of one of the selected members and
★... while holding the modifier keys and the mouse button pressed move the mouse.
★If necessary you can switch the Composer page during the Drag & Drop operation.
★If necessary you can select and open a member during the Drag & Drop operation.
★At the target location, where you want to add the dragged content release the mouse button.
★Finally release the modifier keys.
The following table provides an overview of the possible modifier key combinations you can use in conjunction with Drag & Drop and describes the resulting effects. Please note the form of the mouse pointer, which reflects the actual Drag & Drop effect:
Modifier keys |
Mouse pointer |
Description |
|---|---|---|
Ctrl |
|
Copies the dragged members so that you obtain an exact duplicate of them. |
Alt |
|
Copies the names of the dragged members so that you can drop the names into the Code Editor or into an edit field in the attributes and properties area. |
CtrlShift |
|
Add new classes by deriving them from the dragged classes. See also: |
CtrlShiftAlt |
|
Add new variant members by deriving them from the dragged members. See also: Create new bitmap resource variant |
CtrlAlt |
|
Add new autoobject or embedded object members (instances) from the dragged classes. See also: |


The following screenshot demonstrates the practical usage of Drag & Drop. To duplicate a member (here a font resource member) you select it first and then you move it with the mouse while holding the key Ctrl pressed. Finally you drop the member at the desired location within Composer or Inspector window. Note, that the rename operation is automatically activated just after you drop a new member within the members area of the Inspector:
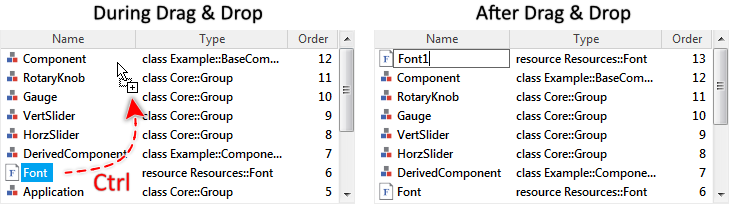
Please note, by duplicating a member you create an exact copy of the original member including its associated attributes and properties. Thus, after the copy operation you would usually move, resize and modify the duplicated members accordingly to your desired application case. You should also rename the members in order to keep your project tidy. Per default, new members retain the name of the original member by appending an additional unique and consecutive number.
Override an inherited member
You override a member if you want to initialized its attributes or properties with expressions different from the specified in its inherited version. Similarly if you want to provide new implementation for an inherited method, you have to override it explicitly:
★First ensure, that the inherited member in question is selected.
★Drag and drop the selected member from the Inspector to the Composer window while holding the keys CtrlShift pressed:
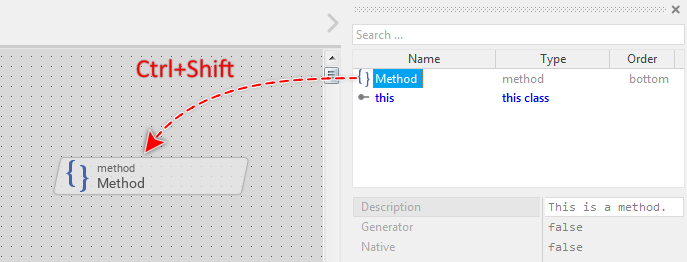
★Alternatively you override the selected inherited member by using the menu item or the keyboard shortcut CtrlM.
In case of data members (e.g. variables, embedded objects, etc.) the member will become overridden implicitly as soon as you modify one of its attributes or properties. You can, but you don't need to override the member explicitly by using the above described procedure.
Revert to an inherited member
If you want to revert an overridden member to its original inherited state, delete it simply. Thereupon, the members list shows the member name with thin gray font again.
Delete members
★First ensure, that all members you want to delete are selected.
★Then press the key DEL
★... or select the menu item .
Please note, that inherited members as being defined in ancestor classes can't be deleted retrospectively. However, if the inherited member is overridden you can use the delete operation to revert the original inherited state of such member. In other words, deleting an inherited member deletes its overriding, the members list shows the member name with thin gray font again.
Select an attribute or property
The attributes and properties area shows a list with all attributes and properties common to the currently selected members. You can navigate in the list, inspect and edit the displayed values:
★To navigate in the list use the keys Up and Down
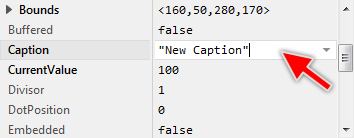
★... or simply click on the corresponding item with the mouse. For example, if you want to edit the property Caption:
The small triangle icon on the left of a name indicates, that there are subordinated values you can inspect and modify:
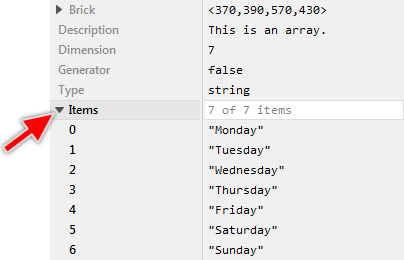
★To expand an item and show its subordinated values just click on the triangle found on the left of the name:

★Alternatively, if no Assistant is available for the item, you can expand it also by pressing the key Enter.
★To collapse an item just click on the triangle  found on the left of the name:
Select an attribute or property while Drag&Drop
If during a Drag & Drop operation the mouse pointer rests over an item within the attributes and properties area for a period longer than 1 second, the affected item is automatically selected. Now you can release the dragged content directly over the edit field of the affected attribute or property. If the mouse pointer rests for a period longer than 2 seconds and the item contains subordinated values, then the item is expanded showing the enclosed contents.
Modify an attribute or property
The currently selected attribute or property provides an in-place edit field right to its name. Here you enter initialization expressions for data members or specify values for member specific attributes:
★First navigate to the attribute or property you want to modify.
★Since the edit field is automatically focused, you can instantly enter the desired expression.
★Finally apply the modifications by pressing the key Enter.
★If you change your mind, you can cancel the modification by pressing the key Escape.
It is worth mentioning, that if at the same time two or more members are selected, the Inspector displays only the attributes and properties which are common to all those members. Modifying such attributes or properties applies then at once to all selected members. In oder words, you can select e.g. several variable members and change their Type attribute with a single operation.
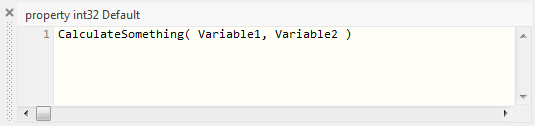
When you edit initialization values of data members like variables, array items, properties, etc. you can specify complex expressions including operators and other members existing in the actual context. In the following example, the member Property is initialized with the value resulting from the invocation of a method CalculateSomething, which in turn uses the both variables Variable1 and Variable2 as its arguments:
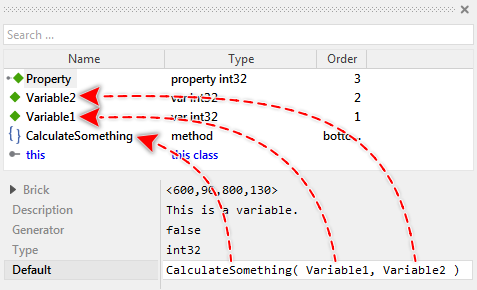
Using this technique you should consider the order in which members are initialized. With the above example, to work correctly, the both variables Variable1 and Variable2 have to be initialized before the member Property. Therefore the order of Property is higher than the of the both variables. If necessary, simply restack the members.
Use the Assistant window
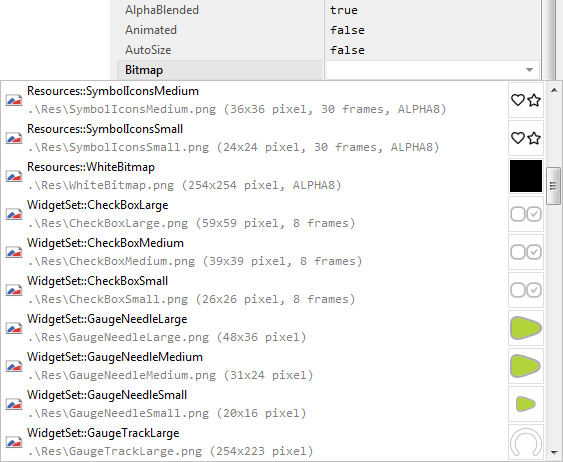
For your convenience the Inspector includes an Assistant window. It helps in particular to find and select the right operand when you edit initialization expression of attributes or properties. For example, the Assistant can list all bitmap resources existing in your project, so you can select the desired one easily:
The availability of the Assistant depends on the type of the respective property or attribute currently selected in the Inspector window. If available, a small button  (triangle) is displayed on the right of the selected attribute or property:
★To show the Assistant window click on the small button (triangle)
★... or press the key ENTER.
The Assistant window appears modeless immediately below/above the affected property or attribute. Embedded Wizard implements various variants of the Assistant, which are shown depending on the type of the affected property or attribute.
Please note the alternative button  (ellipsis), which also can appear in Inspector. Activating this button opens one of the native MS-Windows file/folder selection dialogs where you can explore the file system and select e.g. an image file to use within your project, etc.
For details regarding its usage see Inspector Assistant window.
Link to Code Editor
You can temporarily connect the Inspector to the Code Editor window. Once established the connection, the attribute and property selected in the Inspector can also be read and modified within the text editor area of the Code Editor. This is convenient in particular when you need to enter long text for the attribute or property.
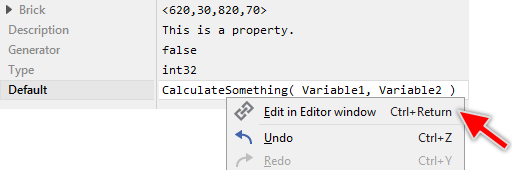
★To edit the currently selected attribute or property in the Code Editor window click on it with the right mouse button to show its context menu.
★From the context menu select the item
★... or you use simply the shortcut CtrlEnter:
After this operation you can conveniently inspect and modify the content of the selected attribute or property directly in the Code Editor window:
Alternativelly, you can control the link between Inspector and Code Editor by the menu item .
TIP
Using the keyboard shortcut CtrlEnter you can conveniently switch forth and back between the Inspector and the Code Editor. In particular, pressing the keys CtrlEnter in the Code Editor window while it is linked to Inspector causes the editor content being transferred to the associated attribute or property selected in Inspector.
Restore the default or inherited value
When you modify an attribute or property, the new value overrides its default or inherited value. To discard such modification you have to restore the original value explicitly:
★First navigate to the attribute or property in question.
★Select the menu item
★... or press the key CtrlR.
Thereupon the affected attribute or property reverts to its default or inherited value. Please note, that with this operation the appearance of the attribute or property changes from bold to thin font reflecting that the value is not modified anymore.
Navigate in the project
The Inspector supports various functions to help you to navigate within your project. For example, if you are editing a GUI component (precisely a class), you can navigate to the Composer page corresponding to the unit where this class is contained. The affected class definition is additionally selected in Composer so you can locate it easily.
The following table provides an overview of all Inspector navigation functions as well as the associated keyboard shortcuts and the corresponding menu items:
Shortcut |
Menu item |
Description |
|---|---|---|
CtrlShiftU |
Navigates to the Composer page of the unit containing the currently edited member. |
|
CtrlShiftS |
Navigates to the Composer page corresponding to the immediate ancestor class of the currently edited class. |
|
CtrlShiftA |
Navigates to the Composer page where the immediate ancestor of the currently selected member is defined. This command is useful by inherited members only. |
|
CtrlShiftD |
Navigates to the Composer page where the original definition (the first ancestor) of the currently selected member. This command is useful by inherited members only. |
|
CtrlShiftT |
Navigates to the project member, which name is currently selected in the inplace edit field within the attributes and properties area. |
Hide the window
Usually the Inspector window is visible all the time. If necessary the window can be hidden easily:
★To hide the Inspector window click on the small close button  at the border of the Inspector window.
Once hidden the Inspector window can be made visible again:
★To show the Inspector window select the menu item .
★or use the keyboard shortcut Alt3.
Undock the Inspector window
Per default the Inspector window appears docked at the edge of the Embedded Wizard main window. Accordingly, when you move or resize the main window the Inspector is arranged automatically. If desired you can change this behavior and undock the Inspector window so it appears floating and independent above the main window. In this manner you can arrange it e.g. on another monitor. To achieve this:
★Click and hold with the mouse the grip area (the dotted bar) of the Inspector window.
★While holding the mouse button pressed drag the window.
★At the desired position release the mouse button again.
★Alternatively you can simply double click within the grip area.
Please note the dotted border which is shown while dragging the Inspector window. The border indicates the mode and position where the window will appear after you have released the mouse button. In particular, thin border indicates that the window will be docked at the given edge of the main window. The thick border, in turn, means that the window will appear undocked exact at the given position. The border changes automatically depending on how close to the edges you move the window:

★To prevent the window from being docked at an edge press and hold the key Ctrl.
★To abort the active dragging operation press the key Escape before releasing the mouse button.
Once the window is undocked and floating above the main window you can click on its caption and move it wherever it is convenient for you. If desired you can resize the window by clicking and dragging on its edges. If you want the Inspector window to appear again docked within the main window do following:
★Double click on the caption bar of the Inspector window. This causes the window to be docked at its latest dock position.
★Or click with the mouse on its caption and drag the window to the edge where you want to dock it.
★Press and hold the key Ctrl to force the docking mode.
★Release the mouse button and then the Ctrl key.
