Project members: Class
With a class you define an object-oriented software component. The component can store data (in variables, properties or arrays) and it can implement functionality (as methods). At the runtime you can create an instance (an object) of the class, access the data stored inside it and execute the functionality implemented in its methods. Class definitions can exist only within a unit member. Per default, classes are represented in Composer by following bricks:

A class can be derived from another class allowing it to inherit the complete definition of all ancestor classes. The resulting class hierarchy is a fundamental technique to structure complex applications. If a class is derived, the name of its direct ancestor is shown in the upper text row of the brick. For example, the following class ToggleButton defined within the unit Example descends from the class Core::Group, what can be recognized by the name displayed in the brick and in the inheritance hierarchy you can evaluate in the Browser window:

Unlike other project members, class definitions can appear in Composer and Inspector decorated with individual icons. Accordingly, different classes and their instances can be distinguished conveniently. Moreover, an icon associated with a single class is automatically inherit by all classes derived from it. For example, the class Example::ToggleButton derived from the class Core::Group inherit automatically its icon:
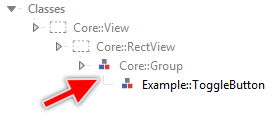
The class Core::Group has an individual icon associated with it. The derived class Example::ToggleButton inherit this icon automatically.
GUI components are classes
In Embedded Wizard, every GUI component (a simple push button or a complex screen) is implemented as an individual class, derived from the particular Mosaic class Core::Group. Thus the buttons and sliders, you see at the runtime on the display, are just instances of the respective GUI component classes. As such all GUI components can be considered as ordinary class definitions.
Add a new empty class
★First switch to the Composer page for the respective unit member, where you want to add the new class.
★Then, in the Gallery window, ensure that the folder Chora is opened.
★Look in the folder for the template named Class.
★With the mouse, select the template and drag it into the Composer.
★Drop the template within the Composer.
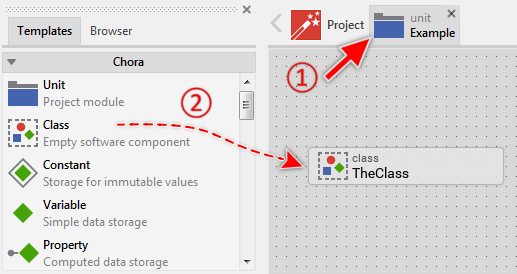
Adding a new empty class not derived from any other class.
Name the class
★First ensure, that the class is selected.
★Press the key F2 or select the menu item .
★Enter the new name in the Inspector window.
Class definitions have a global character - they can be accessed from everywhere within your project. To address a class, you must always use its full name, which is composed of the unit name, the class is defined inside, and the name of the class itself, both separated by :: (double colon) signs. For example Core::Group.
Subclass an existing class
You can create a new class by simply deriving it from an existing class. The new class definition will automatically inherit all members from the base class and all ancestor classes. In the simplest case, if both, the base and new class are defined within the same unit, do following:
★First ensure, that the base class is selected.
★Drag and drop the selected base class while holding the keys CtrlShift pressed.
★Finally rename the just created class definition.

Deriving a new class from a base class existing within the same unit.
If the base class is not defined within the same unit, you can use the Browser window:
★First switch to the Composer page for the respective unit member, where you want to add the new derived class.
★Then ensure that the Browser window is visible.
★Within the Browser locate the desired base class. This can be done easily with Browser's own filter function.
★Select the found class in the Browser window.
★Drag and drop the selected class into the Composer area while holding the keys CtrlShift pressed.
★Finally rename the just created class definition.
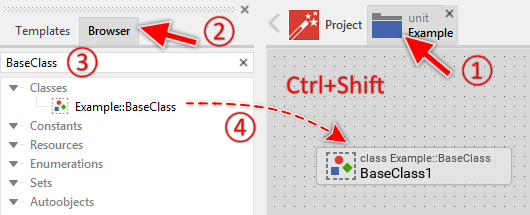
Deriving a new class by using the Browser window.
Alternatively, you can subclass an existing class by using the clipboard functions Copy & Paste:
★Press the keys CtrlC or use the menu item to copy the selected class into the clipboard.
★Eventually switch to the Composer page for the respective unit member, where you want to add the new derived class.
★Press the keys CtrlShiftV or use the menu item to add a new class by deriving it from the class stored in the clipboard.
Use component templates to create a class
Embedded Wizard provides various templates for typical GUI component classes, like the push button or the slider. These are ideal when you intend to implement the widgets from scratch. The templates contain already functionality you can freely adapt or extend according to your needs. All templates are found in the Gallery folder Component Templates. To create a new class from an existing template, do following:
★Then, in the Gallery window, ensure that the folder Component Templates is opened.
★Look in the folder for the desired template e.g. Toggle Button.
★With the mouse, select the template and drag it into the Composer.
★Drop the template within the Composer.
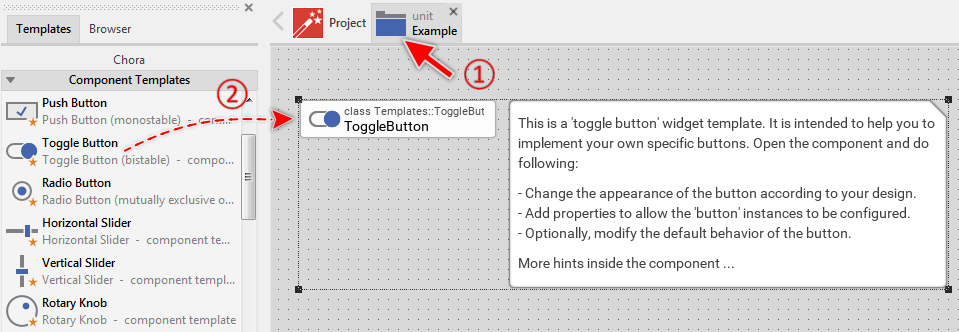
Creating a new class from provided template.
Please note, the templates come associated with annotations providing hints for you how to proceed. If undesired, you can select and delete them. They have no effect on the function of the particular component.
Edit the class
Every class definition can contain any arbitrary number of members to store data and implement functionality. To add new or edit existing members open the class definition in a new Composer page:
★First ensure, that the class definition is selected.
★Press the key ENTER ...
★... or double click on the class definition with the mouse.
Please note, in order to preserve the clarity, all members inherited from a base class but not overridden in the actual class are not shown as bricks in the Composer. Your just derived class can thus appear empty even if there are hundreds of members inherited from the ancestor classes. The Inspector, in turn, shows always the complete list with all inherited, overridden and new members. If you are looking for a particular inherited member, use the Inspector for this purpose.
If you are editing a GUI component class (derived from the Mosaic Core::Group class), all visual members (e.g. text or image views) are shown with their actual appearance in a dedicated Canvas area of the Composer. These members are not shown as bricks:
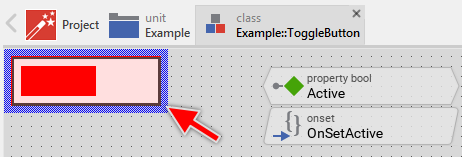
The Canvas area within the Composer.
The following table provides an overview about all members you can add to a class definition and their particular function:
Member |
Short description |
|---|---|
Simple data storage. Variables are intended to store states within an instance of a class. |
|
'Array of' data storage. Arrays are intended to store multiple states within an instance of a class. |
|
Computed data storage. Properties serve as interfaces to exchange data with an instance of a class. |
|
Embedded instance of another class. You can nest instances of one class within another class. |
|
Common logic implementation. Methods can implement the behavior of a class. |
|
Signal handler logic implementation. Slot methods can implement the logic to execute when signal is sent to a particular slot method. |
|
Property read logic implementation. OnGet methods can implement the logic to execute when the corresponding property is read. |
|
Property write logic implementation. OnSet methods can implement the logic to execute when the corresponding property is modified. |
Localize a class
With the attribute MultiLingual you can configure a class to automatically handle the language selection.
Implement the constructor method Init()
Every class definition can contain an optional constructor method named Init(). If available, the Init() method is invoked automatically for each new created instance of the class. As such, it is ideal to complete the initialization of an object just before it is delivered.
Implement the destructor method Done()
Every class definition can contain an optional destructor method named Done(). If available, the Done() method is invoked automatically for every instance reclaimed by the Garbage Collector. As such, it is ideal to perform all necessary cleanup operations just before the object is discarded.
Implement the re-constructor method ReInit()
Every class definition can contain an optional re-constructor method named ReInit(). Every time the language selection changes, Embedded Wizard invokes the ReInit() methods of all currently existing objects. As such, ReInit() is ideal to perform language specific update operations. Please note, with the attribute MultiLingual you can configure a class to handle the language selection as far as possible automatically.
Duplicate an existing class
You can create any number of copies of an already existing class definition.
★First ensure, that the class definition is selected.
★Press the keys CtrlC and CtrlV in succession ...
★... or hold the key Ctrl pressed while you drag and drop the selected class brick.
★Finally rename the just duplicated class.
You can also Drag & Drop a class member from the Browser into the Composer window and create so a duplicate of the affected member:
★First switch to the Composer page for the respective unit member, where you want to add the duplicate of the class.
★Then ensure that the Browser window is visible.
★Within the Browser window locate the desired class member. This can be done easily with Browser's own filter function.
★Select this class member in the Browser window.
★Drag and drop the selected class member into the Composer:
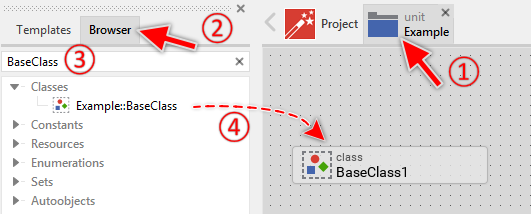
Duplicating a class by simply Drag & Drop it between the Browser and Composer windows
★Finally rename the just duplicated class.
Use the class
Once available, the class can be used for creating new objects. You can either embed the objects directly into another classes just at the design time or you create the objects dynamically in Chora expressions by using the new operator. It is also possible to create global instances of the class as so-called autoobjects.
Moreover, every class definition can be considered as an individual user defined data type, you can use in the declaration of data members like variables, properties, arrays, local variables, local arrays as well as in parameter and return type declaration of a method. At the runtime, the data members can store references to objects of the given class. The class data type is composed of the unit name, the class is defined inside, and the name of the class itself, both separated by :: (double colon) signs. For example:
// Declare a local variable able to refer to a 'Views::Image' object var Views::Image imageObject; // Create a new instance of the Views::Image class and store it // in the local variable imageObject = new Views::Image;
Derive a variant of a class
Every class definition can be overridden by one or more class variant members. Once overridden, the variant member can retrospectively modify the implementation of the original class. The derivation of variants provides the fundamental technique to manage several product and design variants within one and the same GUI application. The selection of the appropriate variant occurs automatically depending on the condition specified in the VariantCond attribute of the corresponding variant member.
Control the code generation
With the attribute Generator you can selectively control, whether the class definition should be taken in account during the code generation or not. Configuring this attribute with the value false will exclude the class from your project unless the class is explicitly involved within a Chora expression or data member declaration.
Associate a brick icon to a class
If desired, you can decorate your own classes with individual icons. The icons are ordinary PNG files in 32x32 pixel resolution. You have to store the PNG files inside a specially for this purpose existing Icons directory:
★First using your preferred graphic editor design the icon and store it as 32x32 pixel large PNG file.
★In Windows Explorer locate your home directory.
★Below your home directory locate the directory AppData\Local\Embedded Wizard\Icons
★Copy your prepared icon PNG file into this directory.
★Rename the PNG file according to the following syntax: Unit nameClass name.png
For example, if you have a class PushButton within the unit MyWidgets then the correct name of the icon file is MyWidgetsPushButton.png.
★Finally you have to exit and start Embedded Wizard Studio again in order to update its internal icon cache.
Delete a class
★First ensure, that the class definition is selected.
★Press the key DEL or select the menu item .
Attributes of a class
The following table shows the complete list of attributes provided by the class definition:
Attribute name |
Short description |
|---|---|
Determines the position and the size of a class brick within the Composer window. |
|
Contains the description for the class definition. |
|
Controls the code generation for the affected class definition. |
|
Controls the localization of a class member. |
|
Determines the base class of a class member. |
