Project members: Bitmap resource
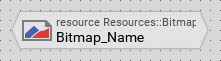
With a bitmap resource member you can include an image file to your project. It can thereupon be displayed by views like the image, frame or wallpaper, etc. Bitmap resource members are represented in Composer by following bricks:
Embedded Wizard supports the common image file formats PNG, JPG, BMP and GIF. During code compilation the files are automatically converted in a format optimized for the particular target system. It includes the adequate color conversion and compression. This approach is optimal for embedded systems not providing any image decoding engine. Bitmap resource members can also be localized with several image files, one for every supported language. This capacitates the bitmap resource to automatically offer the image corresponding to the currently selected language.
Please note, a bitmap resource member can exist only within a unit member. Moreover, bitmap resources are stored statically and can not be modified at the runtime.
If your target system provides its own PNG image decoder, then Embedded Wizard can be configured to not convert nor compress the images. Instead, only references to image files residing in your target system are generated. The particular image decoder has to be connected with Embedded Wizard application through dedicated interfaces. Please note, this approach requires a special version of Embedded Wizard Platform Package.
Colored (native) vs. alpha-only bitmaps
The Graphics Engine of Embedded Wizard distinguishes between the following two bitmap formats, you can display on the screen:
Format name |
Short description |
|---|---|
NATIVE |
The bitmap stores both: color and opacity information. At the runtime, the opacity information of the bitmap can be additionally modulated by a solid value or a linear gradient. The colors of the bitmap, however, can't change. Internally, the native bitmaps are stored in the color format corresponding to the selected Platform Package. For example, with the Platform Package for the color format LumA44 every pixel of the native bitmap will store 4-bit luminance and 4-bit alpha information. |
ALPHA8 |
The bitmap stores the pure opacity information. As such it doesn't provide any color information. It is thus required to explicitly specify the desired color at the runtime as a solid color value or a linear color gradient. ALPHA8 bitmaps are ideal for all application cases, where monochrome icons should flash or change the colors dynamically at the runtime. |
Multi-frame and animated bitmaps
You can configure a bitmap resource to be treated as so-called multi-frame bitmap. In such case the content of the original image file is split in several equally sized frames. When displaying a multi-frame bitmap, the number of the desired frame needs to be specified explicitly.
Multi-frame bitmaps are ideal wherever several versions of one and the same image are necessary. For example, a button can display different versions of its icon depending on whether the user actually presses the button or not. Instead of creating individual bitmap resources for every possible button state you store the different versions of the icon as frames within one multi-frame bitmap resource.
Additionally, a multi-frame bitmap resource can be configured as containing an animated video sequence. When displaying such bitmap resource in a view (e.g. image view), the view will play back the bitmap frames autonomously.
Add new bitmap resource
★First switch to the Composer page for the respective unit member you want to add the new bitmap resource member.
★Then, in the Gallery window, ensure that the folder Resources is opened.
★Look in the folder for the template named Bitmap Resource.
★With the mouse, select the template and drag it into the Composer.
★Drop the template within the Composer.
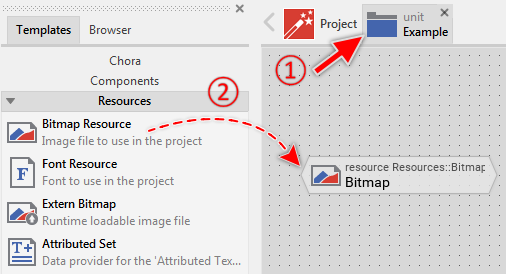
Adding a new bitmap resource member.
Alternatively you can add bitmap resources by conveniently drag-and-drop the original image files (*.PNG, *.JPG, *.BMP and *.GIF) directly from the MS-Windows file explorer into a Composer with an opened unit. Accordingly, Embedded Wizard adds for every image file a new bitmap resource member automatically. The bitmap resource members are already configured to refer to the original image files, so you don't need to specify the image files manually. To add new bitmap resources by drag-and-drop do following:
★First switch to the Composer page for the respective unit member you want to add the new bitmap resource members.
★In the MS-Windows file explorer select all interesting image files.
★With the mouse, grab and drag the selected files into the Composer.
★Drop the files within the Composer.
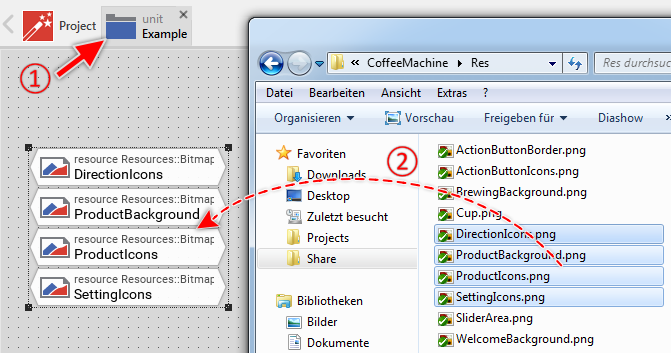
Adding new bitmap resource members by drag-and-drop the original image files from MS-Windows file explorer.
Name the bitmap resource
★First ensure, that the bitmap resource member is selected.
★Press the key F2 or select the menu item .
★Enter the new name in the Inspector window.
Bitmap resource members have a global character - they can be accessed from everywhere within your project. To address a bitmap resource member, you must always use its full name, which is composed of the unit name, the member is defined inside, and the name of the member itself, both separated by :: (double colon) signs. For example Widgets::IconOk.
Specify image file(s)
The image files to include by the bitmap resource are specified in its attributes FileName and/or AlphaName. With FileName you can specify the image file containing color and optionally opacity information. With the attribute AlphaName you specify the image file providing the pure opacity information.
If you add a bitmap resource by drag-and-drop the original image file directly from the MS-Windows file explorer into a Composer with an opened unit, Embedded Wizard configures the attribute FileName of the affected bitmap resource to refer to the original image file. The attribute AlphaName remains empty in this case. If desired, you can modify the attributes after performing the drag-and-drop operation.
Configure a multi-frame bitmap resource
Per default, every new bitmap resource is treated as containing a single frame with the size corresponding exactly to the of the original image file. In order to split the content of the image file in several smaller equally sized frames you have to specify the size of the frame in the attribute FrameSize. The frames are arranged in the row-major order starting with the first frame at the top-left corner of the image file:
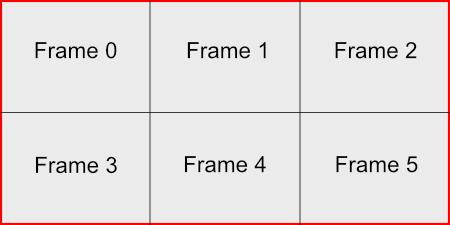
The order in which the content of the original image is split in frames.
IMPORTANT
Even when configured as multi-frame, the bitmap resource is still treated as a single entity. Accessing such multi-frame bitmap causes all embedded frames belonging to it to be loaded at once implicitly. With this it is ensured, that all frames are immediately available and can be displayed quickly without any additional delay.
Depending on the number of frames and the configured bitmap format mode this may impact the RAM usage in your target device. This is in particular essential when the frames within the bitmap resource are very large. In other words, accessing a bitmap resource containing 5 frames with 320 x 240 pixel frame size can be compared with accessing a bitmap containing a single frame with e.g. 640 x 600 pixel dimension.
Configure an animated bitmap resource
Multi-frame bitmap resources can additionally be configured as containing short animation sequences similarly to the frames in a movie. This is controlled by the attribute FrameDelay. If this attribute is initialized with a value > 0, the bitmap resource is considered as animated. The value determines the period between two consecutive frames.
Localize the bitmap resource
You can specify several, individual initialization expressions for the FileName, AlphaName, FrameSize and FrameDelay attributes, one for each language available in your project. The appropriate version is selected dynamically at the runtime when the bitmap resource is evaluated within a Chora expression. The selection is controlled by the global variable language.
Duplicate an existing bitmap resource
You can create any number of copies of an already existing bitmap resource member.
★First ensure, that the bitmap resource member is selected.
★Press the keys CtrlC and CtrlV in succession ...
★... or hold the key Ctrl pressed while you drag and drop the selected bitmap resource member.
★Finally rename the just duplicated bitmap resource member.
You can also Drag & Drop a bitmap resource member from the Browser into the Composer window and create so a duplicate of the affected member:
★First switch to the Composer page for the respective unit member, where you want to add the duplicate of the bitmap resource.
★Then ensure that the Browser window is visible.
★Within the Browser window locate the desired bitmap resource member. This can be done easily with Browser's own filter function.
★Select this bitmap resource member in the Browser window.
★Drag and drop the selected bitmap resource member into the Composer:
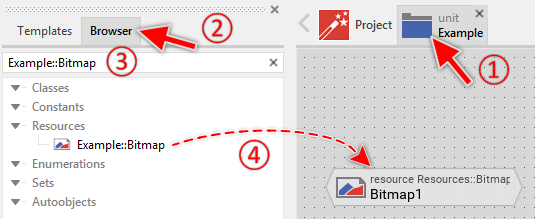
Duplicating a bitmap resource by simply Drag & Drop it between the Browser and Composer windows
★Finally rename the just duplicated bitmap resource member.
Please note, when you have two bitmap resource members configured with one and the same image file, then Embedded Wizard will treat both individually. In other words, the image file is converted twice and it is stored twice in the generated code.
Use the bitmap resource
Every bitmap resource is represented at the runtime by its own individual global instance of the Mosaic class Resources::Bitmap. As such bitmap resources can be involved within Chora expressions wherever an operand of the mentioned Mosaic class is expected. It can, for example, be assigned to a Bitmap property of a view able to display images. Moreover, the properties exposed by the Resources::Bitmap object can be evaluated. The bitmap resource itself is identified by its full name, composed of the unit name, the resource member is defined inside, and the name of the resource member itself, both separated by :: (double colon) signs. For example:
// Assign the bitmap resource 'Widgets::IconOk' to an image view SomeImageView.Bitmap = Widgets::IconOk; // Evaluate a property of the bitmap resource object var point size = Widgets::IconOk.FrameSize;
Please note, if the resource is localized for multiple languages, the right version is determined just at the evaluation time of the expression involving the bitmap resource. Let's assume, your project contains a bitmap resource Widgets::Flag localized for the both languages French and English, then the bitmap resource will result in different Resources::Bitmap instances depending on the currently selected language:
// Switch to the default (English) language language = Default; var Resources::Bitmap flag1 = Widgets::Flag; // Switch to the French language language = French; var Resources::Bitmap flag2 = Widgets::Flag; trace flag1; // Resource object: Widgets::Flag for language Default trace flag2; // Resource object: Widgets::Flag for language French
For the complete overview of available properties see the reference documentation of the Mosaic class Resources::Bitmap.
Lifetime of a bitmap resource
To prevent the system from loading the same resource twice, Embedded Wizard maintains all currently existing resource objects in an internal cache. Multiple accesses to one and the same resource result thus in the same instance of the Resources::Bitmap class. In the case, the bitmap resource is localized, Embedded Wizard will store for every variant an individual resource object in the cache. For example:
// Switch to the default (English) language language = Default; var Resources::Bitmap flag1 = Widgets::Flag; [ ... ] var Resources::Bitmap flag2 = Widgets::Flag; // Switch to the French language language = French; var Resources::Bitmap flag3 = Widgets::Flag; trace flag1 == flag2; // true trace flag1 == flag3; // false
If a bitmap resource object is not referenced anymore by any GUI component, the Garbage Collector deletes the object from the cache automatically.
Derive a variant of a bitmap resource
Every bitmap resource member can be overridden by one or more bitmap resource variant members. Once overridden, the variant member can retrospectively modify the initialization expressions of the original bitmap member. The derivation of variants provides the fundamental technique to manage several product and design variants within one and the same GUI application. The selection of the appropriate variant occurs automatically depending on the condition specified in the VariantCond attribute of the corresponding variant member.
Control the code generation
With the attribute Generator you can selectively control, whether the bitmap resource member should be taken in account during the code generation or not. Configuring this attribute with the value false will exclude the member from your project unless the member name is explicitly involved within a Chora expression.
Delete a bitmap resource
★First ensure, that the bitmap resource member is selected.
★Press the key DEL or select the menu item .
Attributes of a bitmap resource
The following table shows the complete list of attributes provided by the bitmap resource member:
Attribute name |
Short description |
|---|---|
Determines an image file with opacity information to use by a bitmap resource member. |
|
Determines the position and the size of a bitmap member brick within the Composer window. |
|
Contains the description for the bitmap member. |
|
Determines an image file with color and evtl. opacity information to use by a bitmap resource member. |
|
Controls the playback speed of an animated bitmap sequence represented by a bitmap resource member. |
|
Determines the size of a single bitmap frame in a multi-frame bitmap resource member. |
|
Controls the code generation for the affected bitmap member. |
|
Determines the class of a resource member. |