Project members: Autoobject
With an autoobject member you can define a global instance of a particular class. Usually autoobjects represent the data model of your application or serve as interfaces to the underlying target device. Since they are global, autoobjects can be accessed from everywhere in your project. Please note, an autoobject can exist only within a unit member. Per default, autoobjects are represented in Composer by following bricks:

An autoobject member appears in Composer and Inspector decorated with the icon associated to its class. Autoobjects of different classes can thus be distinguished conveniently. Moreover, the class of the autoobject is shown in the upper text row of the brick:

The brick shows the class of an autoobject and the associated icon.
Create new autoobject
You create a new autoobject by simply deriving it from an existing class. In the simplest case, if both, the class and the autoobject are defined within the same unit, do following:
★First ensure, that the class definition is selected.
★Then drag and drop the selected class while holding the keys CtrlAlt pressed.

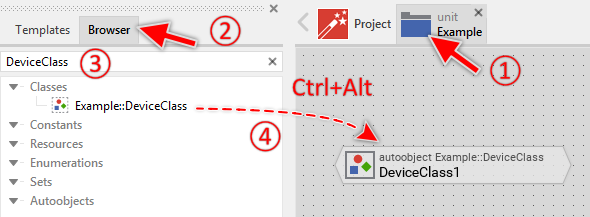
Creating a new autoobject by deriving it from a class existing within the same unit.
If the class is not defined within the same unit, you can use the Browser window:
★First switch to the Composer page for the respective unit member, where you want to add the new autoobject.
★Then ensure that the Browser window is visible.
★Within the Browser locate the desired class. This can be done easily with Browser's own filter function.
★Select the found class in the Browser window.
★Drag and drop the selected class into the Composer area while holding the keys CtrlAlt pressed.

Creating a new autoobject by using the Browser window.
Alternatively, you can create a new autoobject by using the clipboard functions Copy & Paste:
★First ensure, that the class definition from which you want to create the object is selected (e.g. in Composer, Inspector or Browser).
★Press the keys CtrlC or use the menu item to copy the selected class into the clipboard.
★Eventually switch to the Composer page for the respective unit member, where you want to add the new autoobject.
★Press the keys CtrlAltV or use the menu item to add a new instance of the class stored in the clipboard.
Name the autoobject
★First ensure, that the autoobject member is selected.
★Press the key F2 or select the menu item .
★Enter the new name in the Inspector window.
Autoobject members have a global character - they can be accessed from everywhere within your project. To address an autoobject member, you must always use its full name, which is composed of the unit name, the member is defined inside, and the name of the member itself, both separated by :: (double colon) signs. For example Examples::Device.
Modify the properties of an autoobject
When the autoobject is selected, you can inspect and modify its properties directly in the Inspector window. In particular, you can specify initial values for every property of the object. An autoobject exposes automatically all properties defined in its class.
If you have modified a property, you can simply revert to its original value (defined in the class of the autoobject) by pressing the keys CtrlR when the property in question is selected in Inspector.
Duplicate an existing autoobject
You can create any number of copies of an already existing autoobject definition.
★First ensure, that the autoobject definition is selected.
★Press the keys CtrlC and CtrlV in succession ...
★... or hold the key Ctrl pressed while you drag and drop the selected autoobject brick.
★Finally rename the just duplicated autoobject.
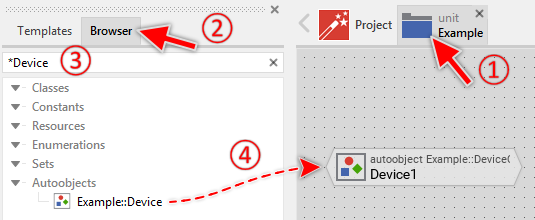
You can also Drag & Drop an autoobject member from the Browser into the Composer window and create so a duplicate of the affected member:
★First switch to the Composer page for the respective unit member, where you want to add the duplicate of the autoobject.
★Then ensure that the Browser window is visible.
★Within the Browser window locate the desired autoobject member. This can be done easily with Browser's own filter function.
★Select this autoobject member in the Browser window.
★Drag and drop the selected autoobject member into the Composer:

Duplicating an autoobject by simply Drag & Drop it between the Browser and Composer windows
★Finally rename the just duplicated autoobject.
Use the autoobject
Every autoobject is represented at the runtime by a global instance of the class, specified in autoobject's Class attribute. As such autoobjects can be involved within Chora expressions wherever an operand of this class is expected. Moreover, the properties exposed by the object can be evaluated and its methods can be invoked. The autoobject itself is identified by its full name, composed of the unit name, the autoobject member is defined inside, and the name of the autoobject member itself, both separated by :: (double colon) signs. Let's assume, your project contains a class Example::DeviceClass and an autoobject of this class named Example::Device, then following code accesses the autoobject:
// Assign the autoobject to a local variable var Example::DeviceClass someObject = Example::Device; // Evaluate properties and invoke methods of the autoobject if ( !Example::Device.IsEngineRunning ) Example::Device.StartSomeEngine();
Lifetime of an autoobject
Autoobjects are global entities. To prevent the system from creating the same object twice, Embedded Wizard maintains all currently existing autoobjects in an internal cache. Multiple accesses to one and the same autoobject result thus in the same instance. For example:
var Example::DeviceClass device1 = Example::Device; [ ... ] var Example::DeviceClass device2 = Example::Device; trace device1 == device2; // true
CAUTION
If an autoobject is not referenced anymore by any component within the running application, the Garbage Collector deletes the object from the cache automatically. This means, if the autoobject stores data, this information is lost then. To prevent an autoobject from being deleted, you can refer it permanently by a variable defined e.g. in the application component.
Derive a variant of an autoobject
Every autoobject member can be overridden by one or more autoobject variant members. Once overridden, the variant member can retrospectively modify the properties of the original autoobject member. The derivation of variants provides the fundamental technique to manage several product and design variants within one and the same GUI application. The selection of the appropriate variant occurs automatically depending on the condition specified in the VariantCond attribute of the corresponding variant member.
Control the code generation
With the attribute Generator you can selectively control, whether the autoobject member should be taken in account during the code generation or not. Configuring this attribute with the value false will exclude the autoobject from your project unless the autoobject is explicitly involved within a Chora expression.
Delete an autoobject
★First ensure, that the autoobject member is selected.
★Press the key DEL or select the menu item .
Attributes of an autoobject
The following table shows the complete list of attributes provided by the autoobject member. Please note, besides the attributes, an autoobject also exposes all properties defined in its class:
Attribute name |
Short description |
|---|---|
Determines the position and the size of an autoobject member brick within the Composer window. |
|
Determines the class of an autoobject member. |
|
Contains the description for the autoobject member. |
|
Controls the code generation for the affected autoobject member. |
