Platform Integration Aspects: Open-CMSIS-Pack Tutorial
The Open-CMSIS-Pack (OCP) is an open standard that delivers software components, device parameters, and development board support files. This project simplifies embedded development workflows and lifecycle management. An OCP may include source code, libraries, documentation, and example projects. In the context of Embedded Wizard, an Open-CMSIS-Pack serves as an excellent starting point for professional GUI development by providing a variety of technically versatile GUI examples directly to your development board.
The OCP system offers metadata for files associated with a software component, facilitating consistent software component upgrades, and identifying incompatible configuration files. It also outlines the build tools for projects based on software packs. The Open-CMSIS-Pack project, established in April 2021, is hosted, and managed by Linaro in collaboration with Arm, NXP, and ST.
There are several different pack types within the Open-CMSIS-Pack ecosystem. For now, it is helpful to understand the Device Support Pack and the Board Support Pack:
★Device Support Pack (DSP): A DSP provides information about a specific microcontroller or microcontroller family. This pack informs the Integrated Development Environment (IDE) about key information such as the flash size or the type of peripherals that can be connected to a microcontroller device.
★Board Support Pack (BSP): The BSP contains the necessary configuration files for a specific development board. For instance, information about the mounted display or GPIO configurations can be found within the BSP. Additionally, a BSP may include examples specifically configured for the development board it is made for.
An Embedded Wizard Open-CMSIS-Pack contains GUI examples for some of the most used IDEs. Currently, these examples are available for Keil MDK-ARM and IAR Embedded Workbench. In the following two sections, you will learn how to import, build, and download the examples with these IDEs.
Each example represents and encapsulated software development project which contains all necessary files and settings to get started quickly with your embedded GUI development!
Usage of Open-CMSIS-Packs with Keil MDK-ARM
This section offers a detailed guide on importing and using examples from an Open-CMSIS-Pack. The Open-CMSIS-Pack for Embedded Wizard provides a convenient way to access advanced GUI examples directly within your preferred Integrated Development Environment (IDE).
The following step-by-step guide is based on the NXP i.MX RT1060 development board, but the workflow remains consistent for any other development board that is supported by an Embedded Wizard Open-CMSIS-Pack. For a complete list of available Embedded Wizard Open-CMSIS-Packs, please refer to the section titled Available Embedded Wizard Open-CMSIS-Packs.
To import an Embedded Wizard GUI example with MDK-ARM, please follow these instructions:
★Step 1: Search for and start from the start menu. This step may vary depending on your operating system.

Keil MDK-ARM in Windows start menu.
★Step 2: Within the Keil MDK-ARM tool menu you can find a button to open the . Please click on this button.

Pack Installer in Keil MDK-ARM.
★Step 3: If you’re using the pack installer for the first time, a welcome message will be displayed. You can uncheck the checkbox to prevent this message from appearing the next time you start the pack installer. Please continue by clicking .
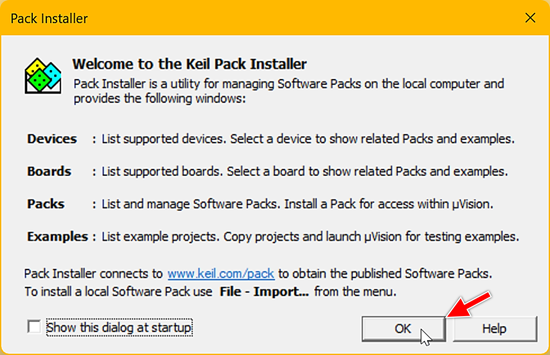
Pack Installer welcome message.
At this point, the Open-CMSIS mechanism updates the so-called pack index. This might take a moment, and once it’s done, you’ll be able to access a list of the latest available Open-CMSIS-Packs, including the Embedded Wizard packs.
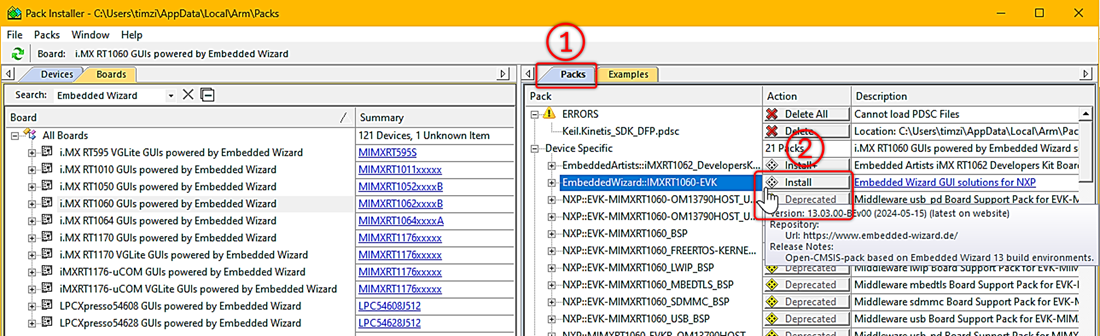
★Step 4: The OPC pack installer is divided into two parts. On the left side, you see the and tabs. With those menus you can filter for the exact microcontroller or board name. A board always has mounted at least one device, for example, the latest version of the i.MX RT1060 uses the MIMXRT1062CVL5A device. For a development board can exist multiple Board Support Packages (BSP). Upon selecting the desired board on the left side, you’ll see the window on the right side will update accordingly. The Embedded Wizard Open-CMSIS-Packs are designed as BSPs. Therefore, you can find them by navigating to the tab and searching for Embedded Wizard. This will list all BSPs which contain Embedded Wizard in its names. Additionally, the BSP name contains the development board name it is made for. To continue, please select the desired BSP on the left side. For this guide the pack named i.MX RT1060 GUIs powered by Embedded Wizard is used.

Pack Installer - Board selection.
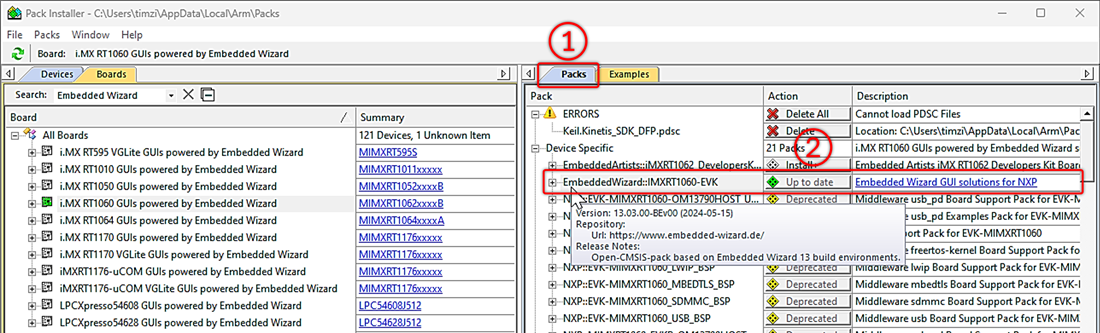
★Step 5: Upon selecting the board in the tabs, you’ll see the right section of the pack installer updates automatically. As next, please navigate to the tab and search for the pack named EmbeddedWizard::IMXRT1060-EVK. The names of the Embedded Wizard packs always start with EmbeddedWizard:: followed by the board name. The overview on the right side shows which packs are available for installation. If a pack is not installed, it is usually indicated by an button. Please press this button to initiate the pack installation. By hovering above the pack name, you can also inspect the pack metadata like the version or release notes.
Pack Installer - Pack selection.
★Step 6: Some packs require to accept a license agreement. Please enable the checkbox and continue by pressing .

Pack Installer - License Agreement.
★Step 7: The installation usually takes a moment. Once it’s done, you can see in the tab that the installation button has changed its caption to . This indicates that the pack is now locally available on your hard drive and content such as examples can be imported into your IDE.
Pack Installer - Available Embedded Wizard pack.
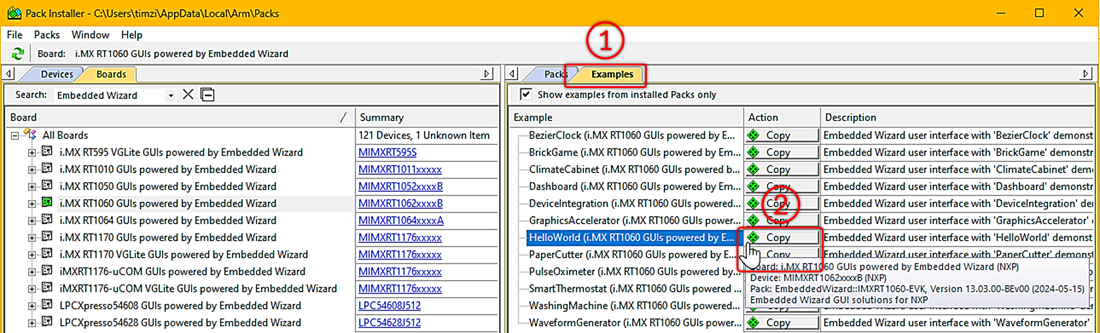
★Step 8: Now it’s time to check out which examples are available in your Embedded Wizard Open-CMSIS-Pack. To do so, please navigate to the tab. As you can see, plenty of examples are available for the NXP i.MX RT1060 development board. Depending on the board you have selected in step 4, your list of available examples might look different. Nevertheless, the HelloWorld example is available in all Embedded Wizard Open-CMSIS-Packs. Please click on to proceed.
Pack Installer - Example selection.
★Step 9: Before copying an Open-CMSIS-Pack example, Keil MDK-ARM asks for a workspace path. This is the folder where the example will be copied. It is recommended to keep this path short, for example, C:\workspace\u_vision would be a good choice. After selecting a path, press to copy the example project into it.

Example destination path.
★Step 10: As mentioned earlier, Open-CMSIS-Packs come in different variations. Some contain information about the microcontroller device, some contain software packages, and others contain board examples. When using a Board Support Pack (BSP) it is required to have installed the correct Device Family Pack (DFP). The installation of the DFP will be triggered automatically as soon as you import an example. Depending on the development board you have selected, the correct DFP will be downloaded and installed. Please continue by pressing .
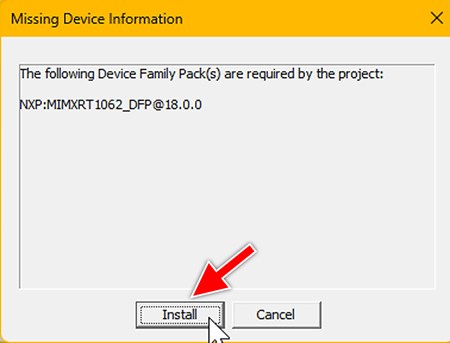
Automatic installation of pack dependencies.
★Step 11: Once all missing dependency packs are installed and the example is copied, Keil MDK-ARM will display the project. This project is ready-to-use, and you can build and download the Embedded Wizard GUI example right away. To do so, please press and verify the progress in the window.

Build after example import.
★Step 12: For downloading the binary into your development board please select to initiate the flash process.
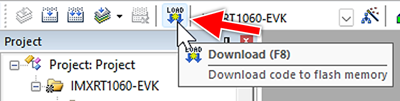
Download of binary onto device.
This action will open the flash tool in a separate window. Within that window you can verify the progress.
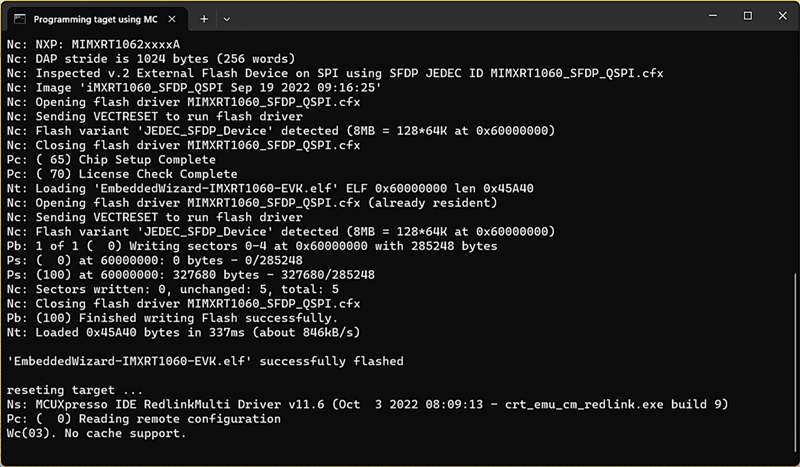
Download progress.
If everything works as expected, the application is now running on your i.MX RT1060 development board.

Embedded Wizard Hello World up and running.
★Step 13: When inspecting the workspace folder, you will find the example sources files. The file structure is the same as in our regular build environments. For each development board, a dedicated build environment with additional useful features is available. If you are interested in starting with an MCUXpresso project or Makefile, please refer to the Getting started with NXP MCUs section.
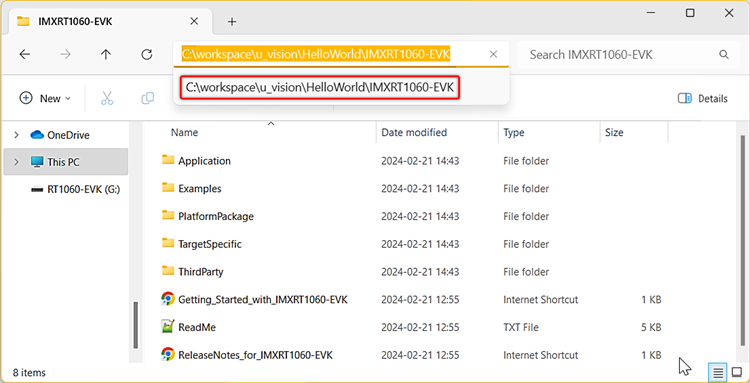
Example folder - Keil MDK-ARM.
Usage of Open-CMSIS-Packs with IAR Embedded Workbench
As a further option to start with the Embedded Wizard Open-CMSIS-Pack examples, you can use IAR Embedded Workbench to import, build, and download sophisticated embedded GUIs on your development board. The workflow with this Integrated Development Environment (IDE) is explained in the steps below.
★Step 1: Open your as usual.

IAR Embedded Workbench in Windows start menu.
★Step 2: As you can see from the tool menu, IAR Embedded Workbench comes with an integrated . Please open this tool by clicking on the CMSIS-Pack Manager button as shown in the illustration below.

CMSIS-Pack Manager in IAR Embedded Workbench.
★Step 3: Subsequently, the IDE will ask you to save a CMSIS-enabled workspace. Please proceed by selecting a path and continuing with . Upon saving the workspace, it might take a moment until the CMSIS-Pack Manager has updated the pack index and other internal information. This ensures you will have access to the latest available packs such as the Embedded Wizard packs.
IMPORTANT
The IAR compiler does not allow paths longer than 256 characters. Therefore, keep the workspace path short, for instance, choose C:\workspace\iar.

Configuration of workspace.
★Step 4: The CMSIS-Pack Manager will open in a separate window and should look as shown in the illustration below. This window must be open for the entire time you work with your CMSIS-enabled workspace. In case you close it accidentally, it will open again automatically. Within the CMSIS-Pack Manager, you can find the tab, please open it. To find Embedded Wizard GUI examples, please use the search field and type Embedded Wizard. This will list all boards for which an Embedded Wizard pack is available. As next, perform a right-click on the desired board and click on .

CMSIS-Pack Manager - Board selection.
★Step 5: Within the tab, you can inspect the components and examples available once the pack is installed. For this guide, a NXP i.MX RT1060 is used. Please proceed with .

CMSIS-Pack Manager - Pack installation.
★Step 6: Please accept the Embedded Wizard License Agreement and continue with . This will initiate the download and installation which usually takes a short moment. If you wish to verify the installation process, you can do so with the tab.

CMSIS-Pack Manager - License Agreement.
★Step 7: Once the pack is installed, please navigate back to the tab. In the examples section, you now can see that a copy feature is available for each of the examples. An example represents a read-to-use IDE project perfectly pre-configured for the development of an Embedded Wizard GUI. Depending on the development board you use, the list of examples may look different. Nevertheless, the example is available with each Embedded Wizard Open-CMSIS-Pack. Please select an example and proceed by pressing .
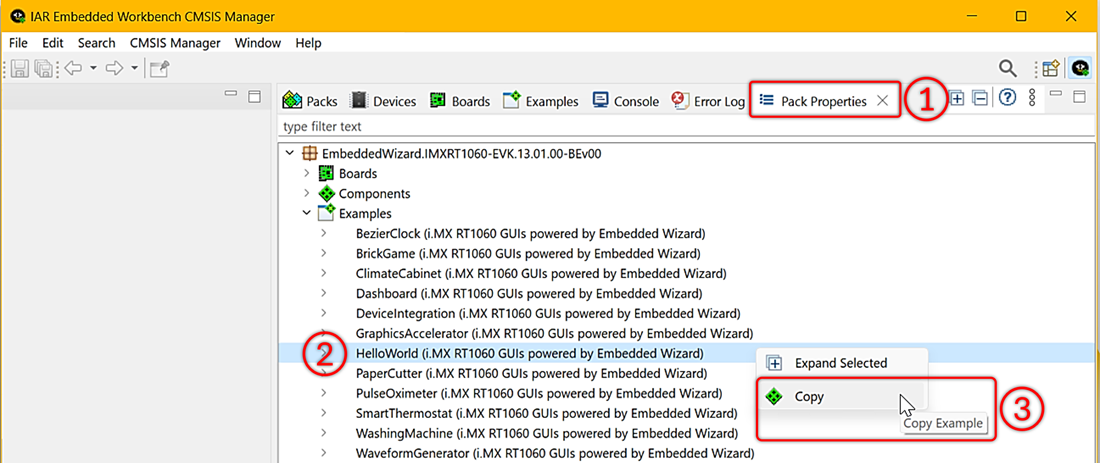
CMSIS-Pack Manager - Example selection.
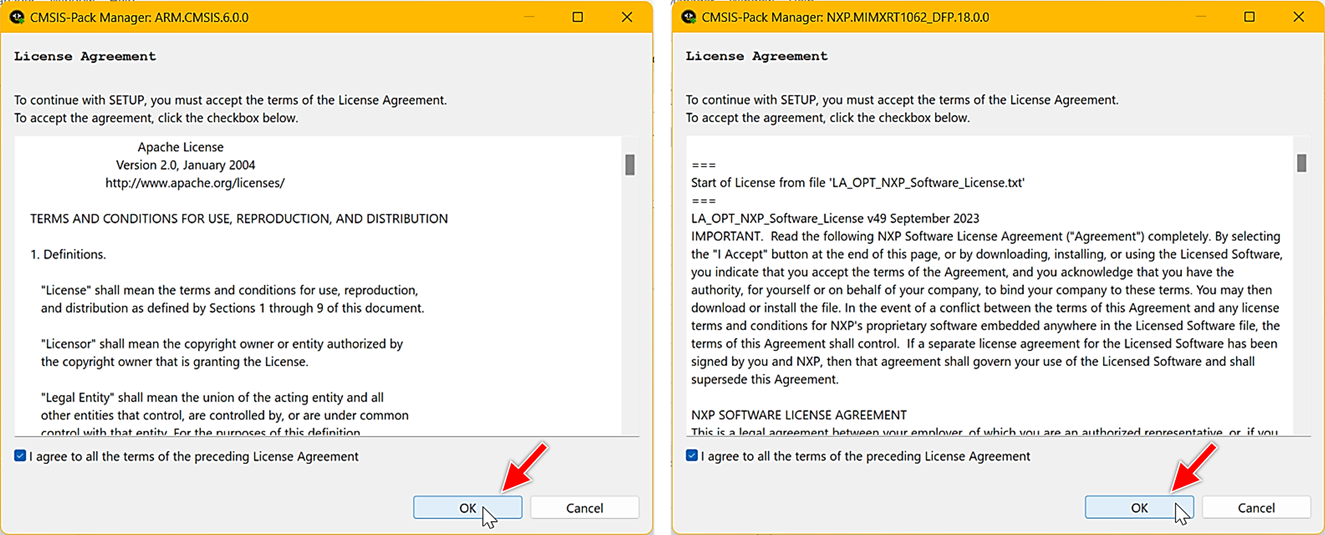
★Step 8: As you've learned in the introduction section, an Open-CMSIS-Pack may require other packs to be installed with external software components or device information. As soon as you copy an example, the CMSIS-Pack Manager resolves all dependencies and will prompt for each of it an installation dialog. You must install these dependency packs to be able to compile and download the Embedded Wizard GUI on your development board. Please agree to the license agreements and continue by pressing .
CMSIS-Pack Manager - Automatic installation of pack dependencies.
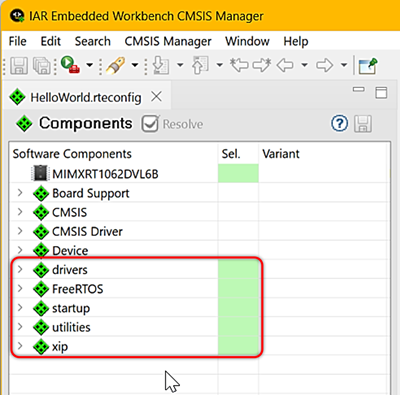
★Step 9: Upon successful installation of all pack dependencies and importing of the example into your workspace folder, you can see that the left section of the CMSIS-Pack Manager now contains the list of the used software components. This list may look different depending on the selected development board. Only components which are highlighted in green are in use in the example project.
Active CMSIS software components.
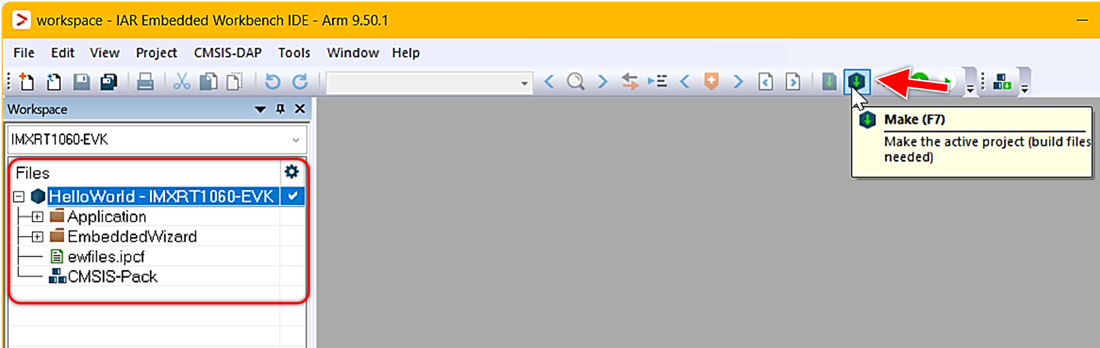
★Step 10: So far, all required actions have been taken with the CMSIS-Pack Manager. Next, please minimize the CMSIS-Pack Manager window and maximize the IAR workspace window. In the file explorer, you can now find the example’s file structure. This example project is ready-to-use and can be compiled right away by pressing .
Build after example import.
Within the window, you can inspect the compilation progress. Please wait until Build succeeded appears.
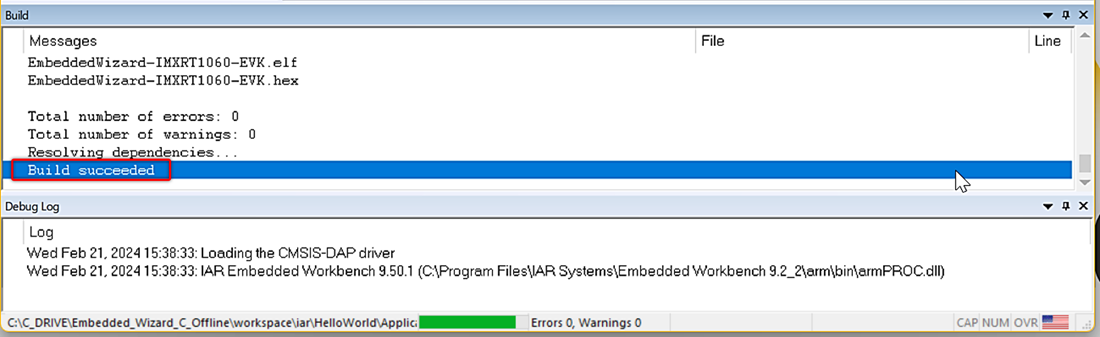
Successful build process.
★Step 11: The final step is to download the binary onto your development board. To do so, please select the option from the tool menu.
Download of binary onto device.
The download process may take a moment and will be indicated with a popup window.

Download progress.
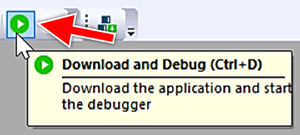
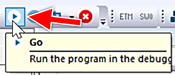
★Step 12: Once the binary is downloaded, start the application by pressing .
Running of the Embedded Wizard example.
If everything works as expected, the application is now running on your i.MX RT1060 development board.

Embedded Wizard Hello World up and running.
★Step 13: When inspecting the workspace folder, you will find the example sources files. The file structure is the same as in our regular build environments. For each development board, a dedicated build environment with additional useful features is available. If you are interested in starting with an MCUXpresso project or Makefile, please refer to the Getting started with NXP MCUs section.
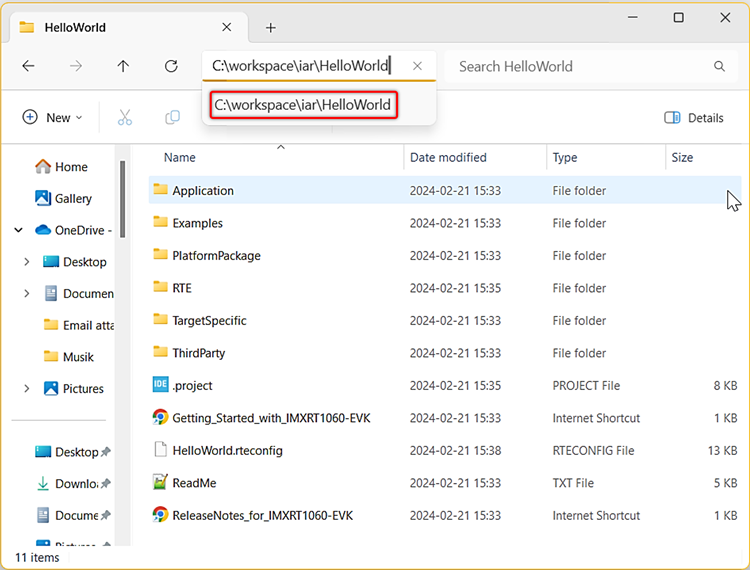
Example folder - IAR Embedded Workbench.
Updating the Embedded Wizard GUI
The example GUIs available in the Open-CMSIS-Packs are made with Embedded Wizard Studio. With it you can easily modify your embedded GUI and recreate the source files used in the example IDE project. The following section explains how to open and modify the GUI project with the Embedded Wizard Studio. Since the usage and handling of the Embedded Wizard Studio is not a part of this article, please also refer to the Welcome to Embedded Wizard and Basic concepts article to understand how to use Embedded Wizard Studio.
★Step 1: In step 13 of the previous sections, you inspected the example’s file structure. Within it you can find a folder named Examples. This folder contains the Embedded Wizard GUI project files. With this project you can recreate the UI source code. Let’s assume you have used the recommended workspace folders from above, then you can find the Embedded Wizard GUI project in C:\workspace\u_vision\HelloWorld\IMXRT1060-EVK0x272\HelloWorld respectively C:\workspace\iar\HelloWorld\IMXRT1060-EVK0x272\HelloWorld. Depending on the used development board and example, this path may vary. Please adapt it accordingly and navigate to the GUI project file. In case you have already installed Embedded Wizard Studio, you can open HelloWorld.ewp with the right-click context menu. If you are missing the Embedded Wizard Studio, please refer to the download page.

Opening of GUI project with Embedded Wizard.
★Step 2: Upon opening the GUI project file, you will see the start screen which lists all units used in the GUI project. The main canvas area is a part of the Application unit. Therefore, please double click it.
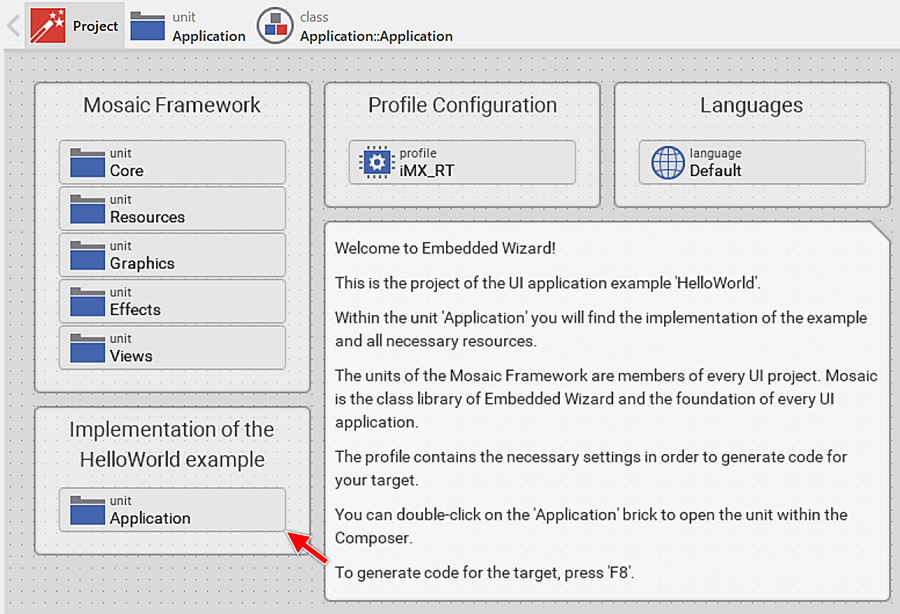
GUI project overview.
★Step 3: By navigating further down the project structure, you will end up displaying the GUI start screen.
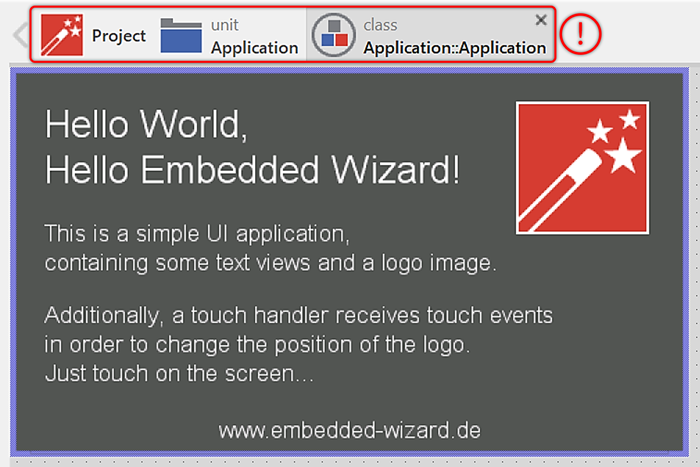
Hello world canvas area.
★Step 4: On the right side you can find the so-called Inspector view. With it you can modify the GUI elements such as the text label which contains Hello Embedded Wizard. Please change its parameter String to Hello Open-CMSIS.
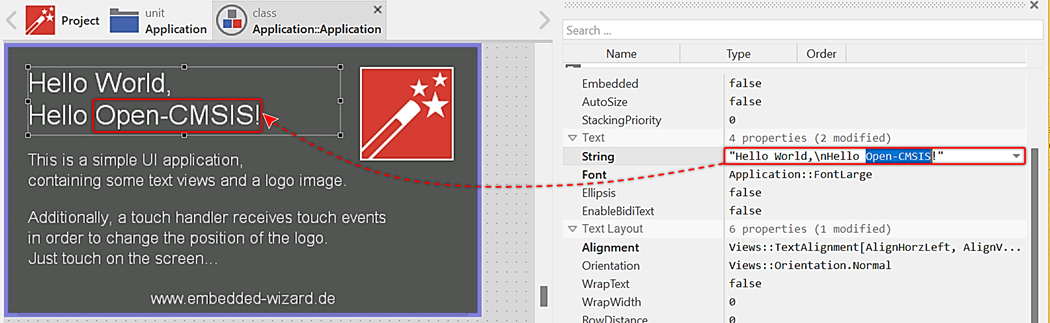
Modification of GUI content.
★Step 5: To recreate the GUI source files, please press the button. You can find this feature in the tool menu.

Building of updated GUI code.
★Step 6: For updating the GUI on your development board, you have to compile and download the binary again. This process is already explained in Step 11 and Step 12 within the introduction sections from above. Therefore, please repeat these steps. Upon successful completion, you will see the updated GUI on your development board’s screen.

Updated GUI up and running on target.
Available Embedded Wizard Open-CMSIS-Packs
Currently follwing Embedded Wizard Open-CMSIS-Pack are available for download within Keil MDK-ARM and IAR Embedded Workbench. Please refere to follwing list for manual download and forward to our regular build environments.
★EmbeddedWizard.LPCXpresso54608.pack (Download - Getting started with LPCXpresso54608)
★EmbeddedWizard.LPCXpresso54628.pack (Download - Getting started with LPCXpresso54628)
★EmbeddedWizard.IMXRT1010-EVK.pack (Download - Getting started with i.MX RT1010)
★EmbeddedWizard.IMXRT1050-EVK.pack (Download - Getting started with i.MX RT1050)
★EmbeddedWizard.IMXRT1060-EVK.pack (Download - Getting started with i.MX RT1060)
★EmbeddedWizard.IMXRT1064-EVK.pack (Download - Getting started with i.MX RT1170 - PXP)
★EmbeddedWizard.IMXRT1170-EVK-PXP.pack (Download - Getting started with i.MX RT1170 - VGLite)
★EmbeddedWizard.IMXRT1170-EVK-VGLite.pack (Download - Getting started with iMXRT1176-uCOM - PXP)
★EmbeddedWizard.IMXRT1176-uCOM-PXP.pack (Download - Getting started with iMXRT1176-uCOM - VGLite)
★EmbeddedWizard.IMXRT1176-uCOM-VGLite.pack (Download - Getting started with i.MX RT595 - VGLite)
★EmbeddedWizard.IMXRT595-EVK-VGLite.pack (Download - Getting started with RT595 - VGLite)