Using timers and animation effects: Move and resize rect
The Mosaic class Effects::RectEffect implements an animation object specialized to calculate a transition between two rect key values. This so-called Move and resize rect Effect can be used to enrich your GUI component with animations, in particular to control the properties of views embedded within the GUI component. At the runtime, the Effect object modifies the property with values resulting from the interpolation between the specified key values. For example, you can smoothly move or resize a Border view by simply animating its property Bounds.
If you don't intend to connect the Effect with a property, you can connect it with a slot method and implementing it control the views within your GUI component more flexibly. Additionally you can precisely configure the timing behavior of the animation, in particular its duration, the number of repetitions, the course of the easing curve, and much more.
The following sections are intended to provide you an introduction and useful tips of how to work with the Move and resize rect Effect object. For the complete reference please see the documentation of the Effects::RectEffect class.
Please note, that this Effect object is optimized to handle with rect values only. Other data types are supported by the Effects Change int32, Change float, Pulse color, Move point and Change bool.
Add new Animation Effect object
To add a new Animation Effect object just at the design time of a GUI component do following:
★First ensure that the Templates window is visible.
★In Templates window switch to the folder Effects.
★In the folder locate the template Move and resize rect.
★Drag & Drop the template into the Composer window:
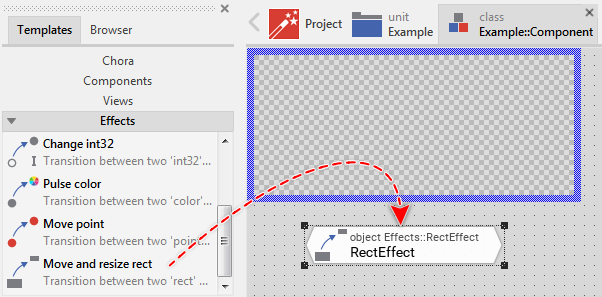
★Eventually name the new added Effect object.
Inspect the Animation Effect object
As long as the Effect object is selected you can inspect and modify its properties conveniently in the Inspector window as demonstrated with the property Enabled in the screenshot below:
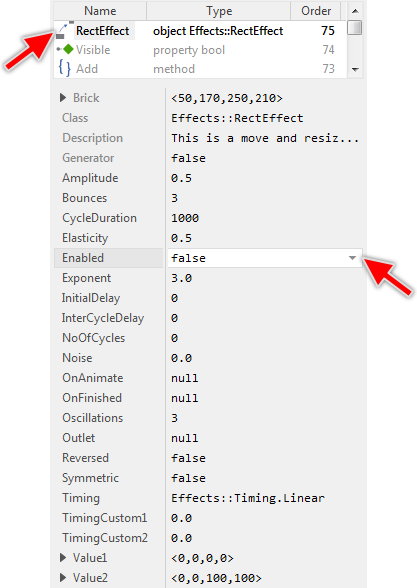
This is in so far worth mentioning as all following sections describe diverse features of the Effect object by explicitly referring to its corresponding properties. If you are not familiar with the concept of a property and the usage of Inspector window, please read first the preceding chapter Compositing component appearance.
Specify the key values for the transition
The Effect object describes the animation as a continuous transition between two predetermined key values. At the runtime, when the animation is active, the both values are used to interpolate between them the actual progress of the animation as function of the elapsed time. For example, a simple effect to move horizontally a 100x100 pixel large view from the upper left corner 50 pixel far away could be configured as transition between the key value <0,0,100,100> and <50,0,150,100>. The following figure demonstrate the idea of key values and the interpolated curve lying in between:
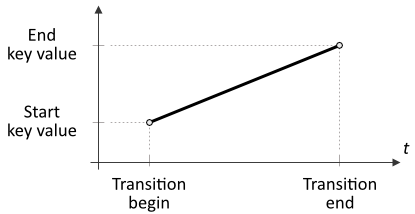
To specify the key values the Effect object provides the properties Value1 and Value2. Under normal circumstances, the property Value1 determines the value at the begin of the transition. In turn, Value2 determines the value at its end. Accordingly, to implement the above mentioned movement example you have to initialize the property Value1 with <0,0,100,100> and Value2 with <50,0,150,100>.
TIP
Per default, the Effect object interpolates between Value1 and Value2 linearly. By specifying other timing (easing) function you can perform more sophisticated transition effects.
Connect the Animation Effect with a property to animate
The Animation Effect implements an interface for easy coupling it with a property you want to animate at the runtime. In this manner the Effect object is able to access and directly modify the property without the need that you write a single line of code. This convenient approach, however, is limited to one property. If you want multiple properties being controlled by the same Effect object, you don't come around implementing an OnAnimate slot method.
The connection is established by initializing the Effect's property Outlet with a reference to the property you in fact intend to animate. The reference is built by prefixing the name of the desired property with a reference operator ^. For example, if you want the Animation Effect to control the Bounds property of a Border view named Frame, you have to initialize Outlet with the expression ^Frame.Bounds as shown in the screenshot below. Please note, that using the Inspector Assistant you can conveniently select the right property:

Once initialized Outlet with a reference to the desired property and the Animation Effect is started, the affected property is continuously modified with values resulting from the interpolation between the specified key values. You can imagine, in this manner using the reference the Effect object can control the property remotely.
IMPORTANT
The Move and resize rect Effect can be connected only with a property declared with rect data type. Trying to initialize Outlet with a reference to a property of other data type will lead to Chora compilation errors. If your application case requires the Move and resize rect Effect to control properties of other data types, you can add an OnAnimate slot method and within it put the initialization of the affected properties including the necessary type conversion and arithmetic operations.
The following example demonstrates how simple it is to connect the Move and resize rect Effect with a property in order to animate the position and the size of a view:
Please note, the example presents eventually features available as of version 8.10
Implement the OnAnimate slot method
In the most cases it is sufficient to connect the Effect object with the property you intend to animate by using the Outlet technique described in the section above. This approach is very simple and convenient. It is however limited to a connection established with exact one rect property.
If your application case requires a more flexible approach, you can implement a slot method and connect it with the Effect by assigning the method to its property OnAnimate. When the animation progresses the Effect object sends signals to the slot method. This approach permits you to implement more complex functionality to execute during the animation. This is in particular useful if you need to control multiple properties by a single animation object (e.g. to move several views simultaneously). The following are the steps how to implement this approach:
★First add a new slot method to your GUI component.
★Assign the slot method to the property OnAnimate of the Effect object.
★Open the slot method for editing.
★In the Code Editor implement your desired functionality to perform during the animation.
The Effect object stores the current state of the animation in its variable Value. During the animation progresses the variable is updated continuously with values resulting from the interpolation between the specified key values. Accordingly, by evaluating the variable Value your implementation of the OnAnimate slot method can query the current progress of the transition. For example, you can use Value to initialize with it multiple properties of views you want to move or resize simultaneously or you calculate with the current Effect value. In the following Chora code, the OnAnimate slot method moves several Image views at once arranged one below the other:
SomeImage1.Bounds = Effect.Value; SomeImage2.Bounds = Effect.Value + <0,100>; SomeImage3.Bounds = Effect.Value + <0,200>;
The following example demonstrates a simple implementation of an OnAnimate slot method to move several views simultanously by additional calculating with the current Effect value:
Please note, the example presents eventually features available as of version 8.10
Start, stop and restart the animation
Per default, new added Effect objects are inactive. To start the Effect you have to set its property Enabled to the value true. Setting this property to the value false stops and resets an active Effect object again. When you have configured this property with the value true already at the design time in the Inspector window, the Effect will start immediately as soon as the GUI component, this Effect belongs to, is instantiated.
Sometimes it is necessary to reset and restart an already active Effect object. For this purpose you simply set its property Enabled to the value false and then again to the value true as demonstrated in the Chora code below:
// If the effect is already active, stop and reset it now. // If the effect was inactive, nothing will happen. Effect.Enabled = false; // Then start the effect again. Effect.Enabled = true;
You can start and stop the Effect object also by sending signals to its corresponding slot methods StartEffect and StopEffect. This results in the same operation as if the property Enabled were set true or false. The additional slot methods are convenient when you intend to chain several Effect objects together.
Specify the duration of the animation
The Effect classes implement various properties permitting you to precisely configure the course of the animation. The first and most important is the property CycleDuration. With it you specify how long should the animation take for the transition between the start and the end key values. This property is expressed in milliseconds. For example, when you initialize CycleDuration with the value 250 and you start the animation, the transition will take 250 milliseconds.
With the property InitialDelay you can specify an additional delay to wait before the animation may begin with its first transition. This value is expressed again in milliseconds. Accordingly, initializing InitialDelay with 1000 will cause the Effect object just after it has been activated to pause for 1000 milliseconds before the transition begins.
Per default, as long as an Effect object is enabled, its transition is repeated endlessly. In other words, after the transition has reached the end value, the animation starts again with the start value. This can be controlled more exactly by modifying the property NoOfCycles. Initializing this property with the value 4 will cause the animation to repeat the transition four times. Afterwards the animation stops and deactivates itself. Accordingly, if you want to limit the animation to a single run, you have to initialize NoOfCycles with the value 1. Initializing NoOfCycles with 0 (zero) restores the default behavior of the transition being repeated endlessly.
When the animation is configured to repeat the transition, you can specify an additional delay to pause the animation after one transition is finished and the next following begins. For this purpose initialize the property InterCycleDelay with the desired delay expressed in milliseconds. For example, initializing InterCycleDelay with the value 100 will cause the animation to pause between two consecutive transitions for 100 milliseconds.
Although the properties CycleDuration, InitialDelay and InterCycleDelay accept values expressed in milliseconds, the actual precision of an Effect object depends on the resolution of the hardware available in the particular target device.
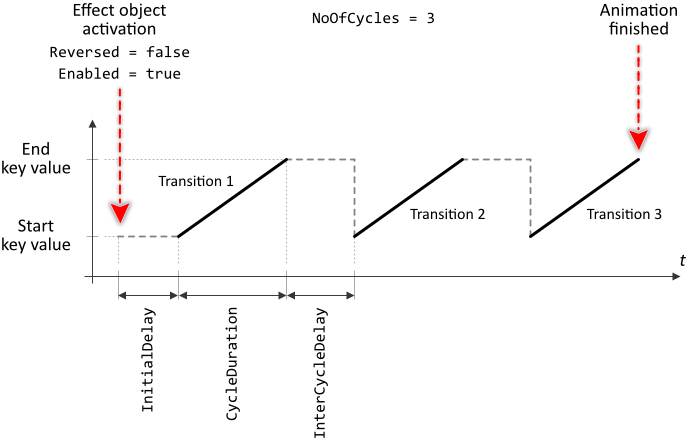
The following figure demonstrates the effect of the just described properties. Here the animation is configured to repeat the transition 3 times before it stops:
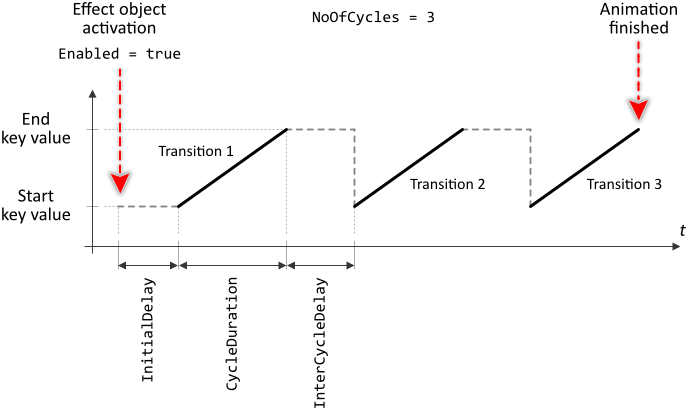
The following example contains an Effect object configured to repeat the transition three times in total as demonstrated in the figure above:
Please note, the example presents eventually features available as of version 8.10
Specify the timing function (easing) for the transition
During the transition, the current value of the animation is calculated by interpolating it between the specified start and end key values. This is per default performed linearly and as such not really exciting. By using the property Timing you can select another, more sophisticated function to interpolate the values.
The most popular timing functions are named EaseIn_FastOut and FastIn_EaseOut. Analog, the transition configured with the respective function starts slowly (or fast) and then speeds up (or slows down) until the end key value has been reached. You can imagine, that using them for a movement animation the speed of the animated object will increase or decrease continuously. The following figures present the course of the both timing functions:
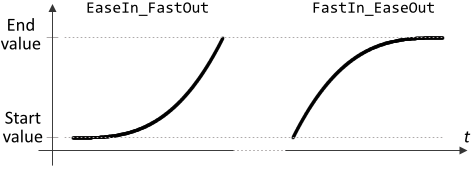
The property Timing is declared with the enumeration data type Effects::Timing. The above mentioned function names are just members within this enumeration. Thus, when initializing the property Timing it is obligatory, that you always specify the complete enumeration name, for example Effects::Timing.EaseIn_FastOut.
Other two popular functions EaseIn_EaseOut and FastIn_FastOut are ideal when you want the transition both to start and end slowly (or even fast) as presented in the graphs below:
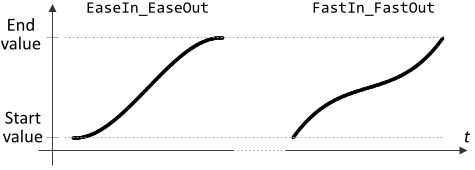
The following three functions Power_In, Power_Out and Power_InOut work similarly, however you can configure them more precisely. These functions are based on the common equation f(t)=t^Exponent with the value of the equation operand Exponent represented by the homonymous property Exponent. The larger the value, the more steep the function course. With the default initialization of this property (value 3.0) the timing functions are as follows:

The functions Exp_In, Exp_Out and Exp_InOut are based on the common equation f(t)=(exp(Exponent*t)-1.0)/(exp(Exponent)-1.0) with the value of the equation operand Exponent represented by the homonymous property Exponent. The larger the value, the more steep the function course. With the default initialization of this property (value 3.0) the timing functions are as follows:

The functions Back_In, Back_Out and Back_InOut are based on the common equation f(t)=t^3-t*Amplitude*sin(t*180) with the value of the equation operand Amplitude represented by the homonymous property Amplitude. The larger the value, the larger the setback. With the default initialization of this property (value 0.5) the timing functions are as follows:

The functions Bounce_In, Bounce_Out and Bounce_InOut implement a sophisticated bounce timing function. The total number of bounces is determined by the property Bounces. How much the amplitude is increased or decreased with every bounce is determined by the property Elasticity. With the default initialization of the property Bounces (value 3) and Elasticity (value 0.5) the timing functions are as follows:

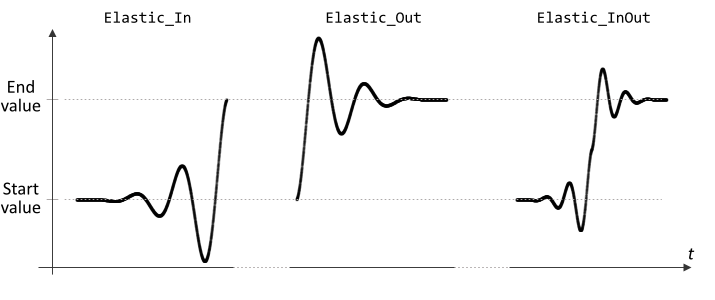
The functions Elastic_In, Elastic_Out and Elastic_InOut are based on the common equation f(t)=t^3*sin(t*90*(1+4*Oscillations)) with the value of the equation operand Oscillations represented by the homonymous property Oscillations. The larger the value, the more oscillations are included. With the default initialization of this property (value 3) the timing functions are as follows:
The following three functions Circle_In, Circle_Out and Circle_InOut are based on the common equation f(t)=1-sqrt(1-t^2). The timing functions are as follows:

Finally, the following three functions Sine_In, Sine_Out and Sine_InOut are based on the common equation f(t)=sin(t*90). The timing functions are as follows:

In practice there is no special recommendation to select the right function for the particular application case. When you understand the above presented graphs you can imagine how the respective timing functions will affect the resulting transition. Accordingly you are able to select the optimal function for your desired animation. Or, you simply try out several functions until you find the right one. Please remember, that many of the functions can be additionally configured. The following example provides a simple comparison of the various timing functions:
Please note, the example presents eventually features available as of version 8.10
Please note, besides the above listed functions, the Effect objects support also the timing named Custom. This function, however, exists just for compatibility purpose with older Embedded Wizard versions. It is not necessary to use it in new projects.
Configure symmetric transition
Per default, the transition begins with the start and terminates with the end key values. By setting the property Symmetric to the value true, the transition will both begin and terminate with the start key value. The end key value is reached on the half way. The resulting timing function course appears to be mirrored in the middle of the transition. You can imagine, that applied to a movement animation, the animated object returns to its start position when the transition ends. The following graphs demonstrate the effect of this property on various timing functions:

Add random noise
Additional to the above described possibility to select a timing function, the course of the transition can also be modulated by a super-imposed random noise. This results in the transition becoming slightly fidgety. You can imagine, that with such random noise applied to a movement animation, the animated object will prance around its actual position.
The random noise is configured by the property Noise. This property expects values lying in the range 0.0..1.0. The larger the value the more intense the noise affect. Initializing Noise with 0.0 (zero) disabled the noise function. The following graphs present the course of the default Linear timing function with the random noise configured with different values:

Revert the direction of the animation
With the property Reversed you control the playback direction of the animation. Per default, this property is initialized with the value false causing the animation to be played forward as usually expected and demonstrated again in the figure below. Please note, that with this setting the transitions begin always with the start key value:
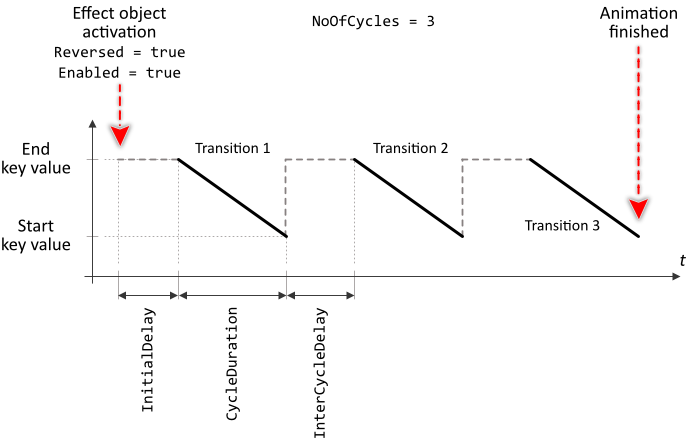
If this property is set true still before the animation is started, the Effect object will behave as if it had been configured with exchanged start and end key values and the timing function mirrored. All other aspects like the eventually specified InitialDelay and InterCycleDelay remain unaffected. In other words, the Effect object plays the transitions reverse beginning with the end key value. The following figure demonstrates the resulting course of such animation:
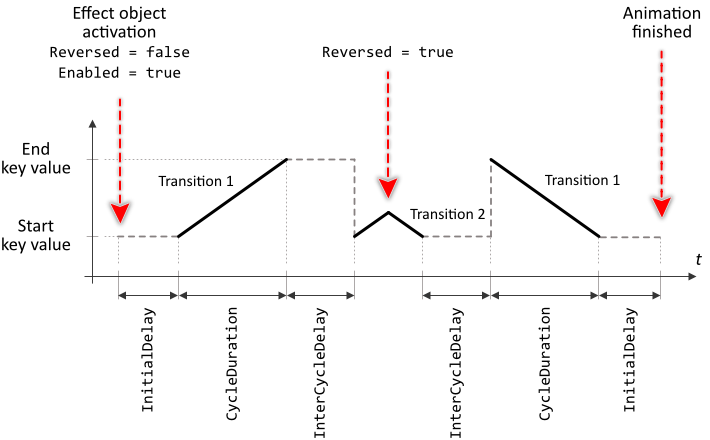
Modifying Reversed while the Effect object is already active will cause the playback direction being changed immediately. Accordingly all previously traversed transitions are rewinded till the origin of the animation is reached again. You can imagine, the Effect object behaves as if the time would go back. The following figure demonstrates how the Effect object reacts to the change of the animation direction while it is active:
The possibility to reverse an Effect is a very convenient feature if you need to change the course of an active animation. Instead of deactivating the Effect and starting a new one, you can simply instruct it to revert its direction. In this manner it is unnecessary to calculate from the latest state of the stopped Effect the start condition for the new one, which may become really complicated or even impossible if the Effect was configured with a non-linear timing function.
The following example demonstrates the usage of the property Reversed to enlarge an Bitmap Frame view as long as the user touches the screen. When the user releases the screen, the Frame view restores its original size again. This works even if the user has tapped the screen for a period shorter than the Effect duration:
Please note, the example presents eventually features available as of version 8.10
Implement the OnFinished slot method
If your application requires to react to the end of the animation, you can implement a slot method and connect it with the Effect object by assigning the method to its property OnFinished. As soon as the animation has reached its end position, the Effect object will send a signal to this slot method. Thereupon, the method can complete the operation. The following steps describe how to do this:
★First add a new slot method to your GUI component.
★Assign the slot method to the property OnFinished of the Effect object.
★Open the slot method for editing.
★In the Code Editor implement your desired functionality to perform at the end of the animation.
For example, it is sometimes necessary to suppress user inputs when activating an animation in order to avoid eventual interferences. With the OnFinished slot method you can restore the event handling again as soon as the animation is done. The following example implements this approach:
Please note, the example presents eventually features available as of version 8.10
Please note, if the Effect object is configured to run an endless animation, the animation will never stop as long as it is active. In such case, the slot method associated to the property OnFinished will never receive a signal.
Chain several Animation Effects together
With the above described OnFinished property it is easy to combine several Animation Effects together so that the end of one animation causes another one to be activated automatically. In principle, you can chain as many Effect objects together as your application case requires, creating in this manner complex animation sequences.
To chain two Effect objects, you assign the StartEffect slot method of one Effect object to the OnFinished property of another object. The following example demonstrates this application case with six Effect objects, configured to mutually activate each other:
Please note, the example presents eventually features available as of version 8.10
Animation Effects and Garbage Collection
When a GUI component is discarded, all active Animation Effect objects existing inside it are automatically disabled. In other words, you don't need to worry about active effects. They never prevent the components from being reclaimed by the Garbage Collector.
Animation Effects and user interaction
Per default, while an Animation Effect is running, the application will continue processing all user inputs. This means in particular, that the user can unhamperedly interact with the application while e.g. an indicator GUI component is blinking or a list scrolls its contents.
This, however, is not always the desired behaviour. You can imagine the situation of an Effect object used to drive a transition between two GUI components (e.g. to fade-in a new screen while the old screen is faded-out). In the short time while the transition is active the both components are (partially) visible and their functionality is eventually accessible for the user.
Touching the screen or pressing a key on a real keyboard while such transition is in progress may cause the involved GUI components to unexpectedly start operations, which then can interfere with the just active transition. In worst case, the entire application can enter in an incoherent state preventing the user from being able to continue working with the application.
In order to protect your application from such critical situations, the application component provides two methods BeginAnimation and EndAnimation. Invoking the method BeginAnimation suppresses temporarily the entire application from being able to handle user inputs. Invoking EndAnimation restores this ability again.
In practice, you invoke the method BeginAnimation just in moment your implementation starts the Effect to drive a critical animation. From now, the application will ignore user inputs. Later at the end of the animation, you invoke the method EndAnimation, which on its part re-enables the event handling again. With the built-in variable rootthis you can obtain access to the application component. For example:
// Just in the moment you start an animation .... SomeEffect.Enabled = true; // ... suppress the event handling rootthis.BeginAnimation(); [...] // Later, when the animation is done you restore the event handling again rootthis.EndAnimation();
Internally the both methods do manage a counter, which is incremented with every BeginAnimation invocation and decremented with every invocation of EndAnimation. As long as the value of the counter is greater than 0 (zero) the event handling is suppressed. Thus, if you are starting several Animation Effects, you can invoke BeginAnimation for every started Effect and EndAnimation for every ended Effect. As soon as all Effects are done, the event handling is re-enabled.
