Using timers and animation effects: Timer
With the Mosaic class Core::Timer you can trigger operations after a specified time interval is elapsed. This so-called Timer object can be used within your GUI component wherever delayed or periodical actions should be performed, in particular to implement animations or time-outs.
The following sections are intended to provide you an introduction and useful tips of how to work with the Timer object. For the complete reference please see the documentation of the Core::Timer class.
Add new Timer object
To add a new Timer object just at the design time of a GUI component do following:
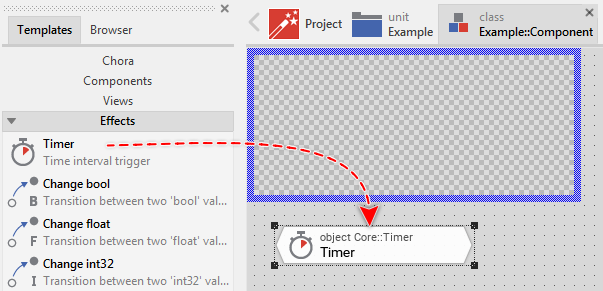
★First ensure that the Templates window is visible.
★In Templates window switch to the folder Effects.
★In the folder locate the template Timer.
★Drag & Drop the template into the Composer window:
★Eventually name the new added Timer.
Inspect the Timer object
As long as the Timer object is selected you can inspect and modify its properties conveniently in the Inspector window as demonstrated with the property Enabled in the screenshot below:
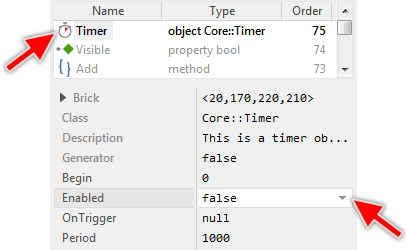
This is in so far worth mentioning as all following sections describe diverse features of the Timer object by explicitly referring to its corresponding properties. If you are not familiar with the concept of a property and the usage of Inspector window, please read first the preceding chapter Compositing component appearance.
Implement the OnTrigger slot method
Every time the timer expires, the Timer object sends a signal to a slot method stored in its property OnTrigger. Within the method, the desired timer related operation can be executed. You can initialize this property with an already existing slot method or you add a new one and implement it as desired. The following steps describe how to do this:
★First add a new slot method to your GUI component.
★Assign the slot method to the property OnTrigger of the Timer object.
★Open the slot method for editing.
★In the Code Editor implement your desired operation to execute when the Timer expires.
Assuming, in your GUI component exists a Border view you want to flash its color red and blue alternatively, then following would be the implementation of the slot method:
// Is the border currently red? Then show it blue if ( Border.Color == #FF0000FF ) Border.Color = #0000FFFF; // ... or if it is blue, show it red. else Border.Color = #FF0000FF;
Start, stop and restart the Timer object
Per default, new added Timer objects are inactive. To start the Timer you have to set its property Enabled to the value true. Setting this property to the value false stops and resets an active Timer object again. When you have configured this property with the value true already at the design time in the Inspector window, the Timer will start immediately as soon as the GUI component, this Timer belongs to, is instantiated.
Sometimes it is necessary to reset and restart an already active Timer object. For example, if the Timer is used to automatically hide a GUI component after the user has not touched it for a given period. In such case, every time the user touches the screen, the Timer is reset. To restart a Timer you simply set its property Enabled to the value false and then again to the value true as demonstrated in the Chora code below:
// If the timer is already active, stop and reset it now. // If the timer was inactive, nothing will happen. Timer.Enabled = false; // Then start the timer again. Timer.Enabled = true;
You can start and stop the Timer object also by sending signals to its corresponding slot methods StartTimer and StopTimer. This results in the same operation as if the property Enabled were set true or false. The additional slot methods are convenient when you intend to chain several Animation Effects and Timers together.
Specify the timer interval and the initial delay
The Timer object provides two properties permitting you to configure when the timer should expire. With the first property Period you determine the interval between two consecutive timer expirations. This property expects a value expressed in milliseconds. Accordingly, initializing Period with the value 100 causes the timer to expire every 100 milliseconds (means ten times per second).
With the second property Begin you can determine an initial delay between the start of a timer and its first expiration. This property expects again a value expressed in milliseconds. For example, when you initialize Begin with the value 500 and later you start the timer, the timer will expire for the first time after 500 milliseconds are elapsed, even if the property Period has been configured with a less value. The following figure demonstrates the timing behavior of the timer:
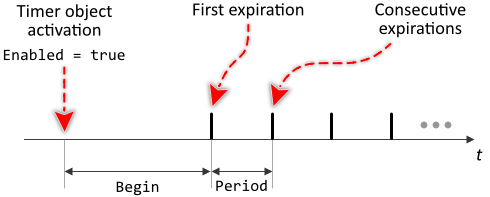
Depending on the initialization of the property Period the Timer object reveals two different behavior modes. If this property is initialized with a value > 0 (zero), the timer expires periodically as long as it is enabled. In turn, if Period is configured with a value <= 0 (zero), the timer will expire only once after the interval specified in the property Begin. Afterwards the Timer object disables itself. Accordingly, the timer can be considered as being periodical or one-shot timer.
If the property Begin is set to a value <= 0 (zero), the initial delay is assumed to be the same as the value of the property Period. In other words, a Timer object will fire for the first time after the interval Period is elapsed.
Although the properties Begin and Period accept values expressed in milliseconds, the actual precision of a Timer object depends on the resolution of the hardware available in the particular target device.
Timer objects and Garbage Collection
When a GUI component is discarded, all active Timer objects embedded inside it are automatically disabled. In other words, you don't need to worry about active timers. They never prevent the components from being reclaimed by the Garbage Collector.
Timer objects and user interaction
Per default, while a Timer is running, the application will continue processing all user inputs. This means in particular, that the user can unhamperedly interact with the application while e.g. an indicator GUI component is blinking or a list scrolls its contents.
This, however, is not always the desired behaviour. You can imagine the situation of a Timer object used to drive a transition between two GUI components (e.g. to fade-in a new screen while the old screen is faded-out). In the short time while the transition is active the both components are (partially) visible and their functionality is eventually accessible for the user.
Touching the screen or pressing a key on a real keyboard while such transition is in progress may cause the involved GUI components to unexpectedly start operations, which then can interfere with the just active transition. In worst case, the entire application can enter in an incoherent state preventing the user from being able to continue working with the application.
In order to protect your application from such critical situations, the application component provides two methods BeginAnimation and EndAnimation. Invoking the method BeginAnimation suppresses temporarily the entire application from being able to handle user inputs. Invoking EndAnimation restores this ability again.
In practice, you invoke the method BeginAnimation just in moment your implementation starts the Timer to drive a critical animation. From now, the application will ignore user inputs. Later at the end of the animation when you stop the timer, you also invoke the method EndAnimation, which on its part re-enables the event handling again. With the method GetRoot you can obtain access to the application component. For example:
// Just in the moment you start an animation .... SomeTimer.Enabled = true; // ... suppress the event handling GetRoot().BeginAnimation(); [...] // Later, when the animation is done you stop the timer and ... SomeTimer.Enabled = false; // ... restore the event handling again GetRoot().EndAnimation();
Internally the both methods do manage a counter, which is incremented with every BeginAnimation invocation and decremented with every invocation of EndAnimation. As long as the value of the counter is greater than 0 (zero) the event handling is suppressed. Thus, if you are starting several Timers, you can invoke BeginAnimation for every started Timer and EndAnimation for every stopped Timer. As soon as all Timers are done, the event handling is re-enabled.