Handling touchscreen or mouse events: Slide Touch Handler
With the Mosaic class Core::SlideTouchHandler you can react to touchscreen or mouse device events. This so-called Slide Touch Handler object can be used within your GUI component to add functionality to be executed when the user touches with the finger on the screen inside the boundary area of the Touch Handler and performs a gesture. If mouse device is available, the gesture can also be performed by using the mouse.
The Slide Touch Handler is optimized to detect one finger slide gestures. Each time, the user strokes the screen inside the Touch Handler's area, the Handler adjusts the scroll offset of the associated content according to the direction, distance and speed of the user's finger movement. As such, the Slide Touch Handler is ideal to implement applications permitting the user to intuitionally scroll long text blocks, large images or lists containing thousands of items.
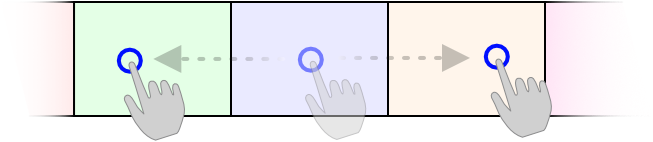
Also other application cases like the implementation of transitions between screens, or an ordinary slider widget, where the user can pull on a slider's thumb are possible with this Touch Handler. The following figure demonstrates the principle idea of a slide gesture applied on a Slide Touch Handler associated to a Horizontal List. Here, when the user strokes the screen horizontally the items within the list are scrolled:
When the user lifts the finger again, the Slide Touch Handler continues sliding with a smooth animation calculated from speed vectors of preceding stroke gestures. Similarly to a real physical system the animation decelerates until it stops, if desired, at predetermined snap positions. Additionally, the Slide Touch Handler implements a kind of realistic rubber band effect. With this effect, the user can pull on the content and drag it outside its visible area. After releasing the touchscreen, the content will bounce back as if it were coupled with a tense rubber band.
In the simplest application case, the Slide Touch Handler is connected directly with the view to scroll its content. In a more sophisticated case you connect slot methods to the Handler, which then receive signals while the user touches the Handler or the Handler performs the above mentioned slide animation. Within the slot methods your particular implementation is executed where you can react to the event and as desired adjust the scroll position of the affected contents.
Please note, that the Mosaic framework provides additional Wipe Touch Handler and Rotate Touch Handler, which implement other important gesture processors. Moreover, with the Simple Touch Handler you can process raw touch events or simple taps.
The following sections are intended to provide you an introduction and useful tips of how to work with the Slide Touch Handler object and process touchscreen and mouse events. For the complete reference please see the documentation of the Core::SlideTouchHandler class.
Add new Slide Touch Handler object
To add a new Slide Touch Handler object just at the design time of a GUI component do following:
★First ensure that the Templates window is visible.
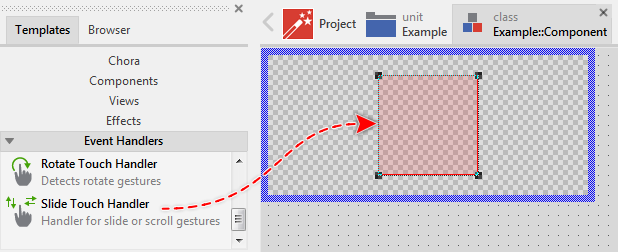
★In Templates window switch to the folder Event Handlers.
★In the folder locate the template Slide Touch Handler.
★Drag & Drop the template into the canvas area of the Composer window:
★Eventually name the new added Handler.
IMPORTANT
Although being an event handler object and not a real view, the Touch Handler appears within the canvas area as a slightly red tinted rectangle. This effect exists just for your convenience and permits you to recognize the Touch Handler while assembling the GUI component. In the Prototyper as well as in the target device the Handler itself is never visible.
Inspect the Slide Touch Handler object
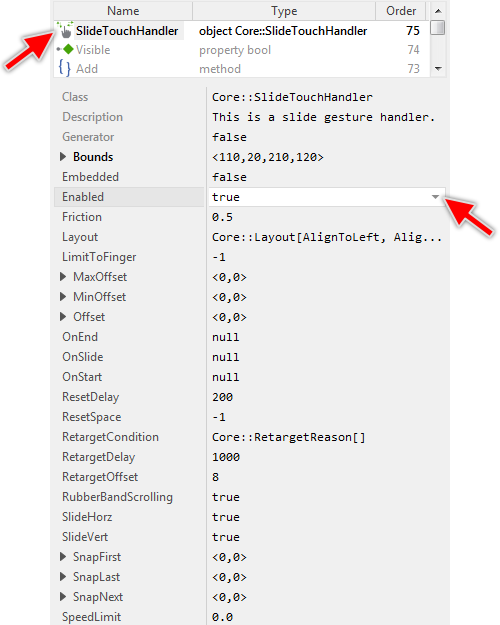
As long as the Touch Handler object is selected you can inspect and modify its properties conveniently in the Inspector window as demonstrated with the property Enabled in the screenshot below:
This is in so far worth mentioning as all following sections describe diverse features of the Touch Handler object by explicitly referring to its corresponding properties. If you are not familiar with the concept of a property and the usage of Inspector window, please read first the preceding chapter Compositing component appearance.
Arrange the Slide Touch Handler object
Once added, you can freely move the Touch Handler, or you simply grab one of its corners and resize it in this way. You can control the position and the size of the Handler also by directly modifying its property Bounds. If you want the Touch Handler to be arranged behind other views you can reorder it explicitly.
Although the Touch Handlers are't visible in the resulting application, their areas determine where the application should in fact react to touch interactions. Only when the user touches inside the Handler's boundary area, the Handler reacts to this interaction. Moreover, if two Touch Handlers overlap, the touch events are per default processed only by the Handler lying top most suppressing the Handler in the background. Thus the right arrangement of how Touch Handlers are placed within your application is an important aspect for its correct function.
Connect the Slide Touch Handler with a view to slide its content
The Slide Touch Handler is ideal to scroll large contents simply by touching the screen and dragging the finger. This is usually the case when your application presents to the user a long text, a large image or a list with hundreds or even thousands of items. For your convenience, all Mosaic components able to display such scrollable contents do implement an interface permitting the Slide Touch Handler to be directly connected with them. It is not necessary to write a single line of code for this purpose.
The interface is exposed by a property named SlideHandler. Every component implementing this interface provide such property. To connect the component with a Slide Touch Handler you simply assign the Handler to the property. Let's assume in your application you want a Text view being controlled by a Slide Touch Handler:
★Add and configure as desired a new Text view.
★Add a new Slide Touch Handler.
★Arrange the Slide Touch Handler so it appears above the area of the Text view.
★Ensure that the Text view is selected.
★In Inspector window locate its property SlideHandler.
★Use the Assistant window to assign the Slide Touch Handler to this property.
The Following example demonstrates, how Text view and Slide Touch Handler are connected together:
Please note, the example presents eventually features available as of version 8.10
Similarly, Slide Touch Handler can be connected with other views like the Image, Attributed Text, Vertical List, Horizontal List or even the Outline Box.
Suppress vertical or horizontal sliding
Per default, the Slide Touch Handler permits the user to slide the associated content both vertically and horizontally. This, however, is not always the desired behavior. Due to the rubber band effect implemented in the Slide Touch Handler, the user can drag the content even if there is nothing to scroll. After releasing the touchscreen the content will bounce back to its original position with the mentioned rubber band effect. In other words, the user can pull on the associated content even if there is nothing to scroll.
To suppress the Slide Touch Handler from being able to perform any scroll operations in a particular direction, the Handler provides two properties SlideHorz and SlideVert. Initializing one of the properties with the value false disables the scrolling in the corresponding direction. For example, in an application displaying a long text block the user should be able to scroll the text vertically. Horizontally, the text is already adjusted to the available screen width so there is no necessity to scroll it. In such case the property SlideHorz is initialized with the value false. Any intents to scroll the text horizontally are then ignored by the Handler.
Control the rubber band animation
Per default, the Slide Touch Handler permits the user to scroll the associated contents beyond the end of the specified scroll range. When the user releases the finger again from the screen, the contents are adjusted automatically within the scroll range by performing a kind of rubber band bounce effect.
If this default behavior is not desired, you can disable it by configuring the property RubberBandScrolling of the affected Slide Touch Handler with the value false.
In turn, if you like the rubber band bounce effect, but you want it to run with other than the per default specified timing, you can modify the animation by changing the values of the properties RubberBandEffectElasticity and RubberBandEffectDuration. The property RubberBandEffectDuration determines how much time (expressed in milliseconds) it takes to automatically scroll the content after the user has released it beyond the end of the possible scroll range. The property RubberBandEffectElasticity determines the timing of the scroll animation. The value of this property is valid in range 1.0 .. 100.0. The larger the value the more elastic the animation effect. Initializing this property with 1.0 results in the animation being performed with linear timing.
Configure the acceleration characteristics
The implementation of The Slide Touch Handler simulates the realistic behavior of a physical system. When the user strokes the Handler's area, the Handler calculates from the interaction its direction and the speed vectors, which then are used to smoothly continue a scrolling animation. As in a real physical system, the animation velocity decelerates due to friction effects between the moved content and its environment until it finally stops.
This deceleration effect is controlled by the property Friction, which expects a float value lying in the range 0.0 .. 1.0. The smaller the value the less the friction. A Slide Touch Handler initialized with Friction value 0.0 will, after being stroked by the user, continue the sliding practically until an end scroll position has been reached. In turn, initializing Friction with 1.0 will almost suppress instantly the slide animation.
When the user strokes the Slide Touch Handler repeatedly, the Handler accumulates the strokes in its internally managed speed vector. In analogy to a real physical system, you can imagine that with every stroke the system receives an energy quantity, which then is consumed during the movement by the friction effects. Thus, the more the user strokes the Handler, the faster and longer the running slide animation.
With the property SpeedLimit you can specify in pixel per second the maximum speed for the animations running by the Slide Touch Handler. For example, initializing SpeedLimit with the value 1000.0 will limit the slide speed to max 1000 pixel per second regardless of how fast and often the user strokes the Handler. Initializing this property with the value 0.0 deactivates the speed limit.
As with a real physical system, trying to grab a body that is currently in motion will break its movement. Accordingly, when the user touches inside the Slide Touch Handler without performing any stroke gestures, the Handler stops the currently running slide animations. In other words, the speed vector accumulated from the preceding interactions is reset when the user taps inside the Slide Touch Handler or presses it with the finger for a longer period. When exactly the speed vector is reset can be determined by the both properties ResetDelay and ResetSpace.
The property ResetDelay determines in milliseconds how long the user has to press the finger inside the Slide Touch Handler in order to reset the accumulated speed vector. For example, initializing this property with the value 500 means, that touching the Handler for less than 500 milliseconds is still interpreted as a regular stroke gesture whose speed is added to the already accumulated speed vector. However, if the user holds the Touch Handler pressed for at least 500 milliseconds, the accumulated speed vector is reset and initialized with the speed resulting from the current stroke only. If the Slide Touch Handler was running a slide animation, the animation breaks now.
Similarly, the property ResetSpace determines the length in pixel of a stroke, which if it is not reached should cause the accumulated speed vector to be reset. For example, initializing this property with the value 10 means, that stroking the Handler for at least 10 pixel distance is still interpreted as a regular stroke gesture whose speed is added to the already accumulated speed vector. However, if the user strokes the Touch Handler for less than 10 pixel, the accumulated speed vector is reset and initialized with the speed resulting from the current stroke only. If the Slide Touch Handler was running a slide animation, the animation breaks now.
By using the property ResetSpace you can configure the Slide Touch Handler to stop the animation after the user taps it without performing any stroke gestures. You can image, the user is scrolling a long list, which then with a simple tap breaks immediately. Per default, ResetSpace is initialized with -1 which disables this reset feature.
The following example demonstrates various Slide Touch Handlers configures with different values for the Friction and SpeedLimit properties:
Please note, the example presents eventually features available as of version 8.10
Configure the snap positions
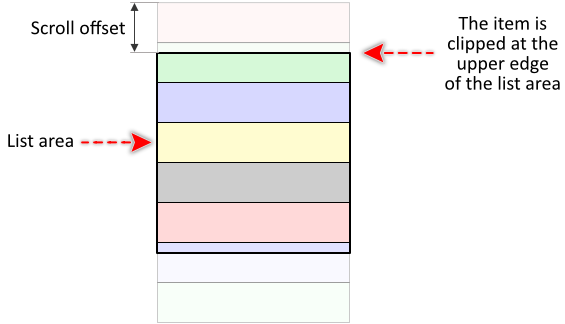
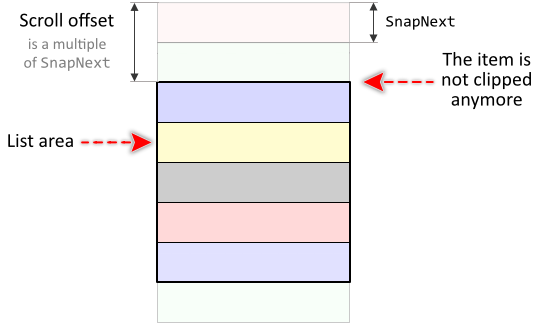
Per default, the Slide Touch Handler stops the slide animation at a position resulting from the relation between its speed vector and its configured friction. The higher the speed and lower the friction, the longer the distance travelled. This stop position can thus lie anywhere inside the possible slide range. For example, when the Slide Touch Handler is used to scroll items within a Vertical List, the resulting scroll offset can become a value lying in the middle of an item, which then appears ugly clipped:
By using the property SnapNext you can instruct the Handler to slightly adjust its speed vector, so that the slide animation stops at positions, which are always a multiple of the value stored in SnapNext property. From the user's point of view, the Slide Touch Handler seems to snap at those positions smoothly. Being a point the property SnapNext can store individual values for the horizontal (x) and the vertical (y) slide direction. For example, initializing SnapNext with the value <40,100> will cause the Handler to snap horizontally at positions 0, 40, 80, 120, ... and vertically at positions 0, 100, 200, 300, ...
With the above described example of a Slide Touch Handler used to scroll the items within a Vertical List, you can configure the property SnapNext with a value corresponding to the height of a single list item. Later when the user scrolls the list, the Slide Touch Handler will stop at the borders lying between two items. The first visible item is not clipped anymore:
Similarly, if the Slide Touch Handler is used to scroll a Text view, you can initialize the property SnapNext with the distance between two consecutive text rows causing the slide animation to snap smoothly at the upper edge of a text row.
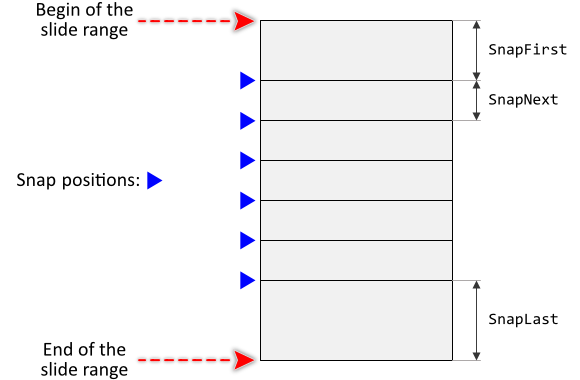
If your application case it requires, with the properties SnapFirst and SnapLast you can configure different values for the first and the last snap position. Accordingly, the Slide Touch Handle will snap first after a distance determined by SnapFirst, then after every further distance determined by SnapNext. The last snap position lies SnapLast far away from the end of the slide range. The following figure demonstrates the effect of those three properties:
In the following example, the Slide Touch Handler is used to scroll a long text. In order to avoid ugly clipped text rows, the SnapNext property of the Handler is initialized with a value corresponding to the distance between two text rows (which is the height of the font used to display the text):
Please note, the example presents eventually features available as of version 8.10
Implement Touch Handler slot methods
While the user touches inside the area of a Slide Touch Handler or the slide animation is performed, the Handler sends signals to slot methods connected with it. Within the slot methods your particular implementation can react and process the events. The slot methods are connected to the Handler by simply storing them in the for this purpose available Handler's properties. The following table describes them:
Property |
Description |
|---|---|
Slot method associated to this property receives a signal at the beginning of a new slide interaction. This is after the user has touched the screen while the Slide Touch Handler was still inactive. If the Handler is already running the slide animation, touching it repeatedly will not generate any further OnStart signals. |
|
Slot method associated to this property receives a signal at the end of a slide interaction. This is after the user has released the touchscreen and the Slide Touch Handler has finished the following slide animation. |
|
Slot method associated to this property receives signals every time the user strokes inside the Touch Handler's area or when while the slide animation the current value of the slide offset changes. |
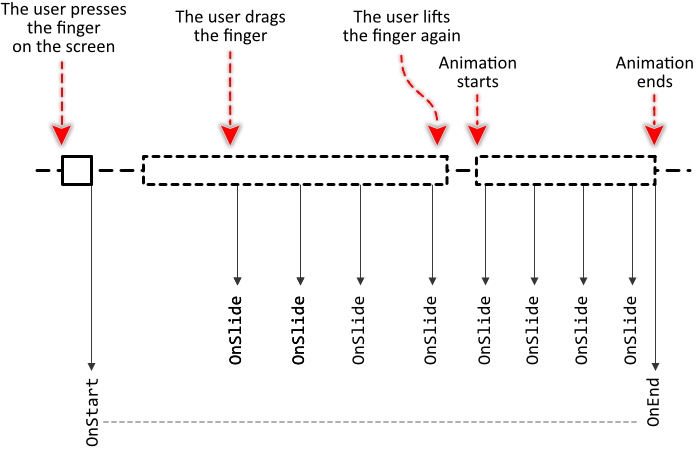
The following sequence diagram demonstrates a typical order in which the slot methods receive signals while the user interacts with the Touch Handler. Please note, that every slide interaction starts with a signal sent to the OnStart slot method. When the user lifts the finger, the Slide Touch Handler starts an animation to continue scrolling the content. With the end of the animation, a signal is sent to the OnEnd slot method. In the meantime the OnSlide slot method is signaled every time the slide offset changes either due to the user interaction or driven by the active animation:
Providing slot methods for all properties is not obligatory. If in your application case you want only the events generated when the slide offset changes, then you left all properties initialized with null except the property OnSlide. You can initialize the properties with already existing slot methods or you add a new one and implement it as desired. The following steps describe how to do this:
★First add a new slot method to your GUI component.
★To react to the start interaction event: assign the slot method to the property OnStart of the Handler object.
★To react to the end interaction event: assign the slot method to the property OnEnd of the Handler object.
★To react to the slide event: assign the slot method to the property OnSlide of the Handler object.
★Open the slot method for editing.
★In the Code Editor implement your desired operation to execute when the corresponding event occurs.
The Slide Touch Handler object manages several variables reflecting its current state. You can evaluate these variables whenever your GUI component implementation requires the corresponding information. Usually, however, you do this from the above described slot methods. The following table provides an overview of the available variables:
Variable |
Description |
|---|---|
The variable is true while the slide interaction is active. This means, as long as the user touches the Handler or during the running slide animation. |
|
This property stores the current slide offset. This corresponds to the scroll position of the content associated to this Touch Handler. The possible range for Offset is determined by the both properties MinOffset and MaxOffset, which are described in the section below. |
|
The variable stores the alternation of the Offset value relative to the preceding OnSlide event. This is useful if you need to incrementally track the alternation of the slide offset. |
Whether and which variables your implementation does evaluate depends on your particular application case. The variable Sliding is useful if you need to perform operations depending on whether the Slide Touch Handler currently does modify the slide offset or not. With the variables Offset and Delta you can calculate and track the slide offset alternations. The following Chora code demonstrates few examples of how the various variables are used:
if ( !TouchHandler.Sliding ) { // The Slide Touch Handler is in idle state. No user interaction. // No animation is running. } if ( TouchHandler.Sliding && ( TouchHandler.Offset > 100 )) { // The Slide Touch Handler is active. This is either because of the // user touching it actually or the running slide animation. The // current slide offset has exceeded the value 100. } // Within the OnSlide slot method move an Image view accordingly to the // changes of the Touch Handler's slide offset. Thus the Image seems to // follow the performed stroke gestures. ImageView.Bounds = ImageView.Bounds + TouchHandler.Delta;
The following example demonstrates the usage of the Slide Touch Handler and the above described slot methods to implement a horizontal slider component. In this example, the user can touch and pull on the slider's thumb. The Slide Touch Handler takes care of the movement calculation and the slide animation effects:
Please note, the example presents eventually features available as of version 8.10
Configure the slide range
The main function of the Slide Touch Handler is to calculate from the user interaction the offset to scroll the associated content (e.g. a long text block). To work correctly, the Touch Handler needs thus to know the exact range in which the offset may be moved. This information is usually provided by the view, the Handler is connected with. For example, if you associate the Slide Touch Handler with a Text view, the view will keep the Handler up-to-date about the available slide range automatically. You don't need to take care of it.
If the Slide Touch Handler is not connected with any view to scroll its content, then its up to you to configure the Handler with the correct slide range. The Touch Handler provides for this purpose the both properties MinOffset and MaxOffset. You initialize the property MinOffset with the lower end of the possible slide range and the property MaxOffset with the upper end. Being a point the both properties can store individual values for the horizontal (x) and the vertical (y) slide direction. For example, if you want the slide offset being changed between the values 100 and 500 in the vertical slide direction only, then initialize the property MinOffset with the value <0,100> and MaxOffset with the value <0,500>.
Additionally with the property Offset you can configure the value the Slide Touch handler should start with when the user strokes inside its area. The property Offset represents the current slide position and it changes while the user interacts with the Handler or the Handler runs its slide animation.
If the slide range is known in advance and invariable, you can configure the properties directly in the Inspector window. If the range may change depending on the currently available contents to scroll, initialize the properties in the OnStart slot method connected with the Slide Touch Handler. In this manner, every time the user starts a new slide interaction, the Handler will signal the OnStart slot method giving you the possibility to configure the Handler for the upcoming interaction. The following code demonstrates the possible implementation of the OnStart slot method:
// From the current state of your application calculate the actually // valid slide range var int32 theLowerValue = ... var int32 theUpperValue = ... var int32 theCurrentValue = ... // Initialize the Touch Handler to slide within this range vertically only. // The range for the horizontal direction remains unchanged, which results // per default in an empty range. TouchHandler.MinOffset.y = theLowerValue; TouchHandler.MaxOffset.y = theUpperValue; TouchHandler.Offset.y = theCurrentValue;
Configure the filter condition
Every time the user touches the screen, the Mosaic framework searches at the affected screen position for a Touch Handler, which is enabled and configured to accept the new interaction. Precisely, if the device does support multi-touch you can restrict a Handler to respond only to interactions associated with a particular finger number.
This setting is controlled by the property LimitToFinger. The fingers are counted starting with 0 (zero) for the first finger touching the screen and 9 for the tenth finger when the user uses all fingers simultaneously. Per default, this property is initialized with -1, which instructs the Handler to accept any interaction regardless of the number of fingers the user touches currently the screen with.
Initializing LimitToFinger with the value 0 (zero) restricts the Handler to accept the interaction associated with the first finger. In other words, the Handler will ignore any further interaction if the user touches already the screen with at least one finger. If this property is initialized with the value 4, the Handler will be activated only when the user touches the screen with the fifth finger.
The numbering of fingers is an aspect you have to take care of in the main software where the GUI application and your particular touchscreen driver are integrated together. Precisely, when you feed touchscreen events into the application by calling the method DriveMultiTouchHitting you should pass in its aFinger argument the number of the associated finger. This requires however, that the touchscreen driver in your device provides information to uniquely identify all fingers involved currently in touchscreen interactions.
Touch events and the grab cycle
When the user touches the screen, the corresponding press event is dispatched to the Touch Handler enclosing the affected screen position. With this begins the so-called grab cycle. The grab cycle means, that the Touch Handler becomes the direct receiver for all related subsequent touchscreen events. In other words, the Touch Handler grabs temporarily the touchscreen. However, if your device supports multi-touch, the grab cycle is limited to events associated with the finger, which has originally initiated the touch interaction. The grab cycle doesn't affect the events triggered by other fingers.
With the grab cycle the Mosaic framework ensures, that Touch Handler which has received a press event also processes the corresponding release event. Disabling the Touch Handler, hiding the superior component or removing its parent GUI component from the screen while the Handler is involved in the grab cycle does not rupture the event delivery. Similarly, when the user drags the finger outside the boundary area of the Touch Handler, the grab cycle persists and the Touch Handler will continue receiving all events associated with the finger.
The grab cycle ends automatically when the user releases the corresponding finger. With the end of the grab cycle the involved Handler will receive the final release event. The grab cycle technique is thus convenient if it is essential in the implementation of your GUI component to always correctly finalize the touchscreen interaction.
Under normal circumstances you don't need to think about the mechanisms behind the grab cycle. You should however understand that the Slide Touch Handler after sending a signal to the slot method stored in its OnStart property will always send a signal to the slot method stored in OnEnd property after the user finalizes the interaction and the eventual slide animation is completed.
Combine several Touch Handlers together
According to the above described concept of the grab cycle the touchscreen events are delivered to the Handler, which has originally responded to the interaction. This relation persists until the user lifts the finger again from the touchscreen surface and finalizes so the interaction. In other words, events generated by a finger are processed by one Touch Handler only.
This is in so far worth mentioning, as trying to arrange several Touch Handler one above the other with the intention to process with every Handler a different gesture will per default not work. Only the Handler lying top most will react and process the events. This Touch Handler, however, after having detected, that it is not responsible for the gesture can reject the active interaction causing another Touch Handler to take over it. In this manner, several Touch Handler can seamlessly cooperate.
With the property RetargetCondition you can select one or several basic gestures, the affected Touch Handler should not process. As soon as the Touch Handler detects, that the user tries to perform one of the specified gestures, the next available Handler lying in the background and willing to process the gesture will automatically take over the interaction. Following table provides an overview of the basic gestures you can activate in the RetargetCondition property and additional properties to configure the gesture more in detail:
Gesture |
Description |
|---|---|
WipeDown |
Vertical wipe down gesture. Per default the gesture is detected after the user has dragged the finger for at least 8 pixel. With the property RetargetOffset the minimal distance can be adjusted as desired. |
WipeUp |
Vertical wipe up gesture. Per default the gesture is detected after the user has dragged the finger for at least 8 pixel. With the property RetargetOffset the minimal distance can be adjusted as desired. |
WipeLeft |
Horizontal wipe left gesture. Per default the gesture is detected after the user has dragged the finger for at least 8 pixel. With the property RetargetOffset the minimal distance can be adjusted as desired. |
WipeRight |
Horizontal wipe right gesture. Per default the gesture is detected after the user has dragged the finger for at least 8 pixel. With the property RetargetOffset the minimal distance can be adjusted as desired. |
LongPress |
This gesture is detected when the user holds the finger pressed for a period longer than the value specified in the property RetargetDelay. This is per default 1000 milliseconds. |
Let's assume, you want to implement a GUI component to display within a Text view some text pages, the user can scroll vertically. With a wipe left and wipe right gestures the user should be able to browse between the various text pages. Moreover, a double tap within the page area should automatically scroll the text to its begin.
This example can be implemented by combining three Touch Handlers: the Slide Touch Handler to scroll the text vertically, the Wipe Touch Handler to detect the wipe left and wipe right gestures and to the regular Simple Touch Handler to detect the double taps. Following are the steps to configure these Handlers:
★Add a new Text view to your component.
★Add a new Slide Touch Handler to your component.
★Arrange the Slide Touch Handler so it covers the area of the Text view.
★Add a new Wipe Touch Handler to your component.
★Arrange the Wipe Touch Handler so it covers the area of the Text view.
★Add a new Simple Touch Handler to your component.
★Arrange the Simple Touch Handler so it covers the area of the Text view.
★For the Simple Touch Handler configure the property RetargetCondition with the value Core::RetargetReason[WipeDown, WipeLeft, WipeRight, WipeUp].
★For the Wipe Touch Handler configure the property RetargetCondition with the value Core::RetargetReason[WipeDown, WipeUp].
★For the Slide Touch Handler configure the property SlideHorz with the value false.
The following figure demonstrates the arrangement and the configuration of the three Touch Handlers:
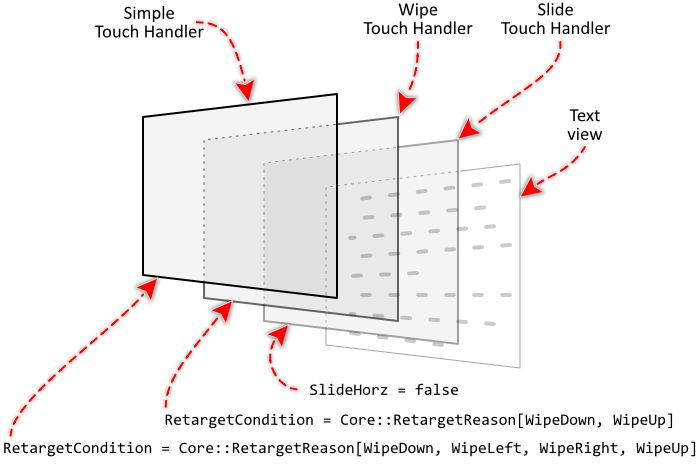
When the user touches the GUI component, the events are primarily processed by the Simple Touch Handler. Later when the user drags the finger to the left, the Simple Touch Handler detects the wipe gesture and retargets the interaction to the Wipe Touch Handler. In turn, if the user has dragged the finger up, the Slide Touch Handler will take over the interaction since the Wipe Touch Handler is configured to also reject all wipe up and down gestures.
The following example demonstrates this application case:
Please note, the example presents eventually features available as of version 8.10
This so-called deflection mechanism is not limited to Touch Handlers within the same GUI component. When the Touch Handler decides to reject the actual interaction, all Touch Handler existing at the moment in the application and lying at the current touch position are asked in order to find the best one which should take over the interaction. The old and the new Touch Handler can thus belong to different GUI components.
Please note, that rejecting the active interactions finalizes the corresponding grab cycle for the old Touch Handler and initiates a new one for the new Touch Handler. Accordingly, the old Handler receives the final release event as if the user had lifted the finger from the screen and the new Handler receives the initial press event as if the user had just touched it. The both Handler act independently.
Slide Touch handler and multi-touch screen
The Slide Touch Handler responds to the first touch interaction matching the specified condition. Afterwards, touching inside the Handler's area with a further finger is ignored. If there is another Handler lying in the background, then it has eventually the chance to respond and process the event. You can imagine, the Slide Touch Handler is restricted to process at the same time events associated with only one finger.
Accordingly, to handle multi-touch interactions it is the simplest to manage several Touch Handlers within the application. For example, in an application containing many Vertical List components, the user can scroll all lists simultaneously. The Slide Touch Handlers connected to the list components will then individually process the touch events associated with the corresponding fingers, detect the slide gestures and scroll the lists. From the user's point of view, the lists can be controlled independent of each other.
Support for mouse input devices
Embedded Wizard developed applications are not restricted to be controlled by tapping on a touchscreen only. With the Slide Touch Handler you can process also events triggered by a regular mouse input device. Accordingly, when the user clicks with the mouse inside the boundary area of a Touch Handler and drags the mouse down, the Handler will accordingly slide the associated content. Thus you can use Embedded Wizard to develop desktop applications able to run under Microsoft Windows, Apple macOS or diverse Unix distributions.
There are no essential differences when handling mouse or touchscreen events except the multi-touch functionality, which is not available when using the mouse device. Even mouse devices with more than one button can be handled. Per default, the left mouse button is associated to the first finger (finger with the number 0 (zero)). The right mouse button corresponds to the second finger and the middle button to the third finger. Knowing this, you can easily configure the Touch Handler to respond to the interesting mouse events.
In principle, in the main software where the GUI application and the particular mouse driver or OS API are integrated together you are free to map the received mouse events to the corresponding invocations of Embedded Wizard methods. Precisely, you feed the events into the application by calling the methods DriveCursorHitting and DriveCursorMovement.
Slide Touch Handler and invisible components
Please note, the function of a Touch Handler is not affected by the visibility status of the GUI component, the handler is used inside. Embedded Wizard differentiates explicitly between the status ready to be shown on the screen and able to handle user inputs. As long as the handler lies within a potentially visible screen area, hiding the component will not suppress the touch handler from being able to react to user inputs. Thus if you want a GUI component to be hidden and to not be able to handle user inputs you have to hide and disable the component.
Generally, whether a GUI component is visible or not is determined by its property Visible. If the component is embedded inside another component, the resulting visibility status depends also on the property Visible of every superior component. In other words, a component is visible only if its property Visible and the property of every superior component are true. If one of these properties is false the component is considered as hidden.
In turn, the ability to react to user inputs is controlled by the component's property Enabled. Again, if the component is embedded inside another component, the resulting enabled status depends also on the property Enabled of every superior component. In other words, a component is able to handle user inputs only if its property Enabled and the property of every superior component are true. If one of these properties is false the component is considered as disabled.
IMPORTANT
A hidden component will receive and handle all user inputs as if it were visible. If it is not desired, you have to set both the property Visible and Enabled of the affected component to the value false.
Disable a Slide Touch Handler
By initializing the property Enabled with the value false you can explicitly suppress a Touch Handler from being able to react to touchscreen inputs. In this manner, other Handlers lying behind it are exposed and can respond to the events.
Please note, that modifying Enabled while the Handler is currently involved in a grab cycle has no immediate effect. In other words, as long as the user does not finalize the previously initialized touchscreen interaction, the Handler will continue receiving events even if it has been disabled in the meantime. Finally, the grab cycle guarantees that Handler, which have received the press event will also receive the corresponding release event.
TIP
In the GUI application an individual Touch Handler can handle events only when the Handler and all of its superior Owner components are enabled, the Handler itself does lie within the visible area of the superior component and the Handler is not covered by any other Touch Handler.
Please note, Touch Handlers continue working even if you hide the superior components. See: Slide Touch Handler and invisible component.