Working with Embedded Wizard: Managing dialogs (multiple screens)
Except very primitive cases, most GUI applications consist of more than one screen. During the runtime, the user interacts with the application and switches between the diverse screens forth and back. At any time this dialog may be interrupted by new screens the application presents in order to inform the user about important events or to ask the user how to proceed with the actually performed action. Such alerts may be modal, so that in order to continue with the main dialog the user has obligatory to confirm or decline the alert notification.
With this chapter we describe how to implement such multi screen application and how to deal with the screens at its runtime. Embedded Wizard offers you diverse techniques how you achieve this. Whichever approach you choose depends on your particular application case and your personal preferences.
Screens are GUI components
The denomination screen implies, that the shown contents fill the entire display area. In Embedded Wizard it is not necessarily the case. Here, the screens are just ordinary GUI components. They can be small or even as large as the display area. From technical point of view, there is no difference between a GUI component representing a complex screen and another component serving e.g. as a simple push button. Thus, when we talk about screens we mean GUI components.
For example, if your application consists of a status and a settings screen, you create two GUI components and compose every of them according to the function of the corresponding screen. You are flexible to decide whether the resulting component should occupy the entire display or just a small area of it leaving space for other components coexisting with it simultaneously. If necessary, you can even resize the components dynamically at the runtime.
The classic approaches
The simplest approach provides, that for every individual screen you maintain an instance of the corresponding GUI component embedded directly within the application component. Which of the screens is visible on the runtime is controlled by their property Visible. If the user wants to switch between screen A and screen B, you simply set the property Visible of the screen A to the value false and the of the screen B to the value true. With this approach, all screens exist whole the time. The most of them is simply invisible.
More sophisticated is to create and show the affected screen instances dynamically just in the moment when the user intends to enter the screen. Later, when the screen is dismissed, the instance can be hidden and the associated memory freed. With this approach your application is more flexible. It can create and show as many screen instances as necessary. Furthermore, only the screens existing actually will occupy memory.
You can enhance the both presented approaches by animation effects. For example, instead of simply setting the property Visible of a screen instance to the value true, you can prepare a Change int32 effect and connect it to the property Opacity of the affected screen instance. When you start the effect, the screen is faded-in. Similarly, with the Move and resize rect effect you can implement slide transitions between the screens.
In any case, when you deal with several screens you have to take care of which screen may actually handle the user inputs and which screens should be suppressed from them. The simplest way to achieve this is setting the property Enabled to the value true for every component you want to react to user inputs and to the value false if the component should be suppressed from being able to handle the events. More advanced is to make the actually active component modal. Accordingly, this component will receive all user inputs. As soon as the modal state of the component ends, the original event flow is restored.
Introducing Dialogs
With Embedded Wizard version 9.0 we have enhanced the Mosaic framework by new functionality permitting you to manage multiple screens even more convenient and simple. In this concept the GUI components intended to represent the individual screens are designated as Dialogs. For example, if your application consists of a settings and a status screen, we talk about the settings and status Dialog or Dialog GUI component. Consequently, when the user switches between two screens, we mean a transition between two Dialogs.
From now, we don't use the denomination screen in this context anymore to simply avoid confusion with the term screen representing the display hardware itself. Instead, we talk about Dialogs.
From technical point of view, a Dialog is an ordinary GUI component, you design exactly as you have learned to compose any other GUI component. Similarly, all other aspects like the event handling, component state management, component interface or the usage of animation effects are valid and true when you create a Dialog component. The unique peculiarity of the Dialog components is, that to show and hide them again, you have to invoke specially for this purpose existing methods. How you achieve this, is described in the following sections.
Understand the Dialog transitions
When analyzing the course of interaction between the user and a GUI application, we can identify three basic dialog operations: Present, Dismiss and Switch To. As its name implies, the operation Present causes the affected dialog to appear on the screen. The operation Dismiss, in turn, performs the corresponding counterpart. It causes the affected dialog to disappear again. Finally, with Switch To operation the previously presented dialog is hidden and another one is shown instead of it.
Let's imagine an alert panel, which typically appears to notify the user about an important event. Showing such panel corresponds to the operation Present. As soon as the user confirms the displayed notification, the panel disappears again (Dismiss operation). Another example is a settings menu. When the user enters the menu, the corresponding menu Dialog component is presented. Now the user may interact with the menu and change all desired settings. To leave the menu again the user dismisses it.
The operations Present and Dismiss manage the Dialogs like a stack. If you repeat Present several times, the affected Dialogs are arranged one above the other according to the order in which the operations have been executed. Please recall the previously mentioned example of a settings menu. Now let's imagine, the menu consists of several levels. At the beginning the user enters the top-level menu and selects there the desired sub-menu. This causes the sub-menu to be presented as a further Dialog just above the already visible top-level menu. Within the sub-menu the user may select and enter the next nested menu level, which again causes the corresponding sub-menu component to be presented above the other menu components:
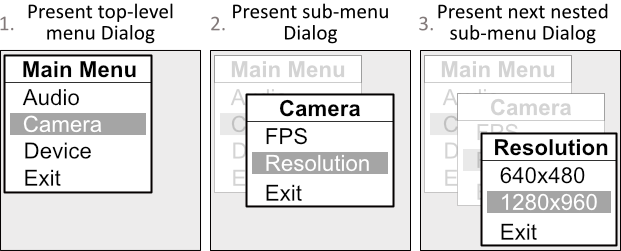
Unless the latest presented menu Dialog is very large and opaque, the user may see all other Dialogs lying behind or shining through it. Interacting with them, however, is not possible. The interaction is limited to the last presented Dialog. Please recall the above example of the menu consisting of several levels. After presenting the top-level menu Dialog, the user can interact with it. As soon as the next sub-menu Dialog is presented, the user interaction is limited to this sub-menu only. The top-level menu does not respond to user inputs anymore until the user dismisses the sub-menu again and returns so to the top-level menu Dialog.
Accordingly, the both operations Present and Dismiss do not only take care of showing and hiding GUI components but they also track the course of user interaction and ensure that only the last presented Dialog (the Dialog in front of all other Dialogs) may react to user inputs. When this Dialog is dismissed, the next Dialog found behind it will become active so the user may interact with it again. This approach is comparable with the technique described in Modal GUI components.
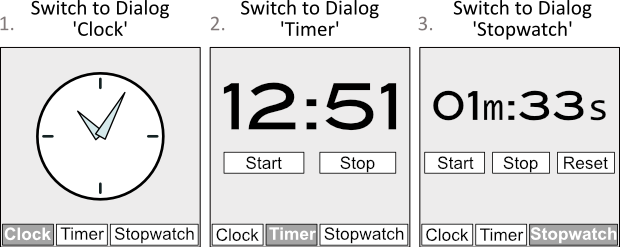
The remaining operation Switch To can be considered as combination of the both operations Dismiss and Present. It dismisses the actually active Dialog (lying in front of all other Dialogs) and at the same time presents another Dialog. Let's imagine a tab control with several buttons. Every button is associated with an individual Dialog. When the user activates one of the buttons, the affected Dialog is presented while the previously visible Dialog is dismissed. The Dialogs are simply exchanged. The following figure demonstrates such application. Activating the buttons in the lower area of the figure switches the Dialogs displayed above them:
Every of the above described operations has as consequence a transition between Dialogs. The transitions can be executed instantly, just in the moment when they are triggered. Accordingly the affected Dialogs appear or disappear immediately. In more demanding cases, the transitions can also be performed with predetermined animations. Just imagine the Switch To operation where the dismissed Dialog is faded out while the new Dialog is presented with e.g. a slide animation.
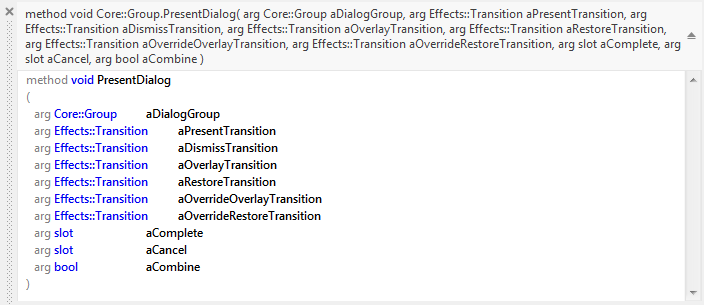
The methods: PresentDialog, DismissDialog and SwitchToDialog
The above explained Dialog operations are implemented in the Mosaic framework as following three methods of the class Core::Group. They are thus available in every GUI component inclusive the application component:
Method |
Description |
|---|---|
Schedules an operation to show a new Dialog GUI component. The new Dialog overlays other Dialogs presented eventually in the past. |
|
Schedules an operation to hide a Dialog GUI component. By this other Dialogs lying eventually behind it are revealed again. |
|
Schedules an operation to hide the actual Dialog GUI component and to show another one instead of it. |
The methods have in common, that they all expect in the first parameter the Dialog instance you intend to present or dismiss. When you use the methods for the first time, you might be surprised by the many further parameters these methods expect. Don't worry. At this moment the special function of these parameters can be ignored so just pass null in their place except the last one where you should pass false. The following code demonstrates the usage of the three methods:
if ( I_want_to_present_a_new_dialog ) { // Assume, this is a new Dialog you want to present var Core::Group newDialog = new Examples::AlertPanel; // Present the Dialog now PresentDialog( newDialog, null, null, null, null, null, null, null, null, false ); } if ( I_want_to_dismiss_an_existing_dialog ) { // Assume, this is an already presented dialog you want to dismiss // again var Core::Group existingDialog = ... // Dismiss the Dialog now DismissDialog( existingDialog, null, null, null, null, null, false ); } if ( I_want_to_exchange_the_actual_dialog ) { // Assume, this is a new Dialog you want to present instead of // another actually presented Dialog var Core::Group newDialog = new Examples::SettingsScreen; // Dismiss the actually presented Dialog and present new Dialog SwitchToDialog( newDialog, null, null, null, null, null, null, null, null, null, false ); }
The following example project demonstrates the practical usage of the PresentDialog and DismissDialog methods. At the runtime, the application shows alert panels. Depending on the buttons the user presses in the actually active alert Dialog, a further nested alert Dialog is presented or the actually active Dialog is dismissed:
Please note, the example presents eventually features available as of version 9.00
In the example above, the Dialogs intended to be presented have been created dynamically by using the new operator. This is not obligatory. In an alternative approach, you can embed all Dialogs directly within the respective component just at the design time and configure their properties Visible with the value false. The Dialogs are thus invisible per default. At the runtime, when the method PresentDialog or SwitchToDialog is executed, the affected Dialog will automatically become visible. In turn, DismissDialog will ensure that the Dialog disappears. Unlike the above example, the Dialogs continue existing since they are embedded within the owner component.
The following example project demonstrates how you deal with Dialogs being embedded permanently. The application contains three embedded Dialog components. All components are configured as invisible. In the bottom area you see three buttons. Activating one of the buttons executes the SwitchToDialog method, by which the corresponding Dialog becomes visible while the previously visible Dialog is hidden again:
Please note, the example presents eventually features available as of version 9.00
An important aspect you have to consider when using the methods is that the effect resulting from the method invocation is limited to the GUI component in context of which the method has been invoked. Precisely, when you invoke PresentDialog in context of a GUI component A, the component A will become the direct owner of the new presented Dialog. In other words, the new Dialog will appear within the boundary area of the GUI component A in front of all other Dialogs existing already within A:
// Assume, you want to present the following new Dialog ... var Core::Group newDialog = new Examples::AlertPanel; // ... within this component 'ownerComponent' var Core::Group ownerComponent = ... // Present the new Dialog within the 'ownerComponent'. ownerComponent.PresentDialog( newDialog, null, null, null, null, null, null, null, null, false ); // Or, you want the Dialog being presented within 'this' component? PresentDialog( newDialog, null, null, null, null, null, null, null, null, false );
Accordingly, if you want to dismiss a Dialog you have to invoke the DismissDialog method in context of the component, which actually contains the affected Dialog. If the ownership of a Dialog is not implicitly known, you can evaluate the variable Owner of the Dialog in order to obtain access to its actual owner component:
// If 'someDialog' has been presented within 'this' component, dismiss // it by invoking the method 'DismissDialog()' in context of 'this': DismissDialog( someDialog, null, null, null, null, null, false ); // ... or if 'someDialog' has been presented in context of 'ownerComponent': ownerComponent.DismissDialog( someDialog, null, null, null, null, null, false ); // If the actual owner of the Dialog is unknown, query it: someDialog.Owner.DismissDialog( someDialog, null, null, null, null, null, false );
Take a closer look at the Dialog functionality
Every GUI component manages its own Dialogs by itself without taking care of Dialogs presented in context of other components. Accordingly, every GUI component maintains its own Dialog stack, tracks the presented Dialogs and controls which of the Dialogs are able to handle user inputs and which are actually suppressed. Since the Dialogs are also ordinary GUI components, it is even possible to interleave one Dialog inside another one creating so applications with complex hierarchy of Dialogs:
// First create two new Dialogs var Core::Group settingsScreen = new Examples::SettingsScreen; var Core::Group menu = new Examples::Menu; // Now present the 'settingsScreen' in context of 'this' GUI component PresentDialog( settingsScreen, null, null, null, null, null, null, null, null, false ); // ... and then present the 'menu' Dialog inside the 'settingsScreen' settingsScreen.PresentDialog( menu, null, null, null, null, null, null, null, null, false );
Let's assume, in your application you want to present an alert panel with a critical error notification. Such alerts impact the actual interaction between the user and the application. In order to continue working with the application, the user is obligated to first confirm the alert. As mentioned above, presenting a Dialog affects only the GUI component in context of which the Dialog has been presented. Since the alert should affect the entire application, it is reasonable to present it in context of the application component itself:
// First create the alert Dialog var Core::Group alert = new Examples::AlertPanel; // If the actual component is not the 'application component' // itself, obtain access to the 'application component' var Core::Root rootObject = GetRoot(); // Now present the 'alert' in context of the 'application component' rootObject.PresentDialog( alert, null, null, null, null, null, null, null, null, false );
Would you present the alert in context of any other arbitrary GUI component e.g. A, the effect of this alert would be limited to this component and all Dialogs existing already inside A. Other Dialogs presented outside the component A were still able to react to user inputs. Understanding this peculiarity is important. When you present a Dialog you have to reflect about the desired effect you want to achieve. Do you want the Dialog to appear locally within a subarea of the application? Or you want it to have a global effect on the entire application?
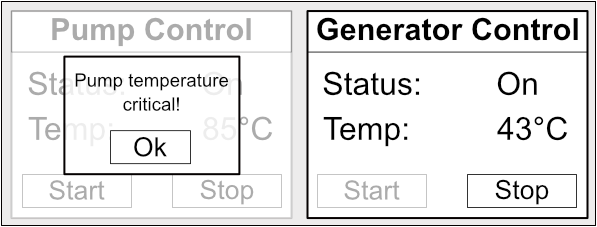
Let's imagine following scenario: you develop an application intended to control two machines, a pump and an emergency generator. Both machines should be controlled and monitored independently of each other. When the pump reports a critical error, the user should be limited to control the pump unless the user has confirmed the error and dismisses the alert. The possibility to control the emergency generator, however, should not be affected by any error with the pump.
To achieve this you can divide the screen in two areas, left for the pump and right for the emergency generator. In the left area you arrange a GUI component containing Dialogs with the interface to control the pump. Right you place another component where Dialogs to monitor and control the emergency generator are presented. Now, when the pump reports an error, you present an alert Dialog in context of the left component. Thereupon the alert affects only the Dialogs existing inside this component. The GUI component on the right intended to control the emergency generator as well as all Dialogs existing inside it are not affected. The user can still interact with these Dialogs and e.g. start or stop the generator regardless of any errors reported from the pump:
The following example project implements such user interface to control the pump and generator. When you start the application, you see on the left some buttons to control the pump. On the right you see buttons to control the generator. With an additional button Simulate an error you can trigger the application to present the alert. As long as the alert is visible, the left area (controlling the pump) is suppressed from being able to handle user inputs:
Please note, the example presents eventually features available as of version 9.00
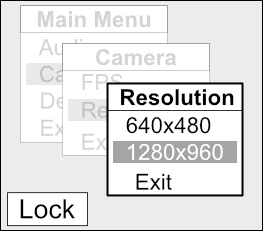
Thus, presenting a new Dialog within a GUI component suppresses all other Dialogs coexisting actually within it. However, other views displayed regularly within the same component and not being explicitly presented as Dialogs by using the methods PresentDialog or SwitchToDialog are not affected. For example, if you have a GUI component containing a push button and several Dialogs, the user is able to interact with the actually active (the latest presented) Dialog and he/she is able to activate the push button. The following figure demonstrates the scenario. Here the user can interact with the top-most menu Dialog Resolution and activate the push button Lock since the button is not presented as a Dialog. Other menu Dialogs are suppressed as expected:
About positioning of Dialogs
Unless you use a customized transition object, the Dialog is always positioned in the center of its respective owner component. In many application cases this is the most desired behavior.
Perform Dialog transitions with animations
When invoking the above described methods PresentDialog, DismissDialog and SwitchToDialog you can specify animations to be performed during the diverse transitions between the affected Dialogs. The animations are determined by so-called transition objects you simply pass in the right method's parameter. Providing null instead of the object (as it was the case in all above demonstrated code examples) causes the operation to be performed without any animation. First at all let's identify the four possible transition cases:
Transition |
Description |
|---|---|
Present |
Determines the animation to perform on the affected Dialog when it is presented. |
Dismiss |
Determines the animation to perform on the affected Dialog when it is dismissed. This is the opposite case to the Present animation. |
Overlay |
Determines an animation to perform on a Dialog when by presenting another Dialog the affected Dialog is overlaid. In this way you can control, whether and how the Dialog should change its appearance when another Dialog is presented above it. |
Restore |
Determines the animation to perform on a Dialog when after dismissing the Dialog in front of it, the affected Dialog is exposed again. This is the opposite case to the Overlay animation. |
Let's recall the example of the hierarchical menu with several menu levels. In this example the user can navigate in the menu system by first entering the top-level menu. Then the user enters a sub-menu and if desired the next possible sub-sub-menu level, and so far. On the way back, the user dismisses the menus one by one in the reverse order. Accordingly, following animations are applied on the affected Dialogs:
1.Just in the moment when the user enters the first (top-level) menu level, the corresponding top-level menu Dialog is presented with the Present animation.
2.Then if the user enters one of the sub-menus, the corresponding sub-menu Dialog is presented with Present animation. At the same time the Overlay animation is applied on the previously presented top-level menu Dialog. Depending on the Overlay animation, the overlaid Dialog may change its appearance or even disappear.
3.When the user decides to dismiss the sub-menu and return to the top-level menu, the animation Dismiss is performed on the sub-menu Dialog. At the same time the Restore animation is applied on the top-level menu Dialog. With the Restore animation the affected Dialog restores its previous appearance.
4.When the user decides to dismiss the top-level menu, the animation Dismiss is performed on the top-level menu Dialog. This Dialog disappears.
Every of these four transition cases can be configured individually. If you take a look at the declaration of the method PresentDialog you see, that it specifies the parameters aPresentTransition, aDismissTransition, aOverlayTransition and aRestoreTransition. Accordingly, you can use different animation when the affected Dialog is presented, overlaid by another dialog, restored again and finally dismissed:
If you don't want a transition to be performed, just pass the value null in the corresponding parameter instead of the transition object. However, if you specify a valid Present transition you should also specify its Dismiss counterpart. Similarly, the Overlay and Restore transitions should be specified in pair. For example:
// Assume, this is a new Dialog you want to present var Core::Group newDialog = new Examples::AlertPanel; // These are the transitions you want to perform var Effects::Transition transition_1 = ... var Effects::Transition transition_2 = ... // The Dialog should be presented with 'transition_1' and // dismissed later with 'transition_2'. PresentDialog( newDialog, transition_1, transition_2, null, null, null, null, null, null, false ); // The Dialog should be presented and dismissed without any // animation. However, if the Dialog is overlaid perform the // animation 'transition_1'. When the Dialog is restored again, // the animation 'transition_2' should be performed. PresentDialog( newDialog, null, null, transition_1, transition_2, null, null, null, null, false ); // The Dialog should be presented and dismissed with the same // 'transition_1' animation. PresentDialog( newDialog, transition_1, transition_1, null, null, null, null, null, null, false ); // The Dialog should be presented and dismissed with the same // 'transition_1' animation. If the Dialog is overlaid by another // Dialog and later exposed again, the Dialog should apply the // 'transition_2' animation. PresentDialog( newDialog, transition_1, transition_1, transition_2, transition_2, null, null, null, null, false ); // The Dialog should be presented without any animation. When the // Dialog is dismissed later, again no animation is performed. PresentDialog( newDialog, null, null, null, null, null, null, null, null, false );
All transition animations are thus determined already in the moment when the Dialog is presented. Later, when the Dialog is dismissed again (e.g. by invoking the method DismissDialog), the previously predetermined animation is performed automatically. Similarly, when the affected Dialog is overlaid by another Dialog and later restored again, the Dialog knows the corresponding animation to perform.
If desired, these once predetermined animations can be overridden by explicitly specifying another transition objects in the aOverride... parameters. The override parameters influence thus the already existing and configured Dialogs. For example, in the parameters aOverrideOverlayTransition and aOverrideRestoreTransition of the PresentDialog method you can specify animations to be applied on the Dialog, which will become overlaid by the just presented new Dialog. In this manner you override the transitions specified at the present time of this Dialog:
var Core::Group dialog_1 = new Examples::AlertPanel; // These are the transitions you want to perform var Effects::Transition transition_1 = ... var Effects::Transition transition_2 = ... // 'dialog_1 should be presented and dismissed with 'transition_1'. // If the Dialog is overlaid, the 'transition_2' is used to hide // and later expose the Dialog again. PresentDialog( dialog_1, transition_1, transition_1, transition_2, transition_2, null, null, null, null, false ); [...] // Some time later, further Dialog should be presented overlying // 'dialog_1'. var Core::Group dialog_2 = new Examples::AnotherAlertPanel; // These are the transitions you want to perform var Effects::Transition transition_3 = ... var Effects::Transition transition_4 = ... // 'dialog_2' should be presented and dismissed with 'transition_3'. // It thus overlays the previously presented 'dialog_1'. Usually, // 'dialog_1' would perform now the animation 'transition_2' as // specified at its own presentation time. We, however, want it // to perform the animation 'transition_4' in this case. PresentDialog( dialog_2, transition_3, transition_3, null, null, transition_4, transition_4, null, null, false );
Similarly to PresentDialog method, also the method SwitchToDialog allows you to specify individual animations for the four possible transition cases of the just presented Dialog. And exactly as you could override the transitions of the already presented Dialogs, you can do this when invoking the method SwitchToDialog. Let's take a look at the declaration of this method:
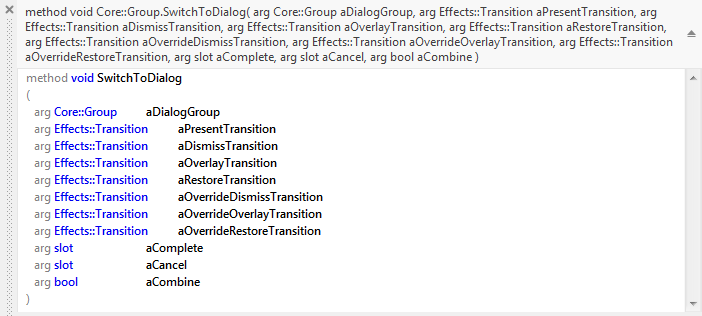
The unique difference to the method PresentDialog is, the method SwitchToDialog expects a further parameter aOverrideDismissTransition. This is necessary because with SwitchToDialog you perform two operations: you present a new Dialog and dismiss the actually active Dialog. With the parameter aOverrideDismissTransition you are able to specify an animation the affected (dismissed) Dialog should perform in order to disappear from the screen which can be different to the specified at the presentation time of this Dialog.
In turn, the method DismissDialog does never present any new Dialog. It is limited to hide (dismiss) the affected Dialog and restore the state of the Dialog eventually overlaid by it. When executed, the method performs the animations specified at the presentation time of the affected Dialogs. However similarly to the other methods explained above, you can specify other animations to override them temporarily. The method DismissDialog is declared as follows:
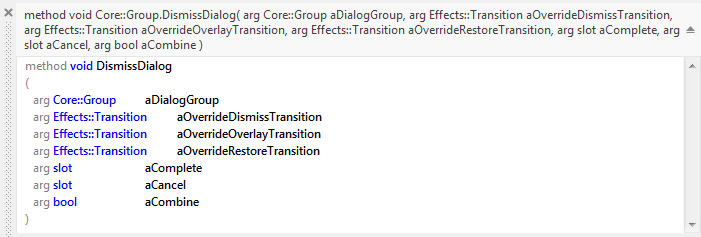
With the parameter aOverrideDismissTransition you are able to specify the animation the affected (dismissed) Dialog should perform in order to disappear from the screen instead of the animation specified at its presentation time. If there is a further Dialog lying behind it, this Dialog will perform its predetermined Restore animation unless you specify another transition in the parameter aOverrideRestoreTransition.
If you dismiss a Dialog existing actually in the middle of the Dialog stack (there is another Dialog in front of the dismissed Dialog as well as behind it), you should consider, that with this operation the Dialog in the background remains still overlaid. Only the overlying Dialog changes. Consequently, the Dialog in the background will perform Restore transition as expected and the Overlay transition as resulting from the now new overlaying Dialog. With the parameter aOverrideOverlayTransition you can, as usual, specify another transition to be performed in this case.
The possibility to override the once specified transitions is just the icing on the cake. In the most cases, however, it is sufficient to work with the transitions predetermined at the presentation time of the respective Dialog. Even in this case you are not obligated to specify for every possible transition the corresponding animation object. Just pass the value null in the corresponding parameter for every transition you are not interested in.
The remaining open question in this context is, what are the transition objects? In the source code examples above we limited to use locally declared variables representing the transition objects. But where do the objects come from? This question is answered in the following sections.
Use default Dialog transition objects
As explained above, you can pass transition objects in parameters of the methods PresentDialog, SwitchToDialog and DismissDialog to determine the animations you want to perform during the transition. For demonstration purpose and to help you to quickly create new product prototypes, Embedded Wizard contains following preconfigured transition objects you can use instantly as they are:
Transition object |
Description |
|---|---|
The most primitive fade-in/out operation alternating the visibility of the respective Dialog component. When using the transition to show the Dialog, the Dialog is automatically arranged in the center of its owner component. This is thus ideal wherever the GUI component should appear or disappear instantly without any animation effects. |
|
The ordinary fade-in/out animation affecting the opacity of the respective Dialog component. When using the transition to show the Dialog, the Dialog is automatically arranged in the center of its owner component. This is thus ideal wherever the Dialog should smoothly appear or disappear. The duration of the transition is configured to take 500 ms. |
|
Slides the affected Dialog from right to left. When using the transition to show the Dialog, the Dialog ends arranged in the center of its owner component. Additionally, while the transition is performed, the opacity of the Dialog fades-in or fades-out accordingly. This is thus ideal wherever the Dialog should smoothly slide-in/out horizontally. The duration of the transition is configured to take 500 ms with FastIn_EaseOut timing. |
|
Slides the affected Dialog from left to right. When using the transition to show the Dialog, the Dialog ends arranged in the center of its owner component. Additionally, while the transition is performed, the opacity of the Dialog fades-in or fades-out accordingly. This is thus ideal wherever the Dialog should smoothly slide-in/out horizontally. The duration of the transition is configured to take 500 ms with FastIn_EaseOut timing. |
|
Slides the affected Dialog downward. When using the transition to show the Dialog, the Dialog ends arranged in the center of its owner component. Additionally, while the transition is performed, the opacity of the Dialog fades-in or fades-out accordingly. This is thus ideal wherever the Dialog should smoothly slide-in/out vertically. The duration of the transition is configured to take 500 ms with FastIn_EaseOut timing. |
|
Slides the affected Dialog upwards. When using the transition to show the Dialog, the Dialog ends arranged in the center of its owner component. Additionally, while the transition is performed, the opacity of the Dialog fades-in or fades-out accordingly. This is thus ideal wherever the Dialog should smoothly slide-in/out vertically. The duration of the transition is configured to take 500 ms with FastIn_EaseOut timing. |
|
Scales the affected Dialog. When using the transition to show the Dialog, the Dialog ends arranged in the center of its owner component. Additionally, while the transition is performed, the opacity of the Dialog fades-in or fades-out accordingly. This is thus ideal wherever the Dialog should appear or disappear by smoothly changing its size. The duration of the transition is configured to take 500 ms with FastIn_EaseOut timing. The scaling factor is configured with 50 %. |
The usage of the default transition objects is very simple. Depending on the desired effect, you pass the right transition object in the corresponding parameter when invoking the methods PresentDialog, SwitchToDialog or DismissDialog. For example, if you want to present an alert with the opacity fade-in animation and dismiss it with the slide upwards animation, implement following code:
// Assume, this is a new Dialog you want to present var Core::Group newDialog = new Examples::AlertPanel; // Present the Dialog with the opacity animation. Later when the Dialog is // dismissed, the slide-up animation is used. PresentDialog( newDialog, Effects::FadeInOutCentered, Effects::SlideUpCentered, null, null, null, null, null, null, false );
The following example project demonstrates the usage of the default transition objects. When you start the application you see a set of radio buttons permitting you to select the transition which should be used when an alert panel is presented and dismissed again. A further push button within the application presents the alert panel:
Please note, the example presents eventually features available as of version 9.00
Customize provided Dialog transition animations
The above presented default Dialog transition objects are finished preconfigured. For example, the object Effects::FadeInOutCentered is configured with 500 ms for its duration and when using it the Dialogs are always arranged in the center within the area of their respective owners. These objects exist for your convenience permitting you to quickly create prototypes of your application. They are not intended to be modified. If you need the transition to take e.g. 330 ms, or you want the Dialogs to appear aligned e.g. at the bottom edge of their respective owners you have to create and configure your own object.
The Mosaic framework implements four classes for the most usual Dialog transition cases. In practice you create an object of the respective class and modify its properties as desired. Then you can pass the object in the parameters of the PresentDialog, SwitchToDialog or DismissDialog method exactly as you do with one of the default transition objects. The following table provides a brief overview of the available transition objects you can create and customize. More details how you parametrize the animations are found in the subordinated chapters describing the respective transition object:
Icon |
Name |
Description |
|---|---|---|
|
This object determines the most primitive transition affecting the visibility of a Dialog GUI component. When using the transition to show a Dialog, the Dialog is automatically arranged at predetermined position within its owner component. You can configure constraints how to arrange the Dialog within the boundary area of its owner and the phase when the affected Dialogs should appear or disappear: at the begin or at the end of the transition. |
|
|
This object determines the ordinary fade-in/out transition affecting the opacity of the respective Dialog GUI components. When using the transition to show a Dialog, the Dialog is automatically arranged at predetermined position within its owner component. You can configure the duration of the animation and the constraints how to arrange the Dialog within the boundary area of its owner. |
|
|
This object determines the transition affecting the position and the opacity of the respective Dialog GUI component. When using the transition to show a Dialog, the Dialog ends arranged in the center of its owner component. You can configure the direction to slide the Dialog, the duration and timing parameters of the animation and the constraints how to arrange the Dialog within the boundary area of its owner. |
|
|
This object determines the transition affecting the size and the opacity of the respective Dialog GUI component. When using the transition to show a Dialog, the Dialog ends arranged at predetermined position within its owner component. You can configure the scaling factor, the duration and timing parameters of the animation and the constraints how to arrange the Dialog within the boundary area of its owner. |


Implement your own Dialog transition animation
If the possibility to customize the provided Dialog transitions is not sufficient in your application case, you can implement your own transition. Doing this you are flexible to create even very sophisticated animations and you can implement your own constraints how an affected Dialog should be positioned within the area of its owner component. However, implementing a new transition is an advanced aspect expecting a good understanding of the functionality behind it. The following are the steps how to proceed:
★As first step derive a new class from the Mosaic class Effects::Transition.
The derived class inherits from its super class four methods: CreatePresentFader, CreateDismissFader, CreateOverlayFader and CreateRestoreFader. These methods are invoked when the homonymous animation is requested to run. Therefore:
★In your derived class override all four inherited methods.
The job of the methods is to create dynamically, configure and return so-called Fader object. Fader objects take care of fading-in and out GUI components. The Mosaic Framework implements following four Fader classes, you can use in your overridden methods to instantiate the desired Fader objects:
Icon |
Name |
Description |
|---|---|---|
|
This class provides functionality for the most primitive fade-in and fade-out transitions affecting the pure visibility of a given GUI component. This fader is thus ideal wherever one GUI component should instantly appear or disappear in context of another component. When you configure the Fader object, you can determine whether the affected GUI component should appear or disappear as well as the position where the GUI component should appear. |
|
|
This class provides functionality for the fade-in and fade-out transitions affecting the opacity of a given GUI component. This fader is thus ideal wherever one GUI component should smoothly appear or disappear in context of another component without changing its actual position. When you configure the Fader object, you can determine the start and the end opacity of the affected GUI component. |
|
|
This class provides functionality for the fade-in and fade-out transitions affecting the position and eventually the opacity of a given GUI component. This fader is thus ideal wherever one GUI component should smoothly appear or disappear by moving it within another component. When you configure the Fader object, you can determine the start and the end position of the affected GUI component as well as its start and end opacity values. |
|
|
This class provides functionality for the fade-in and fade-out transitions affecting the shape and eventually the opacity of a given GUI component. This fader is thus ideal wherever one GUI component should smoothly appear or disappear by 2D/3D rotating, scaling and translating its image within another component. When you configure the Fader object, you can determine the start and the end position of the affected GUI component as well as a 3D matrix representing the desired distortion effect. Also, the start and the end opacity values of the affected component can be configured. |


★Implement the methods to create, initialize and return the desired Fader object.
Let's assume you want the Present operations of your own transition to be performed with opacity animation and without changing the position of the affected Dialog component. In such case implement the corresponding CreatePresentFader method to return an Effects::OpacityFader object. In your method configure the object to change the opacity in the range 0...255 as well as the duration of the animation:
// Create new instance of the Fader object var Effects::OpacityFader fader = new Effects::OpacityFader; // Initialize the fader to show the GUI component. fader.Visible = true; fader.AssignFocus = false; fader.RestackTopmost = true; fader.UseCurrentState = false; // The duration of the animation as well as the start/end values // for the opacity fader.Effect.CycleDuration = 1000; fader.Effect.Value1 = 0; fader.Effect.Value2 = 255; // Finally, return the just created and configured object. return fader;
Similarly, the remaining three methods have to be implemented. This time, however, the initialization of the Fader object should be adapted to correspond to the respective operation. For example, the method CreateDismissFader has the job to create a Fader object, which hides (fades-out) the GUI component. Accordingly, your implementation of the method should configure the Fader to e.g. animate the opacity of the component between the values 255 and 0. For more details, please see the documentation of the respective Fader class.
TIP
If you are looking for examples of how the transitions are implemented and Fader objects used, we recommend you to take a look at the implementation of the provided existing transition classes: Effects::ShowHideTransition, Effects::FadeInOutTransition, Effects::SlideTransition, Effects::ScaleTransition.
Perform several Dialog transitions simultaneously
Every time you invoke one of the methods PresentDialog, SwitchToDialog or DismissDialog, the corresponding operation is stored as a new entry in an internal transition queue. Then, the operations are processed one after another strictly in the order in which you have requested them. For example, if you invoke PresentDialog twice to show two different Dialogs, the second Dialog appears after the animations to present the first Dialog are finished. As long as one Dialog is still performing its animations, other operations are pending in the queue.
As explained above, every GUI component manages its own Dialogs by itself without taking care of any other Dialog presented eventually within another component. Accordingly, every GUI component does maintain its own transition queue and controls the order of operations affecting its own Dialogs only. Presenting a Dialog within one GUI component has thus no impact on the order of operations executed in context of another GUI component. For example, if you present a Dialog within the GUI component A and simultaneously you dismiss a Dialog existing already within the component B, both transition animations will run simultaneously.
Thanks to the queue, the GUI component controls the order in which the Dialogs appear and disappear. Let's imagine the example of a hierarchical menu system permitting the user to navigate and dive in nested sub-menu Dialogs. With every interaction the user enters the next deeper menu level or returns to the immediate superior menu level. Even if the user activates the menu items very quickly, the transitions between the diverse menu levels are performed one after the other. This, however, is not always the desired behavior. In particular cases the user might expect several menu Dialogs to appear or disappear at once with the corresponding transition animations being executed simultaneously. For example, activating an Exit menu item could cause the entire menu system (means all actually presented menu Dialogs) to be dismissed with a single transition.
This can be controlled by the boolean value passed in the last parameter aCombine of the respective PresentDialog, SwitchToDialog or DismissDialog method. If you pass in this parameter the value false (as it was the case in all above shown code examples), the corresponding operation is stored as a new entry in the queue. In turn, if this parameter is true, the operation will be appended at the last enqueued but not yet started operation. As soon as it is its turn, all operations stored in the entry are started simultaneously. Please note, if the queue is empty, the value of the parameter aCombine doesn't matter and the operation is always treated as a new individual queue entry. For example:
// These are the actually presented menu Dialogs starting with the // top-level menu 'mainMenu', its 'submenu_1' and the next subordinated // 'submenu_2'. var Core::Group mainMenu = ... var Core::Group submenu_1 = ... var Core::Group submenu_2 = ... // Schedule a new operation to dismiss the latest presented menu Dialog. DismissDialog( submenu_2, null, null, null, null, null, false ); // Simultaneously, the other two Dialogs should be dismissed too. This // is achieved by passing the value 'true' in the last parameter of the // method invocation. The corresponding operations are thus combined // with the above dismiss operation. DismissDialog( submenu_1, null, null, null, null, null, true ); DismissDialog( mainMenu, null, null, null, null, null, true );
The following example project demonstrates this here described functionality. It implements a simple menu system with 3 levels the user can navigate forth and back. In the third menu level the user can activate the menu item Exit all menus at once or Exit all menus. Accordingly, all actually presented menu Dialogs are dismissed. Depending on the selected item, the Dialogs disappear simultaneously or in succession:
Please note, the example presents eventually features available as of version 9.00
The possibility to combine several Dialog operations together also permits you to create sophisticated transition tricks. For example, while you present an alert Dialog you could present another one serving as a kind of scrim behind the alert. Accordingly the background behind the alert may appear e.g. darkened. When the user confirms the alert again, you dismiss both the alert Dialog and the scrim Dialog simultaneously. For example:
// First create new instances of the both Dialogs to present. var Core::Group scrim = new Examples::SomeScrimDialog; var Core::Group alert = new Examples::AlertPanel; // Now present the 'scrim' and 'alert' Dialogs - simultaneously. // Note, the 'scrim' Dialog is presented with the opacity transition. // The alert, in turn, with the scale animation: PresentDialog( scrim, Effects::FadeInOutCentered, Effects::FadeInOutCentered, null, null, null, null, null, null, false ); PresentDialog( alert, Effects::ScaleCentered, Effects::ScaleCentered, null, null, null, null, null, null, true ); [...] // Later dismiss the alert together with its scrim Dialog DismissDialog( alert, null, null, null, null, null, false ); DismissDialog( scrim, null, null, null, null, null, true );
The following example project demonstrates the above explained application case. Every time one alert is presented, the associated scrim Dialog is shown too. When the user confirms the alert, the alert Dialog disappears together with its scrim Dialog. Except to darken the background, the scrim Dialog has no other particular functionality:
Please note, the example presents eventually features available as of version 9.00
Handle the completion of a Dialog transition
Due to the internally used queue, the methods PresentDialog, SwitchToDialog and DismissDialog are not executed immediately. When the method returns, the corresponding operation is just scheduled for its execution. When this happens depends on other previously scheduled and still waiting operations as well as their associated transition animations. If your application depends on the completion of the once scheduled operation, you can pass a slot method in the both penultimate parameters aComplete and aCancel. This method will be signaled as soon as the operation is successfully finished (aComplete) or canceled (aCancel) due to another operation being scheduled for the same Dialog and making the original operation obsolete again. For example:
// First create a new instance of a Dialog to present. var Core::Group alert = new Examples::AlertPanel; // Slot methods to signal when the operation is completed or canceled. var slot onComplete = ... var slot onCancel = ... // Present the 'alert' Dialog with the scale transition animation. As // soon as the transition is finished, the slot method 'onComplete' // is signaled PresentDialog( alert, Effects::ScaleCentered, Effects::ScaleCentered, null, null, null, null, onComplete, onCancel, false );
Invoking the methods PresentDialog, SwitchToDialog and DismissDialog verifies whether there is another operation pending in the queue and affecting the same Dialog. If this is the case, the new operation evidently overrides the older one. Let's imagine following scenario with an alert panel, which after being scheduled to appear has been dismissed again without giving it enough time to start any animation. To avoid, that such alert flares up briefly and then disappears again, the older pending operation is automatically canceled and removed from the queue. Only the new dismiss operation remains stored. If the canceled operation was scheduled with a slot method specified in the corresponding aCancel parameter, this slot method is signaled now:
// First create a new instance of a Dialog to present. var Core::Group alert = new Examples::AlertPanel; // Slot methods to signal when the operation is completed or canceled. var slot onComplete = ... var slot onCancel = ... // Schedule the 'alert' Dialog to be presented. PresentDialog( alert, Effects::ScaleCentered, Effects::ScaleCentered, null, null, null, null, onComplete, onCancel, false ); // Just before the transition begun, the Dialog is dismissed again. // Since the Dialog is still invisible it will never appear on the // screen. The DismissDialog() invocation causes the previously // scheduled 'PresentDialog()' operation to be automatically canceled. // Signal is sent to the 'onCancel' slot method. DismissDialog( alert, null, null, null, null, null, false );
If you are not interested in the completion signals, simply pass null in the both parameters. The following example demonstrates the usage of the both parameters aComplete and aCancel. This example contains two buttons. With the first one, you present an alert Dialog. With the second one the Dialog is presented and immediately dismissed again. Accordingly, the present operation in the first case is successfully finished and completed while in the second case the operation is canceled and no Dialog appears. Which of the aComplete or aCancel slot methods has received the signal is reported in the Log window:
Please note, the example presents eventually features available as of version 9.00
Identify the active Dialogs and avoid race conditions
When working with Dialogs you should consider, that every transition between two Dialogs has as consequence an immediate state alternation within the application. This is even true if the corresponding operations are pending in the queue and executed with animations. Understanding this is crucial if you want to implement a reliable and secure GUI application.
Let's imagine following situation of an application implementing a menu system. When the user activates a button, the corresponding menu Dialog appears. Now the user may interact with the menu. For demonstration purpose, this application implements also a timer to automatically dismiss the menu system if after being presented the user hasn't interact with it for a while. It is a kind of auto dismiss timer. What can happen now?
1.The timer expires without any user interaction. Thereupon the menu Dialog is dismissed. All is o.k.
2.Still before the timer could expire the user touches one of the menu items to enter one of the sub-menus. Thereupon a new menu Dialog appears. Due to the user interaction the auto dismiss timer is also restarted. All is o.k.
3.The user activates the menu item just at the same moment when the auto dismiss timer expires. The timer causes the menu system to be dismissed. At the same time the operation triggered by the menu item intends to present a further menu Dialog. Problematic.
This is a serious race condition. In the optimistic case, the application ends in a screen showing incomplete sub-menu without its superior menu. In worst case, the menu navigation will become disturbed causing the application to crash. In any case, the described race condition leads the application to enter an undefined state.
Let's analyze another example. Imagine an application containing two push buttons. With the first button the user can start an engine. With the second button the engine is stopped. The problem we assume in this constructed example is the slow communication with the engine. Accordingly, when the user activates a button, it takes a long time until the engine could process the request. During this time, a new Dialog should be presented notifying the user about the operation being actually in progress. At the same time, the Dialog prevents the user from being able to activate other operations. As soon as the application receives an acknowledge from the engine, the Dialog disappears and the user can interact with the buttons again. What can happen?
1.The user presses the first button. Thereupon the start request is sent to the engine and a new Dialog appears notifying the user about the running request. The user has to wait until the engine has confirmed the operation. All is o.k.
2.The user presses the second button. Thereupon the stop request is sent to the engine and a new Dialog appears notifying the user about the running request. The user has to wait until the engine has confirmed the operation. All is o.k.
3.The user manages to press both buttons at the same time or very quickly one after another. In any case, both associated operations are triggered and two contradictory requests are sent to the engine. Accordingly two Dialogs appear to notify the user about the both pending requests. Problematic.
Apart from the fact that the appearance of the both Dialogs is confusing for the user, the application will enter again an undefined state. Depending on how the engine does deal with the both simultaneous and contradictory requests, the application may end in a state showing permanently one of the Dialogs. The user is not able to interact with the application and it is necessary to restart the system.
To avoid such race conditions, all existing Dialogs track which of them is actually active in context of its respective owner component. Every invocation of the PresentDialog, SwitchToDialog or DismissDialog method causes an immediate update of this state information even if the respective transition is pending in the queue for its execution. The following example describes how the states change during the course of interaction between the user and e.g. a menu system:
1.The user wants to enter and navigate in the menu system. Accordingly, new instance of the main menu Dialog is created and the method PresentDialog is invoked to show it. PresentDialog enqueues the operation. The state information, however, is updated immediately. Consequently, when the method PresentDialog returns to the caller, the main menu is already the active Dialog.
2.After a short delay (e.g. after a transition animation) the main menu Dialog is visible and the user can interact with it. This Dialog is still the active one.
3.In the main menu Dialog the user activates an item to e.g. enter the next deeper menu level. Accordingly, new instance of the respective sub-menu Dialog is created and the method PresentDialog is invoked to show it. Again, PresentDialog enqueues the operation and updates immediately the state of the affected Dialogs. From now, the sub-menu Dialog is the active one. The main menu Dialog, in turn, isn't anymore.
4.After a short delay (e.g. after a transition animation) the sub-menu Dialog is visible. Now the user can interact with it. This sub-menu Dialog is still the active one.
5.The user decides to return to the main menu dialog. Accordingly, the method DismissDialog is invoked to hide the sub-menu Dialog. Again the corresponding operation is enqueued. The state of the affected Dialogs, however, is updated immediately. Consequently, when the method DismissDialog returns to the caller, the sub-menu isn't the active Dialog anymore. Now, the main menu is the active Dialog again.
6.The user decides to leave the menu system. The method DismissDialog is invoked to hide the remaining main menu Dialog. As usual, the corresponding operation is enqueued and the state of the affected Dialogs is updated immediately. Consequently, when the method DismissDialog returns to the caller, the main menu isn't the active Dialog anymore.
Even if the corresponding Dialog transition animations take a long time, the information which of the Dialogs are actually active is updated immediately. Knowing this, you can adapt the implementation of the Dialog components so that they react to user interactions or any other timer or system events only when the respective Dialog is actually active. If the affected Dialog has been dismissed or another Dialog has been presented in the meantime, the user interactions and all events which still could reach the Dialog are simply refused as if the Dialog were not available anymore.
In practice, it is sufficient to enhance the implementation of every Dialog method intended to react to user, timer, system, etc. events by an additional if-condition. The condition tests, whether the Dialog is actually active and if it is not the case, the execution of the method ends as if it were never called. Following are the methods you can involve in the expression of the if-condition in order to test the actual state of the affected component:
Method |
Description |
|---|---|
Returns true if the affected GUI component acts actually as a Dialog, this means the component has been presented by a preceding invocation of the method PresentDialog or SwitchToDialog and it has not been dismissed by DismissDialog. |
|
Returns true if the affected GUI component does actually act as a Dialog (see above IsDialog) and it is the latest presented (top-most) Dialog in context of its owner component. |
|
Returns true if the affected component and all of its owners do actually act as active Dialogs (see above IsActiveDialog) and there are no further subordinated Dialogs existing in context of this component. In other words, the affected component is absolutely the top-most Dialog of all Dialogs existing actually in the GUI application, so all user interactions are primarily directed to this Dialog. |
Please recall the above mentioned example of an application containing a menu system with an auto dismiss timer. As you remember, the application could enter an undefined state if the user has managed to open a new sub-menu and at the same time the auto dismiss timer is expired causing the menu system to be dismissed. To avoid it, following could be the adaptation of all menu related methods intended to be executed when the user activates a menu item or when the timer expires. In other words, when the user tries to open a sub-menu, the corresponding method verifies primarily whether the main menu Dialog is still the active one. If it is not, the user interaction can be ignored:
// If 'this' component is not the active Dialog anymore, ignore the interaction. if ( IsActiveDialog( true ) == false ) return; // ... otherwise perform the operation as usual. For example create and present // the sub-menu Dialog. Owner.PresentDialog( new Example::Submenu, ... );
Similarly, when the timer expires the corresponding slot method should be adapted as follows to avoid the race condition with other operations affecting the same menu:
// If 'this' component is not the active Dialog anymore, ignore the timer expiration. if ( IsActiveDialog( true ) == false ) return; // ... otherwise perform the operation as usual. In this case, dismiss the menu Owner.DismissDialog( this, ... );
Thus, with the method IsActiveDialog you can simply test whether the affected Dialog is actually active. The boolean parameter of the method determines the scope of the verification. If you call the method with false as parameter, the test is limited to the immediate owner of the Dialog only. In turn, if the parameter is true the test evaluates recursively all GUI components till the application root component and the method returns true only when all of the involved components are active Dialogs.
Even more restrictive works the method IsCurrentDialog. It returns true only when the affected Dialog is the absolute top-most active dialog within the application. This is, usually, the Dialog the user actually interacts with. Using this method is thus appropriate if the application shows various nested Dialogs. In turn, the method IsDialog implement the less restrictive test. The method returns true if the affected GUI component is a Dialog regardless of whether it is active or not. For example:
// Is 'this' component a Dialog? if ( IsDialog( false )) ... // Is 'this' component the absolutely active dialog within the application? if ( IsCurrentDialog()) ...
The following example project demonstrates the practical usage of the method IsActiveDialog. This example contains two buttons. Both are intended to present an instance of one and the same Dialog. The unique difference is, the slot method associated to second button is adapted to avoid the above described race conditions. When you start the application and quickly click several times in succession on the first button, the button is activated multiple times and multiple Dialog instances are presented. In turn, if you try the same with the second button, only one Dialog is shown. Just in the moment when this Dialog is presented the Dialog containing the buttons looses its active state and the second activation of the button falls through the IsActiveDialog if-condition:
Please note, the example presents eventually features available as of version 9.00
Please note, the application root component is per default considered as an always presented Dialog. Using the above described test methods in context of the application component results thus in following return values:
// Obtain access to the application root object var Core::Root rootObject = GetRoot(); // The application is always a Dialog trace rootObject.IsDialog( false ); // true trace rootObject.IsDialog( true ); // true // It is always an active Dialog trace rootObject.IsActiveDialog( false ); // true trace rootObject.IsActiveDialog( true ); // true // If there is no other Dialog presented in context of the // application, the application is even the current Dialog. trace rootObject.IsCurrentDialog(); // true or false
IMPORTANT
To avoid eventual race conditions at the runtime of the application we recommend to always use the above described test methods in every Dialog related method which may be called in response to user interactions, timer expirations or any other random event.
Enumerate and search for existing Dialogs
Sometimes it is necessary to know the Dialogs existing within the component. This can, for example, be the case when you need to dismiss some of the actually visible Dialogs but in your application there is no variable intended to store a reference to the affected Dialogs. Thus you have to enumerate the existing Dialogs or even search for the particular one. In such case the Core::Group class provides various useful methods. The following table gives you a short overview of them:
Method |
Description |
|---|---|
Returns the total number of Dialog components subordinated actually to the GUI component. |
|
Returns the Dialog component stored at the given index on the stack of the GUI component in context of which the method has been called. The Dialog lying top-most (the active dialog in context of this component) has the index 0 (zero). The dialog next below has the index 1, and so far. |
|
Returns the index of the Dialog component where it is stored on the stack of the GUI component in context of which the method has been called. The Dialog lying top-most (the active dialog in context of this component) has the index 0 (zero). The dialog next below has the index 1, and so far. |
|
Searches the tree of subordinated components for the one, which acts actually as a Dialog and it is an instance of the class specified in the method parameter. |
|
Searches the tree of subordinated components for the one, which acts actually as an active Dialog and it is an instance of the class specified in the method parameter. |
|
Searches the tree of subordinated components for the one, which acts actually as the current Dialog. In other words, it searches for the absolutely top-most dialog of all dialogs shown actually in context of this component. |
With the above methods you can, for example, dismiss all Dialogs existing actually in a particular GUI component. Or, you dismiss only Dialogs, which are instances of a particular class:
// The GUI component, where you want to dismiss the enclosed Dialogs var Core::Group theGroup = ... // As long as there are Dialogs available ... dismiss them while ( theGroup.CountDialog() > 0 ) theGroup.DismissDialog( theGroup.GetDialogAtIndex(0), null, null, null, null, null, false ); [...] // ... or you dismiss Dialogs of a particular class, for example, an alert. var Core::Group dialog = theGroup.FindDialogByClass( Example::SomeAlert ); // As long as an alert was found ... while ( dialog != null ) { // ... dismiss it and ... dialog.Owner.DismissDialog( dialog, null, null, null, null, null, false ); // ... search for the next alert. dialog = theGroup.FindDialogByClass( Example::SomeAlert ); }