Getting started with Ambiq: Apollo4® Plus Display Kit
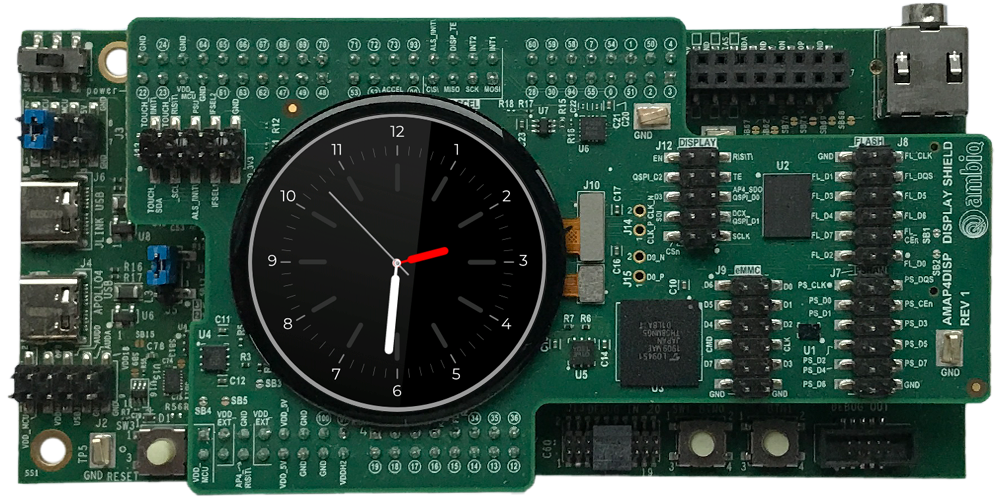
Apollo4 Plus Display Kit: Apollo4 Plus Evaluation Board (AMAP4PEVB) with round 454x454 display (AMAP4PDISP Display Shield).
The following article explains all necessary steps to create an Embedded Wizard UI application suitable for the Apollo4 Plus Display Kit (AMAP4PEVB + AMAP4PDISP) from Ambiq.
Please follow these instructions carefully and step by step in order to ensure that you will get everything up and running on your target. In case you are not familiar with Embedded Wizard, please read first the chapter basic concepts and the Quick Tour tutorial to understand the principles of Embedded Wizard and the GUI development workflow.
Prerequisites
First, make sure you have all of the following items:
Hardware components
★Apollo4 Plus Evaluation Board (AMAP4PEVB) from Ambiq
★Apollo4 Plus Display Shield (AMAP4PDISP) from Ambiq containing a wearable AMOLED display with 454x454 pixel and MIPI-DSI interface
★USB cable to connect the board with your PC
Software components
★Embedded Wizard Studio Free or Embedded Wizard Studio Pro
If you want to use the Free edition of Embedded Wizard Studio please register on our website and download the software.
As a customer, please visit the Embedded Wizard Download Center (login/password required) and download Embedded Wizard Studio Pro.
★Embedded Wizard Build Environment for Apollo4Plus-Display-Kit with NemaGFX graphics acceleration
To evaluate Embedded Wizard on the mentioned target, you can download the suitable Build Environment from the following link:
![]() Apollo4Plus-Display-Kit-BuildEnvironment-V12.00.01.00.zip
Apollo4Plus-Display-Kit-BuildEnvironment-V12.00.01.00.zip
As a customer, please visit the Embedded Wizard Download Center (login/password required) and download the latest version of the Build Environment and your licensed Platform Package libraries or source codes.
Installing Tools and Software
★Step 1: Install the latest version of Embedded Wizard Studio.
★Step 2: Install the Segger J-Link Software and Documentation pack for Windows.
★Step 3: Connect the Apollo4 Display Shield (AMAP4PDISP) with the Apollo4 Plus Evaluation Board (AMAP4PEVB). Connect your board with your PC via the JLINK USB port.
★Step 4: Unpack the provided Embedded Wizard Build Environment for Apollo4 Plus Display Kit to your local file system (e.g. C:\Ambiq\Apollo4Plus-Display-Kit).
Exploring the Build Environment
The provided Embedded Wizard build environment for Apollo4 Plus Display Kit contains everything you need to create, compile, link and flash an Embedded Wizard UI application for the Apollo4 Plus Display Kit. After unpacking, you will find the following subdirectories and files:
•StartGccBuildEnvironment.bat - This script file is provided to start a windows command line to build your GUI applications for the target.
•\Application - This folder contains ready-to-use projects to compile and link an Embedded Wizard generated UI application. They are used for all provided examples and they can be used to build your own UI applications.
•\GeneratedCode - This folder is used to receive the generated code from an Embedded Wizard UI project. All template projects are building the UI application out of this folder. You can create your own UI project and generate the code into the subdirectory \GeneratedCode without the need to adapt the project.
•\Project - This folder contains the prepared project for GCC (make).
•\Source - This folder contains the files main.c and ewmain.c. There you will find the initialization of the system and the main loop to drive an Embedded Wizard GUI application. The file ewconfig.h contains general configuration settings for the target system, like memory ranges and display parameter and configuration settings for the Embedded Wizard Graphics Engine and Runtime Environment. Additionally, this folder contains a configuration file for FreeRTOS and the device driver C/H files used for the DeviceIntegration example.
•\Examples\<ScreenSize> - This folder contains a set of demo applications prepared for a dedicated screen size (454x454 pixel round). Each example is stored in a separate folder containing the entire Embedded Wizard UI project. Every project contains the necessary profile settings for the Apollo4 Plus Display Kit. The following samples are provided:
•\HelloWorld - A very simple project that is useful as starting point and to verify that the entire toolchain, your installation and your board is properly working.
•\ScreenOrientation - This demo shows, that the orientation of the UI application is independent from the physical orientation of the display.
•\DeviceIntegration - This example shows the integration of devices into a UI application and addresses typical questions: How to start a certain action on the target? How to get data from a device?
•\GraphicsAccelerator - This application demonstrates the graphics performance of the target by using sets of basic drawing operations that are executed permanently and continuously.
•\AnalogWatches - This application contains a set of analog watches with rotating clock hands.
•\BezierClock - The sample application BezierClock implements a fancy digital clock and timer application with animated digits. The application uses vector graphics to render dynamically the different digits for clock and timer. The change from one digit to another is handled by moving the vector points to get a smooth transition animation.
•\BrickGame - The sample application BrickGame implements a classic "paddle and ball" game. In the game, a couple of brick rows are arranged in the upper part of the screen. A ball travels across the screen, bouncing off the top and side walls of the screen. When a brick is hit, the ball bounces away and the brick is destroyed. The player has a movable paddle to bounce the ball upward, keeping it in play.
•\PlatformPackage - This folder contains the necessary source codes and/or libraries of the Apollo Platform Package: The Graphics Engine for the supported color format (RGB565) and the Runtime Environment (in the subdirectory \RTE).
•\TargetSpecific - This folder contains all configuration files and platform specific source codes. The different ew_bsp_xxx files implement the bridge between the Embedded Wizard UI application and the underlying board support package (Ambiq hardware drivers) in order to access the display, the serial interface and the clock.
•\ThirdParty - This folder contains third-party source codes and tools:
•\gcc-arm-none-eabi - This folder contains a subset of the ARM GNU toolchain to compile the examples.
•\Make - This folder contains a make tool to build the entire GUI application via command line.
•\ApolloSDK - This folder contains the necessary subset of the Software Development Kit (SDK) for Apollo4 used for the Embedded Wizard UI applications (BSP, drivers, FreeRTOS, NemaGFX, NemaDC).
Creating the UI Examples
For the first bring up of your system, we recommend to use the example 'HelloWorld':
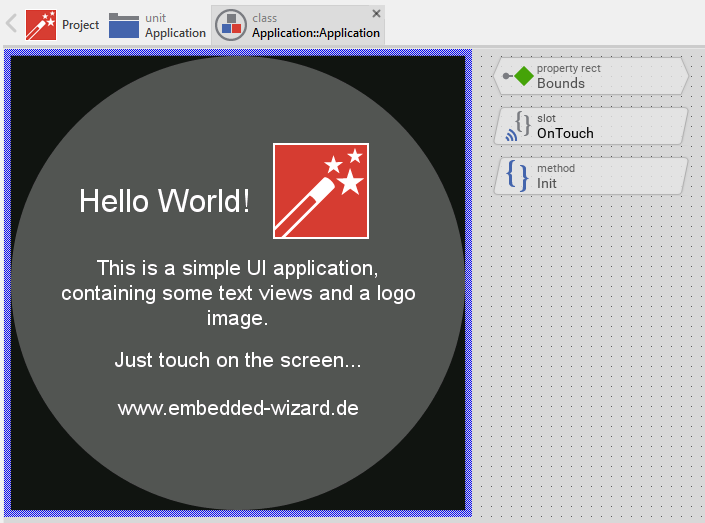
Example 'HelloWorld' within Embedded Wizard Studio.
The following steps are necessary to generate the source code of this sample application:
★Navigate to the directory \Examples\<ScreenSize>\HelloWorld.
★Open the project file HelloWorld.ewp with your previously installed Embedded Wizard Studio. The entire project is well documented inline. You can run the UI application within the Prototyper by pressing Ctrl+F5.
★To start the code generator, select the menu items - or simply press F8. Embedded Wizard Studio generates now the sources files of the example project into the directory \Application\GeneratedCode.
Compiling, Linking and Flashing
The following steps are necessary to build and flash the Embedded Wizard UI sample application using the GCC ARM embedded toolchain:
★Navigate to the top level of the Build Environment.
★Open StartGccBuildEnvironment.bat - as a result, a windows command line window should open. In case there are error messages, please edit the file and double-check the path settings.
★Now start compiling, linking and flashing:
make make install
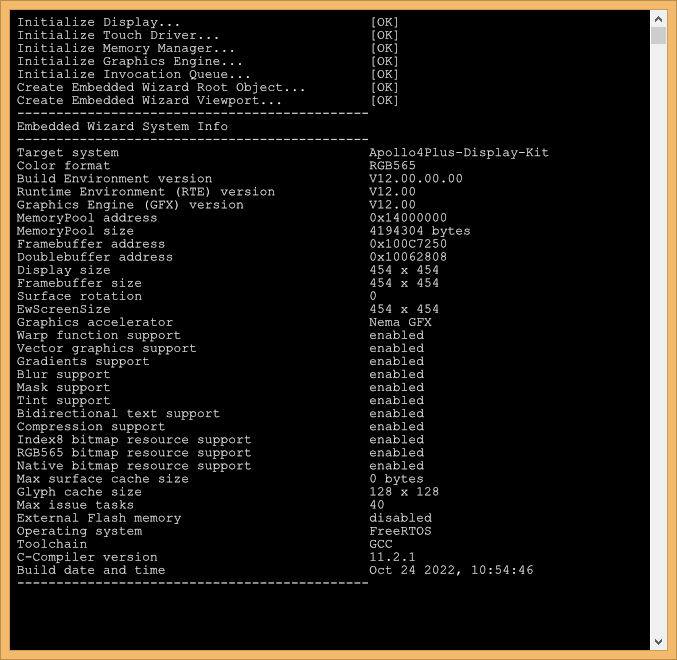
If everything works as expected, the application is now executed on your Apollo4 Plus Display Kit.
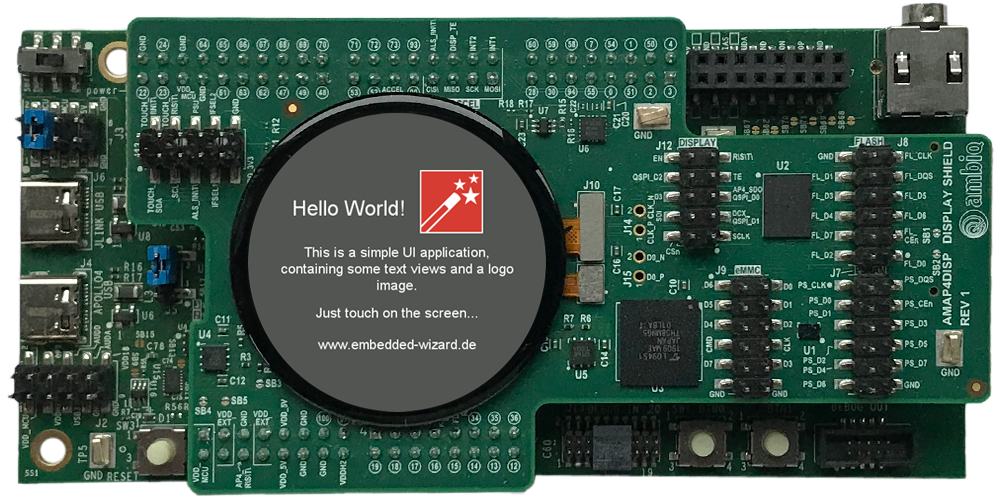
Example 'HelloWorld' running on Apollo4 Plus Display Kit.
All other examples can be created in the same way: Just open the desired example with Embedded Wizard Studio, generate code and rebuild the whole application using simply:
make install
Creating your own UI Applications
In order to create your own UI project suitable for the Apollo4 Plus Display Kit, you can create a new project and select the Apollo4 Plus Display Kit project template:
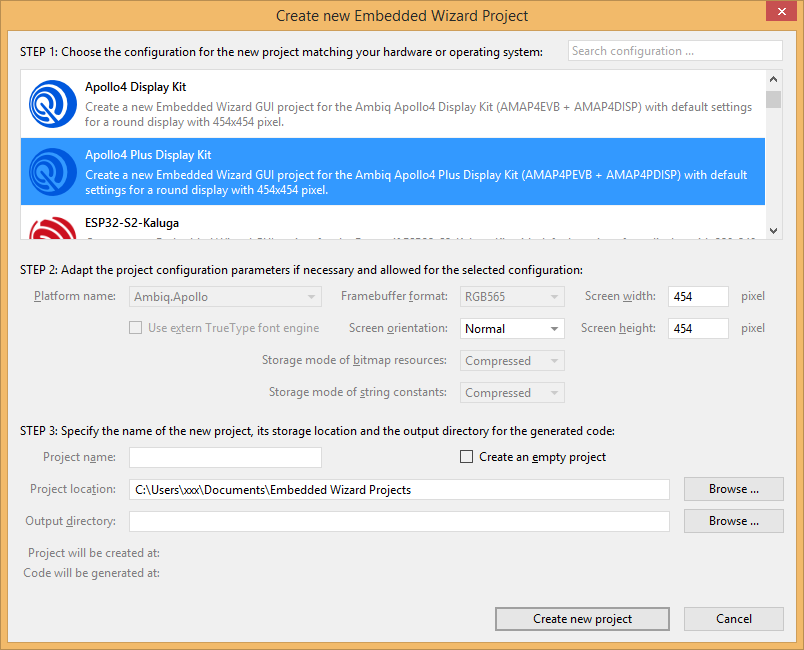
As a result you get a new Embedded Wizard project, that contains the necessary Profile attributes suitable for the Apollo4 Plus Display Kit:
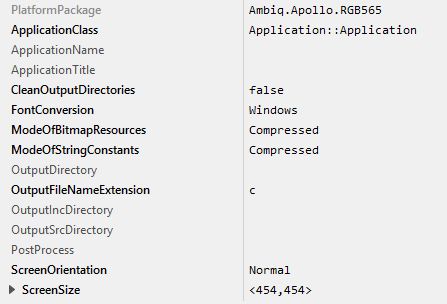
The following profile settings are important for your target:
★The attribute PlatformPackage should refer to the Apollo Platform Package.
★The attribute ScreenSize should correspond to the display size of the Apollo4 Plus Display Kit.
★The attribute OutputDirectory should refer to the \Application\GeneratedCode directory within your Build Environment. By using this template, it will be very easy to build the UI project for your target.
★The attribute CleanOutputDirectories should be set to true to ensure that unused source code within the output directory \Application\GeneratedCode will be deleted.
Now you can use the template project in the same manner as it was used for the provided examples to compile, link and flash the binary.
After generating code, please follow these steps, in order to build your own UI application:
★Start the batch file 'StartGccBuildEnvironment.bat'. Again, a windows command line window should open.
★Start compiling, linking and flashing:
make install
Most of the project settings are taken directly out of the generated code, like the color format or the screen orientation. Only a few additional settings can be configured directly within the Makefile, like the usage of the FreeRTOS operating system. All other settings can be made directly within the file ewconfig.h, which contains general configuration settings for the target system.
Console output
In order to receive error messages or to display simple debug or trace messages from your Embedded Wizard UI application, a serial terminal like 'Putty' or 'TeraTerm' should be used.
★As soon as you connect your Apollo4 Plus Display Kit with the PC via USB, a new virtual Com Port appears within your system device list. Open the device manager to get the port number of this COM port.
★Now you can open your terminal application and connect it via COMx with the following settings: 115200-8-N-1
This terminal connection can be used for all trace statements from your Embedded Wizard UI applications or for all debug messages from your C code.
Release notes
The following section contains the version history of the Build Environment (including Graphics Engine and Runtime Environment) for the Apollo4 Plus Display Kit with NemaGFX graphics acceleration. These release notes describe only the platform specific aspects - for all general improvements and enhancements please see the Embedded Wizard release notes.
Version 12.00.00.00
★Enhanced system configuration: The set of macros used to configure the target system has been enhanced within the file ewconfig.h. All macros are now described in the article target configuration.
★Operating system wrapper (ew_bsp_os.c): All operating system services used within the Build Environment are now grouped together and implemented within the file ew_bsp_os.c. This simplifies the adaptation to other (realtime) operating systems. The functions EwBspClockTickIncrement() and EwBspClockGetTicks() are replaced by EwBspOsSystickHandler() and EwBspOsGetTicks(). Please verify that the system tick is working properly in case you are updating from previous versions.
★Operating system: The macro EW_USE_FREE_RTOS has been renamed to EW_USE_OPERATING_SYSTEM. Please check your code and project file in case you are updating from previous versions.
★FreeRTOS stack definition: The stack size for the main GUI thread is now defined by the macro EW_GUI_THREAD_STACK_SIZE within the file ewconfig.h. The FreeRTOS stack definition from FreeRTOSConfig.h is no more used.
★Multi-Thread, Multi-Task check functionality: All relevant top-level Runtime Environment and Graphics Engine functions perform now a test whether the function is called in context of the original GUI thread/task. For this purpose the test compares the current CPU stack address with the address area known as used for GUI thread/task stack. The stack memory area is provided to the Embedded Wizard application within the file main.c by using the function EwSetStackAddressArea(). The size of the stack area is defined by the macro EW_GUI_THREAD_STACK_SIZE in the file ewconfig.h. The test functionality can be disabled by the macro EW_DONT_CHECK_THREAD_CONTEXT in the file ewconfig.h.
★Communication between threads and tasks: The Runtime Environment has been enhanced by new functions EwInvoke() and EwInvokeCopy(). These functions register user's own implemented C functions to be called in context of GUI thread/task. These functions are explicitly allowed to be called from any foreign thread or even from interrupt service routines. The new macro EW_INVOCATION_QUEUE_SIZE in the file ewconfig.h determines the size of the invocation queue in bytes. The initialization of the invocation queue is done in EwInit() by calling the function EwInitInvocations(). The deinitialization of the invocation queue by using EwDoneInvocations() can be found in EwDone(). The main loop EwProcess() that drives the entire Embedded Wizard GUI application is enhanced by the new function EwProcessInvocations().
★System initialization: The configuration of Runtime Environment and Graphics Engine is now done in EwInit() by using the new functions EwConfigRuntimeEnvironment() and EwConfigGraphicsEngine().
★System information: The function EwPrintSystemInfo() is now determining the current configuration of Runtime Environment and Graphics Engine by using the new functions EwGetRuntimeEnvironmentInfo() and EwGetGraphicsEngineInfo(). The version numbers are printed according to the new version numbering scheme. The layout of the entire message printed to the console is rearranged.
★Immediate garbage collection: The test function EwTestImmediateReclaimMemory() performs a simple test for the correct function of the immediate garbage collection. If the application is compiled with the macro EW_USE_IMMEDIATE_GARBAGE_COLLECTION and the the stack area is specified by using EwSetStackAddressArea(), the function EwTestImmediateReclaimMemory() verifies the correct operation. This is added to EwInit() in the file ewmain.c.
★Cache invalidation: The function GfxCreateSurface() in the file ewextgfx.c is adapted to invalidate the data cache for the complete address range of the pixel data to avoid that cache is written after modifications by graphics hardware.
★Touch initialization: The initialization of the touch driver is improved to avoid potential division by zero errors during runtime in case that touch initialization has failed.
★Color channel order: The default color channel order in compressed bitmap resources has changed from ABGR to ARGB. This avoids an additional color channel reordering during the loading (decompression) of the bitmap resources.
★Device integration example: The example DeviceIntegration and the DeviceDriver.c/h files have to be adapted to show the usage of the new features: A separate worker-thread is created to provide simulated ADC data to the GUI. The functions EwInvoke() and EwInvokeCopy() are used from the work-thread and the hardbutton interrupt service routine (ISR). The example supports OS and bare-metal. The previously used functions DeviceDriver_Init(), DeviceDriver_Done() and DeviceDriver_ProcessData() are presented as deprecated approach or bare-metal.
★Changed to Graphics Engine (GFX) and Runtime Environment (RTE) V12.00.
★Changed support to Apollo4 Plus Evaluation Board (AMAP4PEVB) with Apollo4 Plus Display Shield (AMAP4PDISP).
★Changed to AmbiqSuite SDK V4.3.0.
★Changed to Arm GNU Toolchain V11.2-2022.02.
Version 12.00.01.00
★Bug fix for drawing rotated text with NemaGFX graphics acceleration.