Project members: Embedded objects
With embedded objects you can nest instances of one class within another class, resulting in complex assemblies. Depending on the class of the embedded object, Composer distinguishes explicitly between non-visual and visual objects, so-called views. Non-visual objects are represented as usual by bricks. Visual objects, in turn, do appear with their particular and actual look (as images, text fragments, line segments, ...) within the dedicated Canvas area of Composer:
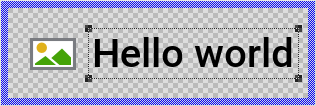
The representation of non-visual and visual object in Composer window.
An embedded object can be defined within a class or class variant only. If one class is derived from another class, all objects defined in the ancestor classes are inherited implicitly. In the derived class the inherited objects can be overridden individually with new initialization expressions for their properties.
In order to preserve the clarity, all non-visual objects inherited from a base class but not overridden in the actual class are not shown as bricks in the Composer. The Inspector, in turn, shows always the complete list including all inherited members. If you are looking for a particular inherited object, use the Inspector for this purpose. Please note, inherited but not overridden objects are shown in Inspector with gray thin font:

Inherited but not overridden objects appear in the Inspector window with thin gray font.
If an inherited object has been overridden, Inspector shows it with dark gray font. Additionally, overridden non-visual objects appear as bricks in the Composer window. You can distinguish easily, whether a non-visual object is overridden or whether it is new by considering the font color in its brick. New non-visual objects are shown with black font. Overridden objects, in turn, with gray font:

Overridden objects appear in Inspector with dark gray font. In case of non-visual objects, they are also shown as bricks in Composer, again with gray font.
Please note, except the Canvas area, embedded objects appear in Composer and Inspector decorated with icons associated to their respective classes. Objects of different classes can thus be distinguished conveniently. Moreover, the class of a non-visual object is shown in the upper text row of the brick:
The brick shows the class of an embedded object and the associated icon.
Create new embedded object
Embedded objects are created by deriving them from a particular class.
★First switch to the Composer page for the respective class or class variant definition, where you want to add the new object.
★Then ensure that the Browser window is visible.
★Within the Browser locate the desired object's class. This can be done easily with Browser's own filter function.
★Select the found class in the Browser window.
★Drag and drop the selected class into the Composer area while holding the keys CtrlAlt pressed.
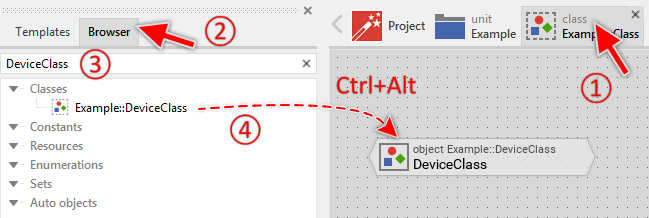
Creating a new object by using the Browser window.
Alternatively, you can create a new embedded object by using the clipboard functions Copy & Paste:
★First ensure, that the class definition from which you want to create the object is selected (e.g. in Composer, Inspector or Browser).
★Press the keys CtrlC or use the menu item to copy the selected class into the clipboard.
★Switch to the Composer page for the respective class or class variant definition, where you want to add the new object.
★Press the keys CtrlAltV or use the menu item to add a new instance of the class stored in the clipboard.
TIP
Starting with Embedded Wizard 9.0 it is not required to hold the keys CtrlAlt pressed during the drag-and-drop operation when you intend to create an embedded object. You can simply select in the Browser window the desired class, grab it and drop it into the Composer window. The keys CtrlAlt are optional in this particular case.
Use templates to create a new object
Embedded Wizard provides various templates for all important objects, like the views, event handlers, widgets or animation effects. These templates offer a convenient approach to embed new objects within a class. The templates are found in the folders of the Gallery. For example, the folder Views contains templates for all view objects. Let's assume, you are editing a GUI component and you want to add an image view object to it, then do following:
★First switch to the Composer page for the respective class or class variant you want to add the new object.
★Then, in the Gallery window, ensure that the folder Views is opened.
★Look in the folder for the desired template Image.
★With the mouse, select the template and drag it into the Canvas area of the Composer.
★Drop the template within the Composer.
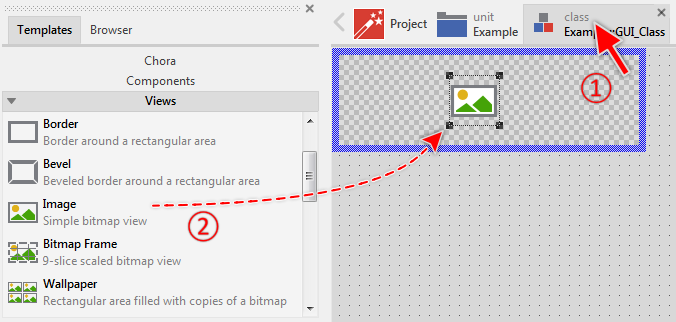
Creating a new object by using templates.
Please note, some templates come associated with annotations providing hints for you how to proceed. If undesired, you can select and delete them. They have no effect on the function of the particular components.
Name the object
★First ensure, that the object member is selected.
★Press the key F2 or select the menu item .
★Enter the new name in the Inspector window.
Embedded objects have a local character - they can be accessed only in context of an instance of the class, in which they are defined. To address an object, you use its name. Please note, the name of an inherited object can't be changed retrospectively in the derived class.
Arrange the object in Composer
As long as the object is selected, you can move and resize it accordingly to your needs. This is in particular essential for all visual objects you arrange within the Composer's Canvas area.
Control the z-order of a visual object
Visual objects are displayed strictly in the order in which they are defined within the class, starting with the back most object (the object with the lowest order number). Objects with higher order overlap automatically other objects lying behind them. The actual order of a member can be verified in the members area of the Inspector window. To change the order you need to explicitly restack the member.
Modify the properties of an object
When the object is selected, you can inspect and modify its properties directly in the Inspector window. In particular, you can specify initial values for every property of the object. An object exposes automatically all properties defined in its class.
If you have modified a property, you can simply revert to its original value (defined in the class of the object) by pressing the keys CtrlR when the property in question is selected in Inspector.
Control the initialization order
At the runtime, when new instance of a class is created, all objects embedded within the class are instantiated too and their properties are initialized automatically with their corresponding initialization expressions. This initialization is performed strictly in the order in which the members are defined within the class, starting with the back most member (the member with the lowest order number).
The actual order of a member can be verified in the members area of the Inspector window. To change the initialization order you need to explicitly restack the member. This, however, is necessary only in cases, when one object's property is initialized with expression containing as operand another member. This 'operand' member, in such case, has to be initialized first.
Please note, changing the order may affect the visibility of visual objects as described above.
Localization
At the runtime Embedded Wizard automatically re-evaluates all initialization expressions, which involve multi-lingual operands. For example, if an embedded object's property is initialized with a localized constant, the initialization expression is re-evaluated and the resulting, eventually different constant value is re-assigned to the property automatically. Thereupon, the onset method associated with the property is executed. See also the section Managing localization.
Duplicate an existing object
You can create any number of copies of an already existing object member.
★First ensure, that the object member is selected.
★Press the keys CtrlC and CtrlV in succession ...
★... or hold the key Ctrl pressed while you drag and drop the selected object member.
★Finally rename the just duplicated object member.
Override an inherited object
When a property of an inherited object is modified, the object will automatically become overridden. The Inspector shows overridden objects with dark gray instead of thin font as explained above. Overridden, non-visual object appear additionally as bricks in Composer. You override an object if you want its properties to be initialized with an expression different to the specified in its inherited version.
Revert a property to its inherited value
If you want to revert an overridden object to its original inherited state, delete it simply. Thereupon, its brick disappears from the Composer and the Inspector shows the object name with thin font again. In case of visual objects, the object restores its original aspect immediately. In turn, to revert a single object's property to its inherited value, select the property and press the keys CtrlR.
Use the object
Once defined, the name of the embedded object can be used within Chora expressions wherever an operand with the data type matching the object's class is expected. Moreover, the properties exposed by the object can be evaluated and its methods can be invoked. Embedded objects are always used in scope of the object, the embedded object belongs to. If no scope is specified, the operation is considered as being performed in context of this object. For example:
// Change the position of an image view object by modifying its // property 'Bounds'. SomeImageView.Bounds = <100,100,130,130>; // Evaluate properties and invoke methods of an embedded object if ( !SomeDeviceObject.IsEngineRunning ) SomeDeviceObject.StartSomeEngine();
Control the code generation
With the attribute Generator you can selectively control, whether the object member should be taken in account during the code generation or not. Configuring this attribute with the value false will exclude the member from your project unless the member name is explicitly involved within a Chora expression.
Delete an object
★First ensure, that the object member is selected.
★Press the key DEL or select the menu item .
Please note, inherited objects can't be deleted. However, if an object is overridden you can delete this overriding.
Attributes of an object
The following table shows the complete list of attributes provided by the embedded object member. Please note, besides the attributes, an object also exposes all properties defined in its class:
Attribute name |
Short description |
|---|---|
Determines the position and the size of an object brick within the Composer window. Please note, this attribute is available for non-visual objects only. |
|
Determines the class of an object member. Please note, this attribute can't be modified if the object is inherited. |
|
Contains the description for the object member. |
|
Controls the code generation for the affected object member. |