Implementing a Device Interface: System Event
The System Event provides a template of an object representing a certain event in your device. This, for example, can be a notification when the device starts to charge the battery. Thereupon the GUI application can react to the event and e.g. update the battery symbol or display an alert informing the user about the new situation. As such, System Events build an integral element of the interface separating the GUI application and the underlying device. Furthermore, System Events abstract the device specific state alternations reducing them to simple notifications like Battery Charging Started.
Usually, you use the System Event template when implementing the Device Interface class. In such case, you add as many System Events to the Interface as notifications your device can report to the GUI. For example, if your device controls a pump, you can add one System Event to notify the GUI when the pump has been started and another event to report when it is stopped. If the pump has additional temperature sensors supervising its correct function you could manage more System Events representing cases like Pump Overload or Temperature Warning.
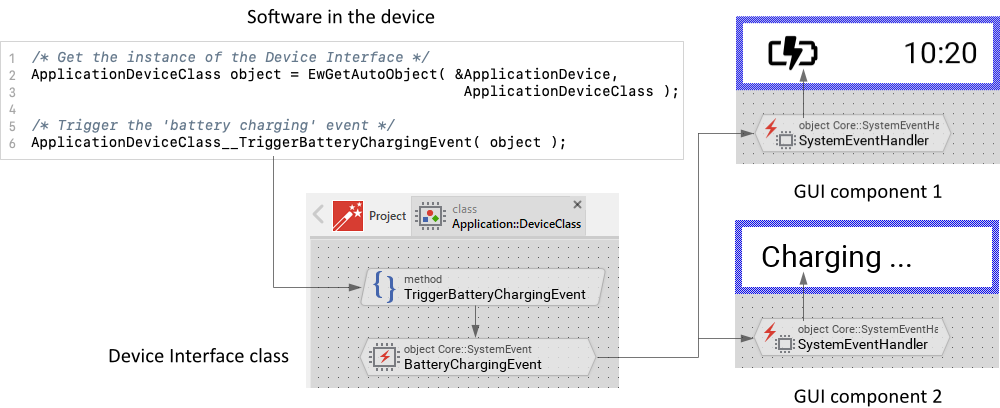
The figure below demonstrates the principle function of a System Event. This example assumes that the device contains a battery. As soon as the battery charging begins, the software running in the device executes the code section and triggers so the System Event object BatteryChargingEvent. This in turn notifies all System Event Handlers connected to this System Event object. The handlers react to the notification and update the appearance of the belonging GUI components or present alerts:
The System Events and the System Event Handlers help to separate the GUI components from the device functionality by what the structure of the entire GUI application can be simplified. The following sections are intended to provide you an introduction and useful tips of how to add and use System Events. To better understand the underlying concepts we also recommend you to read the chapter Implementing a Device Interface as well as Integrating with the device.
Add a new System Event
System Events are usually used when implementing an interface between the GUI application and the device. Accordingly, you add the System Events to a Device Interface class:
★If you have not done it yet, add a new Device Interface to your project.
★Then ensure that the Templates window is visible.
★In Templates window switch to the folder Device.
★In the folder locate the template System Event.
★Drag & Drop the template into the Composer window:
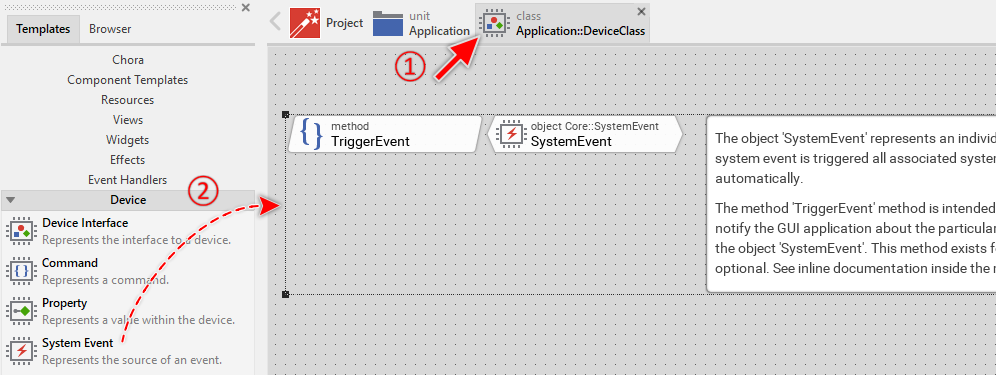
In the screenshot above you see that new added System Events consist of two members: a method and an object. While the object represents the actual System Event, the method serves as the entry point for the external software running on the device. When the event occurs the software invokes the method and triggers so the associated System Event object. The both members are also accompanied by an annotation providing helpful tips how to proceed. If undesired, you can select and delete the annotation.
Name the System Event
The names of newly added System Event objects start per default with SystemEvent. That can lead to confusion especially when your Device Interface consists of many System Events. We recommend thus immediately after adding a new System Event to name it according to the corresponding notification in the device (e.g. to BatteryChargingEvent). For this purpose:
★Press the key F2 or select the menu item .
★Enter the new name in the Inspector window.
The name of the System Event object is relevant for the GUI application only. The name of its associated Trigger method, in turn, plays an important role when it comes to integrate the System Event with the external software running in the device. After adding a new System Event you should therefore also adapt the name of the method to be obvious. Per default this name starts with TriggerEvent. Rename the method so that it reflects the actual notification it will trigger (e.g. TriggerBatteryChargingEvent). For this purpose:
★Press the key F2 or select the menu item .
★Enter the new name in the Inspector window.
Trigger the System Event
System Events are triggered typically by the software running on the device. This software is not part of the GUI application and as such it is considered as extern. It can be seen as a kind of operating system or middleware controlling the device. The GUI application and the extern software form a unity. Interactions made within the GUI are usually reported to the extern software with the aim to perform respective operations. In turn, events generated by the extern software will propagate in the reverse direction.
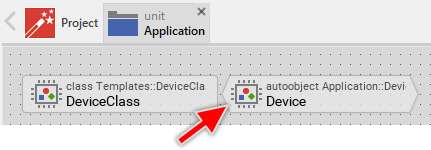
Consequently, to trigger a System Event the extern software has to invoke a function existing in the GUI application. This function represents the Trigger method explained in the sections above. The primary aspect to know is thus the name of the function to call. The second and not less important aspect is the instance of the Device Interface class containing the System Event. This is fundamental, because Chora methods can be executed in context of the corresponding instance only. For your convenience, such instance is prepared automatically when you add a new Device Interface to your project. You recognize it as a global autoobject named per default Device:
How to estimate the name and invoke the function have to be considered differently depending on your development environment C, C++ or JavaScript (depending on your used Platform Package). Similarly the access to the global Device autoobject is also an environment specific aspect. You should also take in account the possibility to trigger events directly from the GUI application instead of by the extern software routines. These different application cases are addressed individually in following three sections.
Trigger System Events in C and C++ compatible systems
Following example demonstrates how to trigger a System Event from C (or C++) code. In the first part we use the function EwGetAutoObject to obtain access to the global instance of the Device Interface class containing the interesting System Event. In the second part we invoke the C function representing the corresponding Trigger method within the Device Interface. The #include preprocessor directive at the beginning of the code snippet ensures that all necessary function declarations are provided before they are used. That's all:
#include "Application.h" [...] /* Obtain access to the Device Interface instance */ ApplicationDeviceClass device = EwGetAutoObject( &ApplicationDevice, ApplicationDeviceClass ); /* Invoke the function to trigger the event */ ApplicationDeviceClass__TriggerBatteryChargingEvent( device );
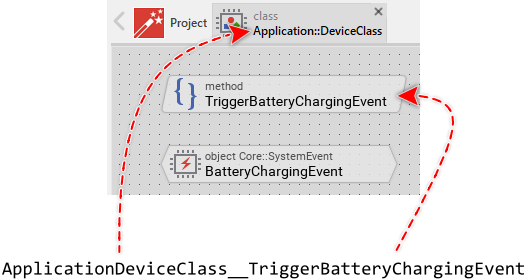
The identifiers used in the first part correspond to the names of the Device Interface class and its associated global autoobject instance. These identifiers are simply derived by concatenating the name of the unit containing the Device Interface class with the name of the class or autoobject itself. The name of the header file used in the #include directive corresponds also to the name of the unit itself. The following figure demonstrates how the diverse identifiers are determined:
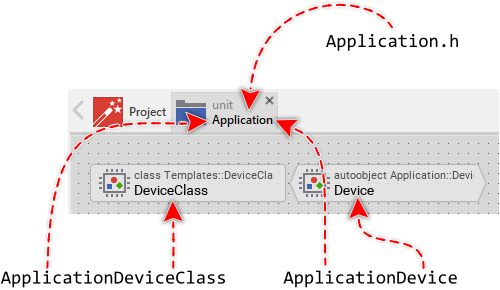
Similarly in the second part, the name of the function to invoke is composed of the unit containing the Device Interface class, the name of the Device Interface class itself, a double underscore __ and the name of the method intended to trigger the System Event. The following figure demonstrates how the above used function name is derived:
Trigger System Events in JavaScript compatible systems
Following example demonstrates how to trigger a System Event from JavaScript code. In the first part we use the function _GetAutoObject to obtain access to the global instance of the Device Interface class containing the interesting System Event. In the second part we invoke the JavaScript function representing the corresponding Trigger method within the Device Interface. That's all:
// Obtain access to the Device Interface instance var device = EmWiApp._GetAutoObject( EmWiApp.Application.Device ); // Invoke the function to trigger the event device.TriggerBatteryChargingEvent();
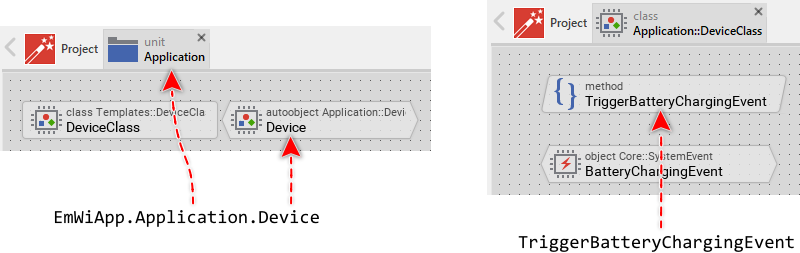
The identifiers used in the first part correspond to the name of the global autoobject instance representing the Device Interface and the unit containing the Device Interface. The identifier EmWiApp represents the instance of the GUI application itself. Please note, that this default name EmWiApp can be modified by specifying another name in the attribute ApplicationName. Similarly in the second part, the name of the function to invoke matches the name of the method intended to trigger the System Event. The following figure demonstrates how the diverse identifiers are determined:
Trigger System Events locally from Chora code
Triggering of System Events can also occur locally from the Chora language. In this case no extern software is involved and the source of the event is the GUI application itself. As such, System Events are well suited to be used for internal communication between GUI components and e.g. the underlying business logic implemented in Embedded Wizard. Triggering a System Event directly from the GUI application is also practicable when during Prototyping of the GUI application the event needs to be simulated.
According to the explanation in the section above to trigger an event you have to invoke its method in context of the Device Interface autoobject containing this System Event. The advantage of a global autoobject is that it can be accessed from everywhere in your application. You should only take care of the correct addressing the instance by using its complete name composed of the unit containing the autoobject, the :: (double colon) delimiter and the name of the autoobject itself. For example, the autoobject from the above screenshots is addressed by the expression Application::Device. A GUI component containing a push button could thereupon implement following code to trigger an event every time the user activates the push button:
Application::Device.TriggerBatteryChargingEvent();
React to System Events in the GUI application
In order to handle a System Event in the GUI application you use System Event Handlers. You add such handlers to your GUI components wherever appropriate and configure them to be connected to the original System Event object. When the System Event is triggered all associated handlers are notified automatically.
Multi-threading and interrupt service routines
Embedded Wizard created applications are not thread safe. Calling functions of Embedded Wizard in context of a thread other than the GUI thread will result in unpredictable behavior including very difficult to understand system crashes. Similarly, calling Embedded Wizard directly from an interrupt service routine is poison. When you integrate the GUI application with the underlying software or operating system you should note the following:
★If you intend to invoke a function of the GUI application, you have to ensure that it occurs always in context of the GUI thread.
★If your application uses several threads intended to trigger events in the GUI application, relay the events to the GUI thread first.
★To relay the events you can use interprocess communication services of your operating system (e.g. message queues, pipes, signals, etc.).
★In simple application cases you can implement the communication between the threads by using shared variables. After the foreign thread set the variable the GUI thread can detect it and trigger the event in the GUI application.
★Events reported by interrupt service routines have also be relayed to the GUI thread. Again use interprocess communication services or shared variables.
If you are developing an application for the WebGL Platform Package, ignore the above indications as multi-threading and interrupt service routines are actually not relevant when implementing JavaScript code.
To dispatch an event relayed from a foreign thread or an interrupt service routine you will need to adapt the main loop of the GUI application. Typically, this function processes user inputs, timer expirations and performs screen updates. Now, you will need to extend it to also process and dispatch the foreign messages. Most of our provided Build Environments are already prepared to allow you a simple adaptation of the main loop. Please take a look at the module DeviceDriver.c found in the Build Environment. It contains following three functions:
/* The following function is executed at the initialization time of the GUI application. */ void DeviceDriver_Initialize( void ) { } /* The following function is executed shortly before the GUI application terminates. */ void DeviceDriver_Deinitialize( void ) { } /* The following function is executed periodically. The returned value has to indicated whether the function has processed any data (!=0) or not (==0). */ int DeviceDriver_ProcessData( void ) { return 0; }
The functions DeviceDriver_Initialize and DeviceDriver_Deinitialize are intended to perform code at startup and shutdown of the GUI application. Here you can, for example, setup a message queue to receive events from a foreign thread or initialize other operating system services essential for the communication with foreign threads.
The third function DeviceDriver_ProcessData is the most interesting one. This function is called periodically by the GUI thread and its aim is to check whether there are some important notifications to process, e.g. whether there are messages waiting in a message queue. If this is the case, the function should peek the message and depending on its content invoke a corresponding GUI function to trigger a System Event. The following code demonstrates the approach:
/* Process messages provided from other threads */ int DeviceDriver_ProcessData( void ) { msg_t msg; /* Peek a message from the queue, if any */ if ( message_queue_peek( &msg ) == 0 ) return 0; /* Evaluate the message type */ if ( msg.id == MSG_BATTERY_CHARGING_STARTED ) { /* Obtain access to the Device Interface instance */ ApplicationDeviceClass device = EwGetAutoObject( &ApplicationDevice, ApplicationDeviceClass ); /* Invoke the function to trigger the event */ ApplicationDeviceClass__TriggerBatteryChargingEvent( device ); /* Event has been processed */ return 1; } /* No interesting message for GUI */ return 0; }
If you are developing a device running without any operating system (so-called bare metal), the potential problem of how to exchange data between a worker and the GUI threads disappears. What remains is a problem of processing events generated by interrupt service routines. As mentioned above, invoking GUI code from an interrupt service routine has to be avoided in any case. Since there is no operating system, the unique possibility to exchange the information between the both partners is to use a shared variable.
In such bare metal application case, the interrupt service routine after detecting a particular event increments a global counter variable. The function DeviceDriver_ProcessData compares periodically the value of this counter and if it detects an alternation triggers the respective System Event in the GUI application:
volatile unsigned int SharedCounter = 0; unsigned int ProcessedCounter = 0; /* The interrupt service routine just increments a counter variable */ void InterruptServiceRoutine( void ) { SharedCounter++; } /* Detect and process alternations of the shared variable */ int DeviceDriver_ProcessData( void ) { /* Any event reported by the interrupt service routine? */ if ( SharedCounter != ProcessedCounter ) { /* Obtain access to the Device Interface instance */ ApplicationDeviceClass device = EwGetAutoObject( &ApplicationDevice, ApplicationDeviceClass ); /* Invoke the function to trigger the event */ ApplicationDeviceClass__TriggerBatteryChargingEvent( device ); /* Also adjust the reference counter to ensure that each reported event is processed only once */ ProcessedCounter++; /* Event has been processed */ return 1; } /* No interesting event for GUI */ return 0; }
If you are developing an application for a target system where no adequate Build Environment is available, you will need to take care of the necessary adaptation directly in the main() function of the GUI application. This function contains a while loop where all user inputs are dispatched and screen updates are triggered periodically. Just modify the loop so that it peeks messages from a message queue or checks shared variables as explained above. For example:
volatile unsigned int SharedCounter = 0; unsigned int ProcessedCounter = 0; /* The interrupt service routine just increments a counter variable */ void InterruptServiceRoutine( void ) { SharedCounter++; } /* The main function */ void main( void ) { XEnum cmd = CoreKeyCodeNoKey; [...] /* Endless loop, until the 'power' key is pressed... */ while ( cmd != CoreKeyCodePower ) { int events = 0; int timers = 0; int signals = 0; int devices = 0; int touch; XPoint point; /* Any event reported by the interrupt service routine? */ if ( SharedCounter != ProcessedCounter ) { /* Obtain access to the Device Interface instance */ ApplicationDeviceClass device = EwGetAutoObject( &ApplicationDevice, ApplicationDeviceClass ); /* Invoke the function to trigger the event */ ApplicationDeviceClass__TriggerBatteryChargingEvent( device ); /* Also adjust the reference counter to ensure that each reported event is processed only once */ ProcessedCounter++; /* Event has been processed */ devices = 1; } [...] } [...] }
Provide data together with a System Event
When triggering a System Event you can associate with it an optional data. This so-called context can thereupon be evaluated by all affected System Event Handlers. For example, instead of having many individual System Events for different battery charging levels you could join them to a single Battery Charging Level event and provide the current charging progress in its context. Accordingly, while the battery is charged the device reports this event periodically notifying the GUI application about the amount of energy stored already in the battery (e.g. 10%, 20%, ... 100%).
This approach requires the declaration of the Trigger method to be enhanced by further parameters in accordance to the count and type of the additional data. If you want to pass a single integer value, enhance the method by a single int32 parameter. If the event should be accompanied by an additional string, add a string parameter to the declaration. The methods are edited in the Code Editor window. For this purpose:
★Press the key ENTER ...
★... or double click on the method with the mouse.
Once the method is opened in the Code Editor you see that the method templates are extensively commented providing you diverse tips how to adapt and implement it. If you don't want the comments, simply select the text in the Code Editor and delete it. The editing of method parameters takes place in the declaration area of the Code Editor window. Following operations are possible:
★You can add new parameters.
★You can edit existing parameters.
★You can delete existing parameters.
★You can reorder existing parameters.
The following figure demonstrates the declaration of a Trigger method enhanced by an additional int32 parameter to report the actual battery charging level:

The second step is to wrap the passed value aLevel inside a Chora object so that it can be associated to the System Event. This is insofar important as System Events can store Chora objects in their context only. Direct assignment of values of a primitive type like string or int32 is not possible. To solve this problem you will thus need to create a new class dedicated specially to wrap the desired data. For this purpose:
★As first switch to the Composer page for the unit containing the Device Interface class.
★Within this unit add a new empty class.
★Rename the class to be obvious (e.g. BatteryChargingLevel).
★Open the new class for editing.
★Within the class add a new variable.
★Rename the variable similarly to the corresponding parameter (e.g. Level).
★Adapt the data type of the variable to match the corresponding parameter (e.g. to int32).
★If you need more values to be passed together with a System Event, add more variables to the class.
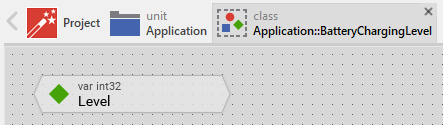
The following figure shows an example of such class containing just a single Level variable of int32 type:
★Open the method intended to trigger the System Event.
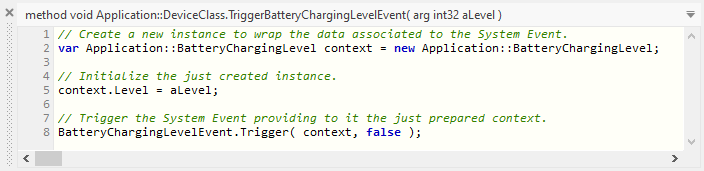
★Replace the existing implementation of the method by the shown in the screenshot below. Please note the usage of the new operator to create a new instance of the BatteryChargingLevel class. Once the instance is available, it is initialized with the parameters and passed together with the triggered System Event:
After you have modified the declaration of the Trigger method you should adapt its invocation found within the extern software. Concrete, you have to provide the method with operands for all new parameters. The number of operands, their data types and the order in which they are passed in the invocation have to match the declaration of the method. Following C (or C++) example demonstrates how you trigger a System Event expecting exact one int32 value:
#include "Application.h" [...] /* Obtain access to the Device Interface instance */ ApplicationDeviceClass device = EwGetAutoObject( &ApplicationDevice, ApplicationDeviceClass ); int level = 30; /* e.g. 30 % battery charging level */ /* Invoke the function to trigger the event and pass the value to it */ ApplicationDeviceClass__TriggerBatteryChargingLevelEvent( device, level );
The following code snippet demonstrates the same implementation for JavaScript compatible systems:
// Obtain access to the Device Interface instance var device = EmWiApp._GetAutoObject( EmWiApp.Application.Device ); var level = 30; // e.g. 30 % battery charging level // Invoke the function to trigger the event and pass the value to it device.TriggerBatteryChargingLevelEvent( level );
In turn, if the event should be triggered locally by Chora code implemented in your GUI application, you pass the desired parameters directly in the method invocation. The following code snippet demonstrates it:
var int32 level = 30; // e.g. 30 % battery charging level // Invoke the method in context of the global autoobject 'Device' // and pass the value to it Application::Device.TriggerBatteryChargingLevelEvent( level );
Following example project demonstrates the above explained application case of a Battery Charging Level Event. For the sake of simplicity, the project does not depend on any extern software running on the device. Instead the events are simulated by a simple timer. Each time the timer expires, the event is triggered and new battery charging level is passed together with it. The System Event Handler reacts to the event and adapts a progress bar within a GUI component. As soon as the charging is finished (battery is full), another event Battery Charging Finished Event is sent. Thereupon the GUI component knows that the battery is full:
Please note, the example presents eventually features available as of version 9.00
Trigger high priority System Events
System Events are delivered in the order in which they have been triggered. This can lead to some priority inversion if there are less important events waiting for their dispatching and now critical event arrives. The critical event has to wait until the less important events are processed. To change this behavior you will need to adapt the Trigger method associated to the System Event. The methods are edited in the Code Editor window. For this purpose:
★Press the key ENTER ...
★... or double click on the method with the mouse.
Once the method is opened in the Code Editor you see that it contains an invocation of a Trigger method belonging to the System Event object. This invocation expects in its last parameter a boolean value. Changing this parameter to the value true will ensure that the System Event is placed in front of all other actually waiting events:

Use System Events for internal communication
In the preceding description we focused mainly on the usage of System Events as communication service between the extern software running on your device and the GUI application. Such events were accommodated consequently in the Device Interface. System Events, however, can also be used outside of a Device Interface for internal communication purpose. This approach helps to follow the Model-View-Controller software design pattern focused on the separation of the application in visual (View) and functional (Model) software blocks.
It permits as well a simply decoupling of existing GUI components. For example, you can add the System Event to an ordinary GUI component. Then you add System Event Handlers to other components interesting in the event. When instantiating these depending components just initialize the Handlers embedded inside them to be connected with the right System Event object. Once the connection is established, the depending components can receive notifications triggered by the original GUI component.