Platform Integration: Device Class and Device Driver
If you have not done it yet, we recommend you to read first the chapter Integrating with the device.
Every GUI application is intended to run on a real system - so it needs to display some real data from a certain machine or it needs to control some activities of the underlying system.
The interface between an Embedded Wizard generated GUI application and the underlying hardware consists of two parts:
1.A device class, that can be accessed from your GUI application. This device class serves as an abstraction layer of the underlying system. This is the interface from the GUI applications point of view.
2.A device driver, written in 'C'. This device driver communicates with the real hardware (e.g. by calling a certain BSP function, by reading/writing some hardware registers, or by communicating via a certain protocol like CAN, I²C, TCP/IP,...). This is the interface from the main 'C' software point of view.
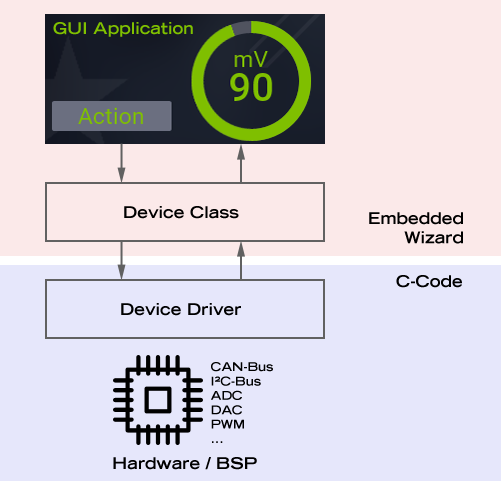
Interaction between device class and device driver.
This article brings the two parts together and explains how the device class and the device driver plays together.
The communication between a device class and a device driver can be implemented in both directions. The following communication scenarios can be implemented:
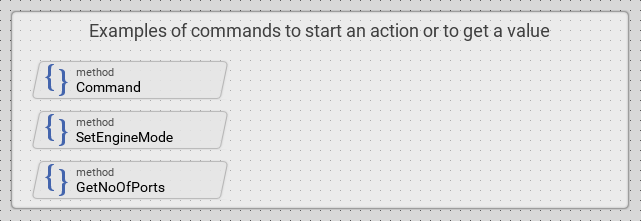
★The GUI application is going to start a certain action, to set a value or to query a value: This can be done by implementing a Command, which is a method within the device class. The device class makes a native call to the appropriate 'C' function within the device driver to perform the desired action. Example: A GUI application contains two buttons to start and stop an engine - for that purpose the device class contains a command to start the engine and a command to stop the engine. Each command makes a function call to the corresponding 'C' function within the device driver module, which is finally responsible to start and stop the engine, e.g. by sending some CAN bus commands.
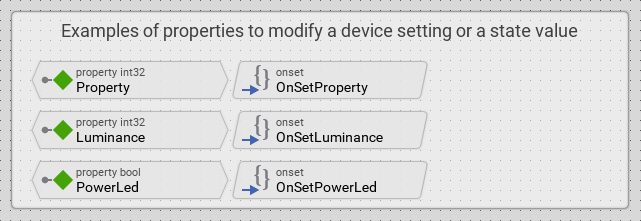
★The GUI application is changing a property value that reflects a certain state of the underlying system: The property and the corresponding onset method can be implemented within the device class. Each time the property is changed the device class is calling the appropriate 'C' function of the device driver to change the real value of the system. Example: A GUI application contains a slider to define the speed of an engine - the speed is reflected by a Speed property within the device class. This property can be used within the GUI application like any other property, e.g. a gauge widget can display the current speed value. As soon as the user has changed the current speed value, the properties onset method is called: Within this method the corresponding C function of the device driver module is called, which finally changes the physical speed of the machine.
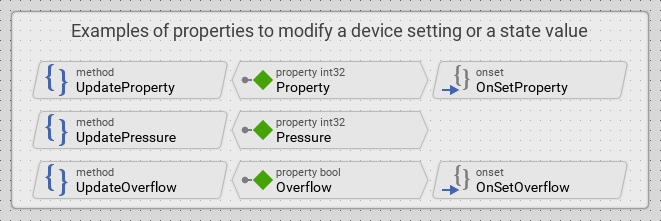
★The GUI application displays a certain value of the underlying system by using a property and gets notified as soon as the real value of the underlying system has changed: The device class contains a property that is used by the UI application. As soon as the value has changed on the target, the device driver module makes a call to the UpdateProperty method within the device class and changes the corresponding property. As a result all UI components or widgets that are referring to the property get notified. Example: A GUI application contains a gauge to display the rpm of an engine. The main 'C' application reads the current rpm value (or receives the current rpm value from a cyclic data telegram) and make a function call to the method UpdateRpm of the device class. This method will update the Rpm property - as a result all UI components or widgets get notified and updated automatically.
★The GUI application has to react on a certain event that appears on the underlying system: The device class implements system events that can be used to describe different kind of events (e.g. error state, operation mode or just a certain value). As soon as an error happens, as soon as the operation mode has changed or as soon as a certain system value has changed, the device class creates a system event and sends it to the UI application. Within the UI application you can use a SystemEventHandler to react on the inserted event. Example: A GUI application has to display an error panel as soon as an error event occurs: When the main 'C' application detects an error situation, the device driver calls a trigger method within the device class, which creates and posts a system event for the UI application - like a key or touch event. The UI application contains a SystemEventHandler to react on this event and to show an error panel.
Typically every GUI application contains a combination of the above communication scenarios, using commands, properties and events. The following paragraphs describe the different aspects for using commands, properties and events within the device class and within the device driver.
Part 1: Device Class
A device class is the access point to your device from the GUI perspective. This means, a device class is the abstraction of the underlying hardware - or simply the interface to the machine you want to control. A device class hides the complexity of the underlying system - you do not have to take care for protocol details or register settings. From the UI applications point of view, you can simply send commands, access properties and react on events. A device class is the Chora counterpart of the device driver.
In order to implement your own device class, open the Gallery folder Device within Embedded Wizard Studio - here you will find all necessary ingredients.

Creating a device class and a device object
The first item within the Device folder of the Gallery is the Device Interface. Just drag and drop this template into your application unit. As a result you will get a classDeviceClass and an autoobjectDevice.

The class DeviceClass implements the interface between the GUI application and the device. Within the class you can define your system events sent by the device, you can exchange data with the device or you can send commands to the device. You are completely free in the design of this interface.
The object Device represents the instance of the device class. It exists for your convenience. As an autoobject it is globally available for all GUI components within your project.
Implementing a command
A command is a simple method, that can be called from the GUI application with the intention to trigger the device to perform a certain action. It's up to you what the method does. You are free in the declaration of the method - the parameters and the return value can be changed according your needs. The inline documentation of the command describes further details. You can add as many commands to your device class as you need: Just drag and drop a Command template from the Gallery folder Device into your device class.
A command can be used also for returning a value, e.g. to query a certain state or number from the device. Please take care when you are using this synchronous communication: It is important that the function returns immediately after calling the device driver and that it is not blocking - otherwise the entire GUI application will hang until the driver returns the result!
The following code snippet shows a simple command method with one parameter and a return value - the function call to the underlying device driver is placed in a native code section:
var int32 result = 0; /* the following native code is used only for the target system */ $if !$prototyper native ( aParam, result ) { result = YourDevice_DoSomething( aParam ); } $endif return result;
Creating a property and implementing an onset method
A property represents an individual setting or state value existing within the device. If the GUI application is allowed or able to change the property, an onset method has to be implemented. Through this associated onset method all write operations to the property can be directed to your particular device driver. The read accesses, in contrast, are handled internally by using the last known value of the property. The inline documentation within the onset method describes further details. You can add as many properties to your device class as you need: Just drag and drop a Property template from the Gallery folder Device into your device class. The data type of the property can be defined according your needs (e.g. to bool, uint32, or string, etc.) - for this purpose use the attribute Type of the property itself.
The following code snippet shows a typical implementation of an onset method within a device class. Within the native code section you can see the function call to the device driver.
... /* store the new value in the internal memory of the property */ pure Property = value; /* the following native code is used only for the target system */ $if !$prototyper native ( value ) { YourDevice_SetSomeValue( value ); } $endif /* notify all associated property observers */ notifyobservers ^Property;
Implementing an UpdateProperty method
In some cases, a property is not changed by the GUI application - it has to be changed be the device driver, due to an update within the device itself. An UpdateProperty method is intended to be called by the device driver to notify the GUI application about an alternation of a setting or state value represented by the property Property. The inline documentation within the UpdateProperty method describes further details. Feel free to add an UpdateProperty method to each property that can be changed by the device driver.
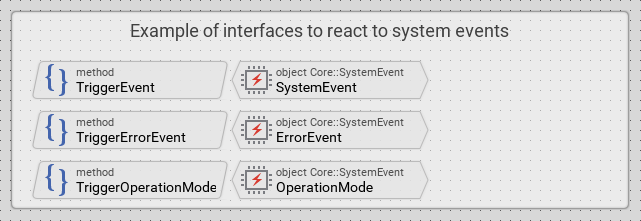
Creating a system event and implementing a TriggerEvent method
The Mosaic class library provides the infrastructure to define and use your own system events within your GUI application. To define a new system event, just drag and drop a new System Event from the Device folder of the Gallery.
The object SystemEvent represents an individual system event. When the system event is triggered all associated system event handlers are notified automatically.
The method TriggerEvent is intended to be called by the device driver to notify the GUI application about the particular system event represented by the object SystemEvent. This method exists for your convenience only and is optional. See inline documentation inside the method.
The type and number of parameters of the trigger method can be defined according your needs. When triggering the event you can pass an optional context object to the system event. By using this optional object, additional event specific data can be attached at the event and dispatched with it. All notified system event handlers can then evaluate this context information. By using this mechanism, you can feed any information from your target into the trigger method and pass it to the system event handlers.
Using Property Observer
A property observer can be used everywhere in your GUI application to react on changes of a desired property: just drag and drop the Property Observer template from the Gallery folder Device into your GUI application.

The object PropertyObserver is a handler of property notifications. When the affected property is notified, the observer calls the associated slot methodonEvent automatically. Within the onEvent method you can react to the notification. The method onEvent exists for your convenience only - you can remove it and connect the observer directly with another slot method.
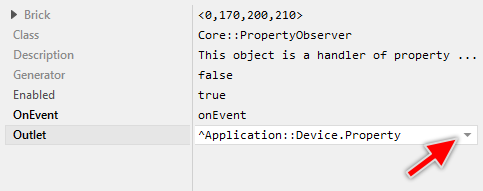
Don't forget to connect the observer with the property of interest. To do this set the property Outlet of the observer to refer to the desired property.
Using System Event Handler
A system event handler can be used everywhere in your GUI application to react on a system event: just drag and drop the System Event Handler template from the Gallery folder Device into your GUI application.

The object SystemEventHandler is a handler of a particular system event. When the system event is triggered, the handler calls the associated slot methodonEvent automatically. Within the onEvent method you can react to the event. The method onEvent exists for your convenience only - you can remove it and connect the observer directly with another slot method.
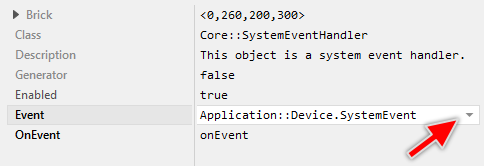
Don't forget to connect the handler with the system event of interest. To do this set the property Event of the handler to refer to the correct system event object.
Part 2: Device Driver
A device driver is responsible to control your device(s). This means, a device driver communicates with your dedicated machine (e.g. via CAN, TCP/IP, serial, ... protocol) or it simply controls some of your hardware components like peripherals (e.g. by accessing BSP driver functions, by direct register settings, ...). A device driver is a 'C' module, that interacts with your main loop (your main.c module) and it is the counterpart to the device class.
In order to create your own device driver, it may be helpful to download and modify the device driver template DeviceDriverTemplate.c.
Creating a device driver
The device driver contains the function template YourDevice_Initialize() that is responsible to initialize your hardware, to open some necessary drivers or to start a certain protocol. The necessary steps depends completely on your dedicated target. Additionally, this initialization function is responsible to get access to the device class of your UI application. The initialization function has to be called from your main module, after the initialization of the GUI application.
The device driver contains also the function template YourDevice_Deinitialize() that is responsible to de-initialize your hardware, to close all the used drivers or to stop a certain protocol. The de-initialization function has to be called from your main module, before the de-initialization of the GUI application.
In case you are using an operating system, please be aware that these functions are called in the context of the main GUI thread. If your drivers or protocols are running within a separate task/thread/process, please ensure to use appropriate OS services (e.g. messages, queues ) to communicate.
Implementing command functions
As written above, a command is a simple method within a device class, that makes a native call to a corresponding 'C' function. Within your device driver you can implement this counterpart as 'C' function. This means, for every command within the driver class, a 'C' function has to be implemented that finally makes the required setting or starts the required action.
Implementing property setter functions
Each time a property of the device class has changed, its associated onset method is called. Within this method a native call to a corresponding 'C' function is done. Within your device driver you can implement this counterpart. As a result, for every onset method within the driver class, a 'C' function has to be implemented that finally changes the state or value of the real device.
Processing data and events
The device driver template contains the function template YourDevice_ProcessData() that is called from the main UI loop, in order to process data and events from your particular device. This function is responsible to update properties within the device class by calling the corresponding UpdateProperty method in case that the corresponding state or value of the real device has changed.
This function is also responsible to trigger system events if necessary, by calling the appropriate TriggerEvent method. Please have a look into the DeviceDriverTemplate.c file for more information about implementation details.