Platform Integration Aspects: Integrating an External Application
Embedded Wizard is intended to create sophisticated and modern looking graphical user interfaces by taking in account constraints valid for embedded systems like modest memory consumption and low CPU load. As consequence, features offered natively by Embedded Wizard are sometimes not sufficient to cover each application case and you may wish to enhance the functionality by third party code. That also applies to other external graphical components you eventually designed in the past and now desire to integrate with Embedded Wizard created GUI.
For example, Embedded Wizard does not include any components to process and display web contents. The Internet, on the other hand, offers diverse implementations of web browsers you can acquire and compile for your target system. Following this approach and assuming your device has enough resources, you will be able to run the web browser on your device. The browser in such scenario, however, will run alternately and independently of the regular GUI application. From the user's point of view it will behave and feel as a separate, external application.
This blemish can be fixed by using the so-called Applet Interface. It specifies a protocol between Embedded Wizard and any other third party code intended to render graphical contents. Through this interface Embedded Wizard may receive graphical outputs produced by the external application and use them when composing the entire screen scene. Conversely, any relevant user event (e.g. keyboard or touch) processed in Embedded Wizard may be relayed via the interface to the external application permitting the user to interact with it. As consequence, the external application will become part of the entire GUI seamlessly.
The functionality of the Applet Interface is represented by the Mosaic class Views::Applet. In order to adapt the interface for a concrete use case, you derive a new class from Views::Applet and implement there the necessary communication. From technical point of view Applets act as simple GUI components. Thus you can create instances of your derived Applet class and add them to other GUI components similarly to how you use e.g. an Image view. For example, if you have implemented an Applet Interface to integrate with a web browser, you can add instances of the corresponding Applet class to your GUI application wherever web contents need to be shown.
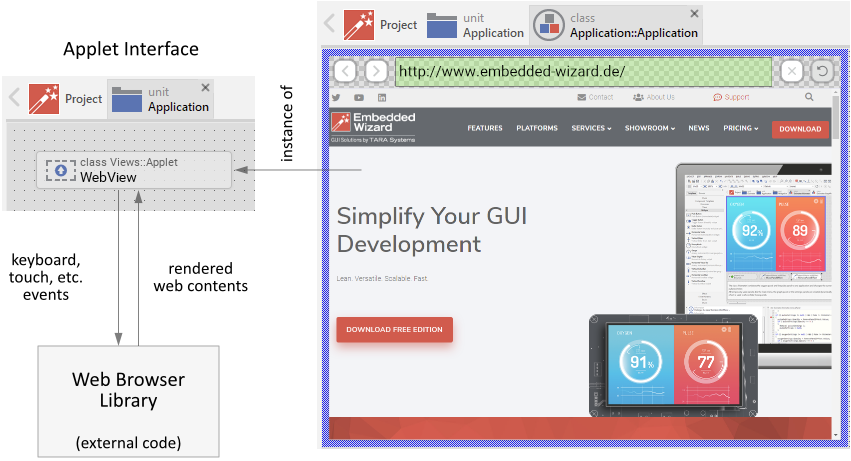
The figure below demonstrates the principle concepts of the Applet Interface. In this figure, the class WebView implements a concrete interface to an external web browser library. On the right you see an instance of this class displaying the graphical outputs of the web browser. At the runtime, when the user interacts with the application (e.g. touches within the WebView area), all relevant events are relayed to the web browser library. Thereupon its graphical outputs are received and presented within the Embedded Wizard environment:
The Applet Interface provides a high degree of flexibility allowing you to integrate within the Embedded Wizard environment any external UI application code. Besides the above mentioned web browser, this can be a video decoder or an interface to a camera device. Similarly, existing computer games, 3D model viewer or PDF decoder are possible use cases. The following sections are intended to provide you an introduction and useful tips of how to add, implement and use your own Applet Interfaces.
Add a new Applet Interface
In order to add a new Applet Interface to your project, following steps are necessary. Please note, that Applet Interfaces can exist in units only:
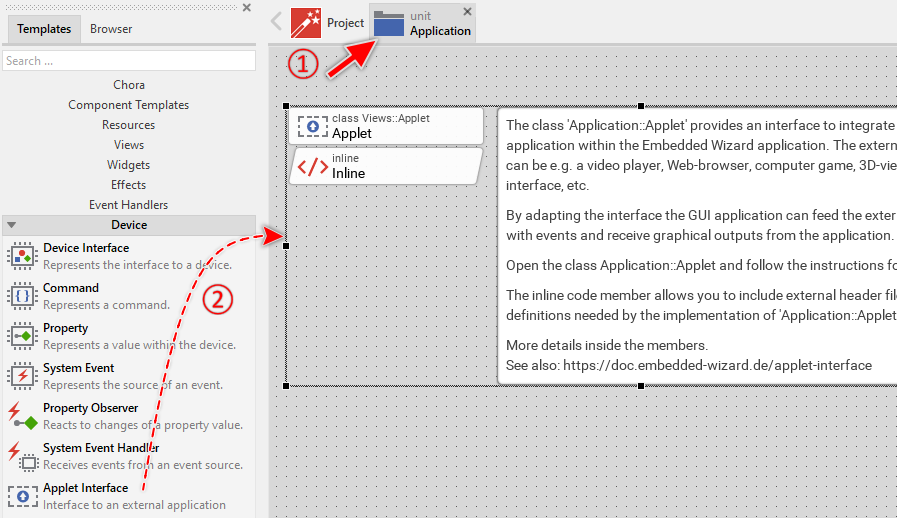
★First switch to the Composer page for the respective unit, where you want to add the new Applet Interface.
★Then ensure that the Templates window is visible.
★In Templates window switch to the folder Device.
★In the folder locate the template Applet Interface.
★Drag & Drop the template into the Composer window:
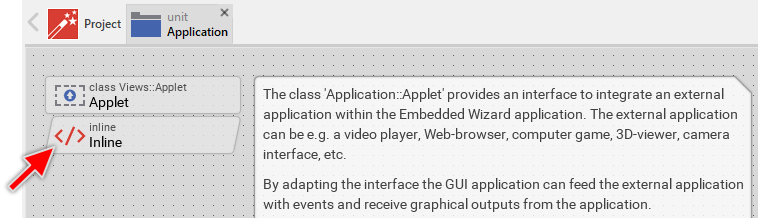
In the screenshot above you see that new added Applet Interfaces are accompanied by an annotation providing helpful tips how to proceed. If undesired, you can select and delete the annotation. The Inline Code member, in turn, is intended to incorporate to the project all relevant external dependencies like C header files, type declarations or even complete functions. In fact, whatever you put within the Inline Code member will be taken over during the code generation as it is. The implementation of the Applet Interface can then access this code. If not necessary, you can select and delete the Inline Code member.
Name the Applet Interface
The names of newly added Applet Interfaces start per default with Applet. That can lead to confusion when your application requires multiple, separate Applet Interfaces to integrate different external application. In such cases it is thus reasonable immediately after adding a new Applet Interface to name it according to the corresponding function in your application (e.g. to WebView). For this purpose:
★Press the key F2 or select the menu item .
★Enter the new name in the Inspector window.
Add external application code to the project
The intention of the Applet Interface is a seamless integration with an external, third party application. This external application can consist of libraries, *.C, *.C++, *.H or, in case of the WebGL target system, JavaScript files. In order to allow the Applet Interface to use this external code you have to add all relevant declarations and external code fragments to Embedded Wizard project. You do this by adapting the Inline Code member found per default in the Applet Interface template:
★Press the key Enter to open the member in the Code Editor.
★... or double click with the mouse on the Inline brick:
Thereupon the content of the Inline Code member is shown in the Code Editor window and you can edit it now. In fact, whatever you put within the Inline Code member will be taken over during the code generation as it is. Consequently, you can specify here all the C include files relevant for the integration with the external application. For example, you could include the API of some video decoder. Also possible, you declare in-place all relevant data types and functions:
/* Include all relevant external header files. */ #include "videodecoder_api.h" /* ... or declare data types in-place. */ typedef struct { /* Reference to the instance of some video decoder. */ void* Decoder; /* Reference to Embedded Wizard own bitmap. */ XBitmap* Bitmap; } VideoPlayer_Object; /* Similarly externally implemented functions can be pre-declared here. */ VideoPlayer_Object* VideoPlayer_NewObject( int aWidth, int aHeight ); void VideoPlayer_DeleteObject( VideoPlayer_Object* aObject );
External applications will expose their functionality by a concrete programming interface, an API. The structure of this API will differ from application to application. In some cases the API will already be perfectly suitable to be used from the Applet Interface. In other cases the usage of the API will become difficult so single Applet Interface operation will require invocations of multiple functions implemented in the external application and it will eventually need to collect the resulting values in data structures, etc.
Generally we don't recommend to access the external API directly from the Applet Interface. Instead you should create a thin programming layer abstracting additionally the API. Within this layer you can encapsulate all the peculiarities of the external application. For example, the initialization of an external video player may require multiple functions to be called. One invocation to open a file stream, another to initialize a decoder instance, maybe also to initialize some hardware decoder. Also possible, you may need to allocate an Embedded Wizard bitmap where the decoded video contents are stored or a separate hardware layer. Summarized, a lot of operations for the single abstract create video player task.
Once you have read the following sections of this chapter and understood the concept of the Applet Interface, you should reflect about the functions and data structures needed to connect the both worlds: Applet Interface on one side and external application on the other side. Doing this try to specify the functions so they correspond as good as possible to the operations imposed by the Applet Interface. For example, at its initialization time the Applet Interface performs an OnCreate operation to properly initialize the external application. It is thus reasonable to encapsulate the entire external application initialization within a single function (e.g. VideoPlayer_NewObject) and invoke this function from the Applet Interface.
The declarations of all resulting functions as well as of all relevant data types you can put in a header file and include this file in the above mentioned Inline Code member. In this manner Applet Interface can use the functions and data types. By the way, separating the Applet Interface and the external application by additional functions helps to avoid conflicts between homonymous type and function definitions existing eventually in the external application and Embedded Wizard.
The following sections explain diverse operations of the Applet Interface and how to adapt them for a concrete external application. In all examples we use imaginary functions, we assume they are implemented as explained above to separate the Applet Interface and the external application. In all examples we also assume, the necessary functions and data type declarations are correctly included in the Inline Code member.
Edit the Applet Interface
Once you have added a new Applet Interface to your project, you will implement it according to your needs. For this purpose, open the Applet Interface class for editing:
★Press the key Enter to open the class in a new Composer page.
★... or double click with the mouse on the Applet brick:

New added Applet Interfaces contain already a lot of methods prepared for your adaptation. Following screenshot shows the default content of a new created Applet Interface. In order to help you to start with your own adaptation, these members are explained in associated annotations. Furthermore each member is inline commented what can be seen in Inspector window after selecting the respective member.
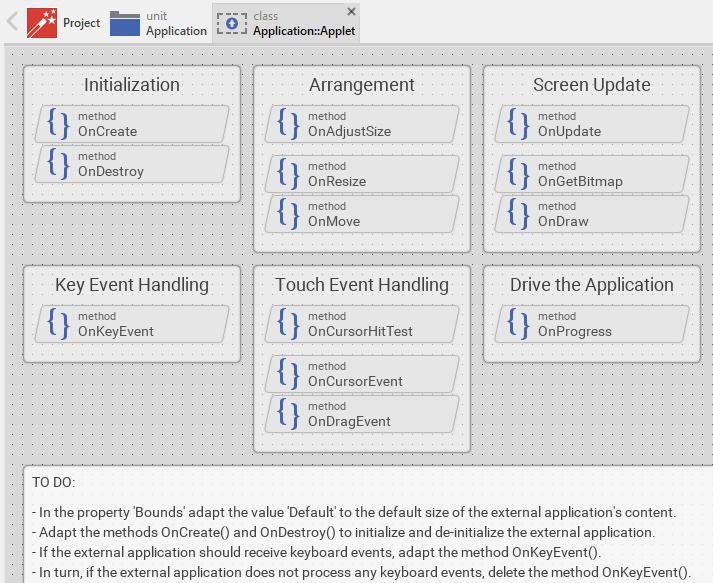
You will edit the methods and implement there the communication with the external code, e.g. you will take care of the correct forwarding of keyboard events to a web browser library. How you adapt the methods is explained in the following sections. According to their function the methods are arranged in groups as explained in the table below:
Methods |
Description |
|---|---|
These methods are intended to initialize and shutdown the external application. They are invoked just in the moment when a new instance of your Applet class is created or released again. |
|
These methods are invoked when at the runtime the Applet view changes its position or size. The implementation of these methods can thereupon adapt the external application to match the new parameters. |
|
These methods take care of the screen update. Which methods you finally implement depends on the desired operation mode. Consequently, the external application can provide the rendered contents within a bitmap, it can draw directly into the Embedded Wizard own framebuffer or it can use a separate graphics layer if the hardware does support it. |
|
This method is intended to relay keyboard events to the external application. |
|
Method belonging to this group are intended to relay touchscreen (or mouse) events to the external application. |
|
This method is invoked periodically by a timer. As such it is suitable to drive animations and also any other background activity the external application requires. |
In order to edit a method you open it in the Code Editor. All methods within the Applet Interface template are already extensively inline commented providing useful hints and examples how diverse application cases can be solved. Nevertheless, before you start adapting the methods we highly recommend you the chapter Integrating with the device. It explains aspects you must absolutely take in account when combining Embedded Wizard created GUI application with external and target specific code.
The most important aspect in this context is the usage of the native statement to enclose target specific code. Embedded Wizard provides an environment to develop highly platform independent GUI applications. From this high claim for platform independence results the consequence, that applications developed with Embedded Wizard have per default no access to the underlying device, be it the hardware, middleware software or the operating system. You can consider the application as running enclosed in a box. Therefore, in order to add target specific code, e.g. an invocation of a C function belonging to an external web browser library, you have to explicitly enclose this invocation within a native statement. For example:
var string url = "www.embedded-wizard.de"; var handle theHandle = GetHandle(); // Enclose following 'C' code within a native statement. native ( theHandle, url ) { /* Invocation of some 'C' function belonging to a WebBrowser library. */ WebBrowser_LoadURL((WebBrowser_Object*)theHandle, url ); }
Also note the usage of the $if..$endif Chora preprocessor directives in the implementation of Applet Interface methods. These directives determine the code sections to take in account when generating code for the target system and code sections used during the prototyping of the application. When you open one of the above mentioned methods for editing you will thus notice that the native code sections are always enclosed between a pair of $if !$prototyper..$endif. For example:
// Ensure the native code is taken in account only when generating code // (= not prototyping). $if !$prototyper native ( theHandle, url ) { ... some 'C' or other target specific code ... } $endif // ... while other code is used during prototyping only. $if $prototyper ... some Chora code used during prototyping only ... $endif
Use the Applet view within the GUI application
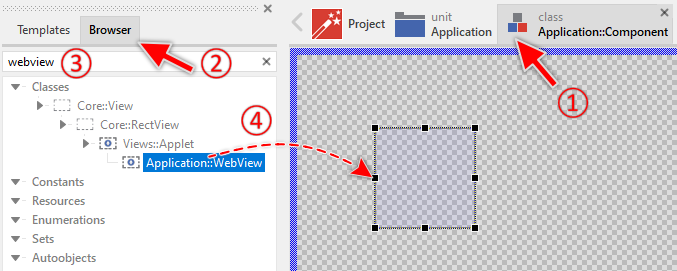
Once you have finalized so far the adaptation of the Applet Interface class, you can add instances of this class wherever expected within your GUI application. This instance will thereupon provide a view to the contents rendered externally. If necessary, you can add multiple instances and display different contents (e.g. different web pages) simultaneously. Apply following steps:
★First switch to the Composer page for the class definition representing the GUI component, where you want to add the Applet view instance.
★Then ensure that the Browser window is visible.
★Within the Browser locate the desired Applet class. This can be done easily with Browser's own filter function.
★Select the found class in the Browser window.
★Drag and drop the selected class into the Canvas area of the Composer.
Just in this moment when the Applet view is brought to life, the external application is initialized. If you have not yet finalized the adaptation of the Applet class or there are simply no contents provided by the external application, the Applet view appears tinted in blue color. This is visible in the Composer only during the design phase and should help you to recognize the area occupied by the view. At the runtime in the target system or during the prototyping, the blue rectangle is not shown.
★After adding the Applet view instance, you can move it with the mouse and resize it according to the expected GUI design.
★Finally rename the instance according to its function within the GUI component.
The above steps demonstrate the approach of how the Applet views are added to a GUI component by Drag & Drop at the design time. If your application case requires the views being created dynamically at the runtime, then you can implement code to create a new instance of the desired Applet view by using the operator new, configure its properties and finally add the just created view to the current component by invoking its method Add. For example, the following code creates a new instance of some WebView Applet class programmatically:
// Create a new instance of some 'WebView' Applet class. var Application::WebView webView = new Application::WebView; // Configure its properties. For example, ensure the view fills // the entire area of the superior GUI component (Bounds.orect). webView.Bounds = Bounds.orect; // ... and finally add the view to this component. Add( webView, 0 );
Later when you want to remove the view from the GUI component again, use the method Remove. If after this operation there are no further references to the affected Applet view instance, the instance is automatically discarded triggering in this phase also the shutdown operation for the external application.
// The Applet view instance you want to remove again from the GUI // component. var Application::WebView webView = ... // Remove the instance from the actual component. Remove( webView );
Choice the appropriate screen update mode
The Applet Interface supports three different strategies how to integrate the graphical outputs of the external application. You choice the right mode depending on your use case, the concrete features of the external application and the functionality of the underlying target system. This decision determines thereupon which methods of the Applet Interface need to be adapted. Understanding the differences between the three use cases is thus important. The available modes are explained in the following three sub-sections:
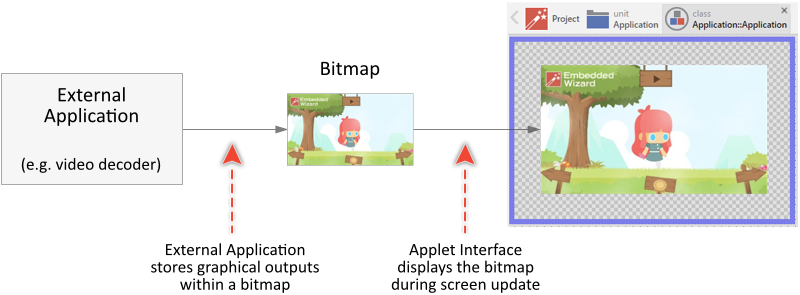
1. Use a bitmap to transfer the graphical outputs
In this case the external application stores its graphical outputs within an Embedded Wizard bitmap. The Applet Interface in turn can display the bitmap whenever it is involved in a screen update. The external application just needs to know the pointer to the bitmap's pixel memory and the color format of how the pixel are stored. The following figure illustrates this strategy:
This results in the graphical contents being integrated seamlessly within the entire GUI application. On the other hand, this approach requires additional RAM to store the bitmap and it has to perform an additional bitmap copy operation when the Applet Interface is involved in the screen update.
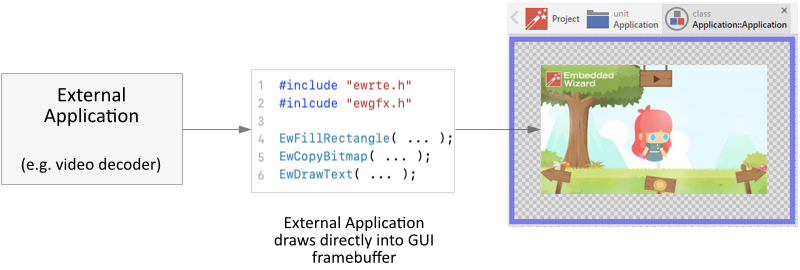
2. Draw directly into Embedded Wizard framebuffer
In this case the Applet Interface notifies the external application whenever it is involved in a screen update. The external application can thereupon perform all necessary drawing operations directly into the Embedded Wizard own framebuffer. For this purpose the external application uses functions and methods provided by Embedded Wizard to fill rectangles, copy bitmaps, render text, etc.. The following figure illustrates this strategy:
This approach requires the external application to be adapted for the usage of Embedded Wizard own graphics API. This is in practice seldom the case as the external applications usually depend on their own graphics libraries. Probably, you will never need to use this approach.
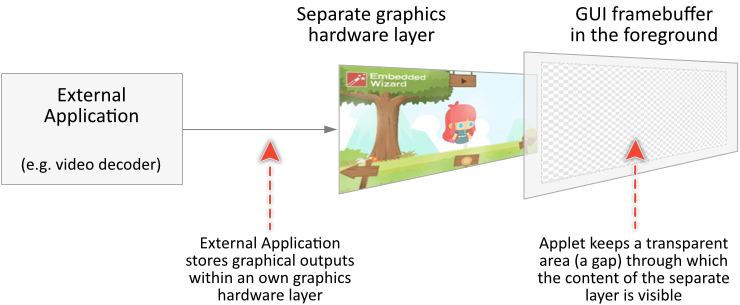
3. Integrate with a separate graphics layer
In this use case the external application stores its graphical outputs within a separate graphics hardware layer. The Applet Interface, in turn, punches out a transparent gap within the foreground layer used by the GUI application. Through this gap the contents of the background layer can be seen on the screen. The following figure illustrates this strategy:
This use case expects that the underlying target system is able to manage at least two graphics hardware layers. This approach requires also additional RAM for the second layer. On the other hand, the external application does not depend on any Embedded Wizard drawing functionality and can perform all operation asynchronously, e.g. within a separate process. Due to the separate layers the resulting screen composition is significantly limited. You can either display the GUI contents above the layer belonging to the external application or vice versa. Flexible interweaving the contents of both is not possible.
Initialize and shutdown the external application
The first two methods that you always have to adapt when implementing your own Applet Interface are OnCreate and OnDestroy. As they names indicate, these methods are intended to control the lifetime of the external application.
The method OnCreate is invoked automatically just in the moment when new instance of the Applet class is created. Its job is thus the initialization, or rather the instantiation of the external application. When implementing the interface it is prudent to allow multiple Applet instances to coexist simultaneously. Imagine a VideoPlayer Applet Interface intended to integrate some external video decoder. At the runtime, it could be possible to create more than one instance of this VideoPlayer each decoding another video content.
Embedded Wizard introduces for this purpose the concept of a handle. Such handle can be understood as reference to the external application. This can be a pointer to a data structure representing a concrete application instance or a number selecting the instance from an array of all existing instances. Knowing this handle the Applet Interface can address the instance and communicate with it. In Embedded Wizard handles are implemented by the data type handle.
The method OnCreate has thus the job to create a new instance of the external application and return this instance encoded within a handle value. The following implementation of OnCreate creates, for example, a new instance of some external video player. This instance may thereupon be used to decode a video:
var handle result; $if !$prototyper native ( result ) { /* Create a new instance of the video player and return it as 'handle'. */ result = (XHandle)VideoPlayer_NewObject(); } $endif return result;
The above example invokes an imaginary C function VideoPlayer_NewObject(). This function takes care then of all initialization steps relevant for the video player, like opening a file stream and configuration of a hardware video decoder. Finally, the function returns a pointer to a data structure representing the just initialized video player. Following pseudo C code demonstrates the possible implementation of such function. Please note the division in the H (header) and C (code) file as it is usual for target systems using natively the programming language C:
/* ******** Within a H file ******** */ /* Declaration of a data structure representing an instance of the video player. */ typedef struct { void* Decoder; FILE* FileStream; int IsDecoding; /* Size of the decoded video. */ int Width; int Height; } VideoPlayer_Object; /* Declaration of a C function to create a new instance of the video player. */ VideoPlayer_Object* VideoPlayer_NewObject( void );
/* ******** Within a C file ******** */ /* Implementation of the C function to create a new instance of the video player. */ VideoPlayer_Object* VideoPlayer_NewObject( void ) { /* Alloc memory for a data structure representing the new instance. */ VideoPlayer_Object* object = EwAlloc( sizeof( VideoPlayer_Object )); /* Initialize the data structure, open file stream, etc. */ object->FileStream = fopen( ... ); object->Decoder = InitializeHWDecoder( 1920, 1080 ); object->IsDecoding = 0; /* Assume some size of the decoded video. */ object->Width = 1920; object->Height = 1080; /* Initialization is done, return the data structure. */ return object; }
In order to allow the Applet Interface to use the function, you will need to add all relevant declarations to Embedded Wizard project. Ignoring this will provoke C compiler or linker errors because of unknown identifiers or unresolved externals. The section Add external application code to the project explains, how this is managed usually.
When implementing the OnCreate method you may evaluate its both parameters aSize and aPosition. These parameters correspond to the area the Applet view occupies initially (just in this moment) within the GUI application. Consequently, the parameter aSize is suitable to configure the external application so it fits within this area. For example, you use it to setup an external video decoder so it scales the video contents appropriately:
var handle result; $if !$prototyper native ( result, aSize ) { /* Create a new instance of the video player and return it as 'handle'. Note: in this version, the imaginary function 'VideoPlayer_NewObject' expects the video size to be passed in its both parameters. */ result = (XHandle)VideoPlayer_NewObject( aSize.X, aSize.Y ); } $endif return result;
The function VideoPlayer_NewObject from the above example can also evaluate the provided size and allocate a bitmap (an off-screen buffer) where graphical outputs of the video player are stored. The Applet Interface can thereupon use this bitmap whenever a new screen update is performed (see case 1 from the above section for more details concerning this approach). The following could be then the corresponding implementation of the H (header) and C (code) file. Please note, in order to be usable by Embedded Wizard, the bitmap has to created by the Graphics Engine function EwCreateBitmap:
/* ******** Within a H file ******** */ /* Declaration of a data structure representing an instance of the video player. */ typedef struct { /* Reference to Embedded Wizard own bitmap. */ XBitmap* Bitmap; /* Size of the bitmap (and thus the of the decoded video). */ int Width; int Height; /* ... other data members ... */ } VideoPlayer_Object; /* Declaration of a C function to create a new instance of the video player. */ VideoPlayer_Object* VideoPlayer_NewObject( int aWidth, int aHeight );
/* ******** Within a C file ******** */ /* Implementation of the C function to create a new instance of the video player. */ VideoPlayer_Object* VideoPlayer_NewObject( int aWidth, int aHeight ) { XPoint size = { aWidth, aHeight }; /* Alloc memory for a data structure representing the new instance. */ VideoPlayer_Object* object = EwAlloc( sizeof( VideoPlayer_Object )); /* Create a new bitmap according to the specified size. */ object->Bitmap = EwCreateBitmap( EW_PIXEL_FORMAT_NATIVE, size, 0, 1 ); /* Evtl. remember the size for later use. */ object->Width = aWidth; object->Height = aHeight; /* ... other initializations ... */ /* Initialization is done, return the data structure. */ return object; }
The parameter aPosition is mainly used when the external application manages a separate graphics hardware layer for its graphical outputs (see case 3 from the above section for more details). In such case the value of this parameter helps to adjust the screen position of the layer to fit within the transparent gap prepared by the GUI application. Doing this you should also use the parameter aSize to correctly adapt the size of the layer. For example, following code could create a graphics hardware layer and connect it with some video player:
var handle result; $if !$prototyper native ( result, aPosition, aSize ) { /* Create a new instance of the video player intended to use a separate graphics hardware layer. The size and the screen position for the layer are specified in the parameters aPosition and aSize. */ result = (XHandle)VideoPlayer_NewObject( aPosition.X, aPosition.Y, aSize.X, aSize.Y ); } $endif return result;
The following could be the corresponding implementation of the H (header) and C (code) file for the above imaginary function VideoPlayer_NewObject. Again, you have to adapt the data structure to store some reference to a graphics hardware layer and adapt the function to create such layer. How this is done, will depend in fact on the concrete target system. Following is the pseudo code:
/* ******** Within a H file ******** */ /* Declaration of a data structure representing an instance of the video player. */ typedef struct { /* Reference to some graphics hardware layer. */ void* Layer; /* Position/size of the layer (and thus the of the decoded video). */ int X; int Y; int Width; int Height; /* ... other data members ... */ } VideoPlayer_Object; /* Declaration of a C function to create a new instance of the video player. */ VideoPlayer_Object* VideoPlayer_NewObject( int aX, int aY, int aWidth, int aHeight );
/* ******** Within a C file ******** */ /* Implementation of the C function to create a new instance of the video player. */ VideoPlayer_Object* VideoPlayer_NewObject( int aX, int aY, int aWidth, int aHeight ) { /* Alloc memory for a data structure representing the new instance. */ VideoPlayer_Object* object = EwAlloc( sizeof( VideoPlayer_Object )); /* Create a new graphics hardware layer. */ object->Layer = GraphicsHW_CreateLayer( aX, aY, aWidth, aHeight ); /* Evtl. remember the position/size for later use. */ object->X = aX; object->Y = aY; object->Width = aWidth; object->Height = aHeight; /* ... other initializations ... */ /* Initialization is done, return the data structure. */ return object; }
The method OnDestroy is invoked when the Applet instance is not needed anymore, immediately before the Applet view is discarded by the Garbage Collection. Its task is thus the de-initialization of the external application and the release of all resources used in between. The method provides a single parameter aHandle which contains the value returned by the preceding OnCreate invocation. You use this parameter to identify the external application instance to release. For example:
$if !$prototyper native ( aHandle ) { /* Destroy the instance of the video player. */ VideoPlayer_DeleteObject((VideoPlayer_Object*)aHandle ); } $endif
The above example uses an imaginary function VideoPlayer_DeleteObject. This function has the job to stop video decoding, release all resources used by the decoder (e.g. the bitmap or the separate graphics hardware layer) and finally free the memory used by the data structure. Assuming, the video player uses an Embedded Wizard bitmap to store the graphical outputs, the following pseudo C code could perform the necessary de-initialization. Please note the usage of the function EwFreeBitmap to release the bitmap properly:
/* ******** Within a H file ******** */ /* Declaration of a data structure representing an instance of the video player. */ typedef struct { /* Reference to Embedded Wizard own bitmap. */ XBitmap* Bitmap; /* Size of the bitmap (and thus the of the decoded video). */ int Width; int Height; /* Other variables relevant for the decoding. */ void* Decoder; FILE* FileStream; int IsDecoding; } VideoPlayer_Object; /* Declaration of a C function to delete the video player instance. */ void VideoPlayer_DeleteObject( VideoPlayer_Object* aObject );
/* ******** Within a C file ******** */ /* Implementation of the C function to delete the video player instance. */ void VideoPlayer_DeleteObject( VideoPlayer_Object* aObject ) { /* Stop video decoding. */ if ( aObject->IsDecoding ) StopHWDecoder( aObject->Decoder ); /* Release the decoder and close the file stream. */ FreeHWDecoder( aObject->Decoder ); fclose( aObject->FileStream ); /* Release the Embedded Wizard bitmap. */ EwFreeBitmap( aObject->Bitmap ); /* Finally free memory used by the data structure. */ EwFree( aObject ); }
Adjust the size and position of the external application
The size and position of the external application (more precisely, its visible content) must match the area associated to the corresponding Applet view. For example, in case of a video player application the size of the decoded video should fit within the Applet view intended to display this content. Consequently, the video decoder needs to know the expected size and scale the video appropriately.
Originally the size and position of the Applet view is determined at its initialization time. This area, however, is not necessarily fixed. It is possible that the size and position of the Applet view changes at the runtime. The user can, for example, enlarge the view to see a bigger video. To handle such alternation you implement the method OnResize and eventually OnMove. The methods are invoked automatically by the Applet Interface.
Both methods provide in their parameter aHandle the value returned by the preceding OnCreate invocation. This parameter identifies thus the concrete instance of the external application permitting OnResize and OnMove to access it. Following code demonstrates the possible implementation of an OnResize method to e.g. adjust the size of decoded video in a video player application. Please note, the new size of the Applet view is provided in its parameter aSize:
$if !$prototyper native ( aHandle, aSize ) { /* Inform the external application about the changed size. Note: 'aHandle' refers the concrete instance of the video player. */ VideoPlayer_SetSize((VideoPlayer_Object*)aHandle, aSize.X, aSize.Y ); } $endif return aHandle;
The method OnMove is mainly used when the external application manages a separate graphics hardware layer for its graphical outputs (see case 3 from the above section for more details). In such case the method helps to adjust the screen position of the layer to fit within the transparent gap prepared by the GUI application. For example, following code could move the graphics hardware layer associated to the actual instance of some video player:
$if !$prototyper native ( aHandle, aPosition ) { /* Adjust the position of the layer. Note: 'aHandle' refers the concrete instance of the video player. */ VideoPlayer_MoveLayer((VideoPlayer_Object*)aHandle, aPosition.X, aPosition.Y ); } $endif return aHandle;
The above examples invoke imaginary C functions VideoPlayer_SetSize() and VideoPlayer_MoveLayer(). These functions take care of all necessary steps, like resizing internally used off-screen buffers or changing the screen position of the graphics hardware layer. Following pseudo C code demonstrates the possible implementation of the VideoPlayer_SetSize() function in case of the player is using an Embedded Wizard bitmap to store the decoded video (see case 1 from the above section for more details):
/* ******** Within a H file ******** */ /* Declaration of a data structure representing an instance of the video player. */ typedef struct { /* Reference to Embedded Wizard own bitmap. */ XBitmap* Bitmap; /* Size of the bitmap (and thus the of the decoded video). */ int Width; int Height; /* ... other data members ... */ } VideoPlayer_Object; /* Declaration of a C function to change the size of the decoded video for the given video decoder instance. */ void VideoPlayer_SetSize( VideoPlayer_Object* aObject, int aWidth, int aHeight );
/* ******** Within a C file ******** */ /* Implementation of a C function to change the size of the decoded video for the given video decoder instance. */ void VideoPlayer_SetSize( VideoPlayer_Object* aObject, int aWidth, int aHeight ) { XPoint size = { aWidth, aHeight }; /* First check, whether there are any relevant size changes. */ if (( aObject->Width == aWidth ) && ( aObject->Height == aHeight )) return; /* Free the old bitmap. */ EwFreeBitmap( aObject->Bitmap ); /* Create a new bitmap according to the specified size. */ aObject->Bitmap = EwCreateBitmap( EW_PIXEL_FORMAT_NATIVE, size, 0, 1 ); /* Evtl. remember the size for later use. */ aObject->Width = aWidth; aObject->Height = aHeight; }
The methods OnResize and OnMove return a handle identifying the instance of the external application. This is mainly the value passed in the parameter aHandle. The only exception is when the external application does not allow any changes of its size or position once the initialization of the application has been finalized. In such case, the implementation of the method have to release the old instance and create a new one using now the new values for size or position. For example, following implementation of OnResize recreates the video player instance using the new size:
$if !$prototyper native ( aHandle, aSize ) { /* First destroy the old instance ... */ VideoPlayer_DeleteObject((VideoPlayer_Object*)aHandle ); /* ... then create a new instance of the video player and return it as 'handle'. Use aSize to determine the size of decoded video. */ aHandle = (XHandle)VideoPlayer_NewObject( aSize.X, aSize.Y ); } $endif // Returns the new handle return aHandle;
In the above discussed use cases the Applet view could assume any arbitrary size. In practice this makes rarely sense since the size will be usually determined by constraints specific to the external application. For example, the video player will impose an aspect ratio between width and height of the decoded video (e.g. 16:9). The corresponding Applet view, when its size changes, must thus respect this aspect ratio. Other external applications may behave even more restrictive allowing only one fixed size (e.g. HD resolution 1920x1080).
In order to prevent the Applet view from being able to assume any arbitrary size, you have to adapt the method OnAdjustSize. The method should evaluate the size passed in its parameter aSize and calculate the correct size according to the imposed constraints. If necessary, the method can also invoke some native function of the external application to query the correct size. For example, the following implementation of OnAdjustSize asks the video player instance for the actual aspect ratio and adapts the size appropriately:
$if !$prototyper native ( aHandle, aSize ) { XPoint aspectRatio; /* Query the aspect ratio of the video decoded by the player. The function returns the aspect ratio in Embedded Wizard XPoint structure. */ aspectRatio = VideoPlayer_GetAspectRatio((VideoPlayer_Object*)aHandle ); /* In the passed 'aSize' adapt the height to meet the aspect ratio 'w:h'. */ aSize.Y = ( aSize.X * aspectRatio.Y ) / aspectRatio.X; } $endif // Returns the adapted size return aSize;
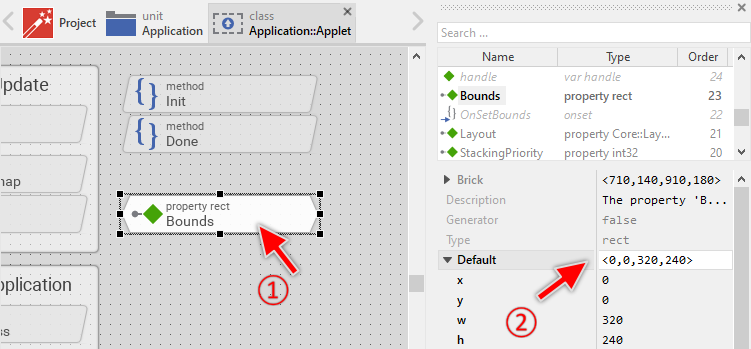
If you have not adapted the above explained OnAdjustSize method, new added instances of the Applet view will per default assume the size of 100x100 pixel. Consequently, the view appears as a 100 pixel large square:
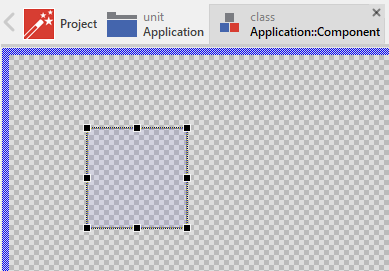
This default size is determined by the initialization value of the property Bounds found in the Applet Interface. When you select this property you can modify the value. For example, if you want the Applet view to originally have the size of 320x240 pixel, then change the initialization as shown in the figure below:
The above examples use external functions and type definitions (e.g. VideoPlayer_SetSize, VideoPlayer_MoveLayer, VideoPlayer_Object, etc.). When you adapt the Applet Interface for your concrete external application, you will surely implement other functions. Don't forget to add all relevant declarations to Embedded Wizard project. Ignoring this will provoke C compiler or linker errors because of unknown identifiers or unresolved externals. The section Add external application code to the project explains, how this is managed usually.
Perform the screen update
The exact process of screen updates does depend on the mode you have decided for. This may result from the programming interface the external application exposes as well as the capabilities of the underlying target system. Please remember the above section presenting the three possible integration strategies in detail. We assume you have read this section and understood the differences.
According to your choice you will implement none or several of the methods OnUpdate, OnGetBitmap and OnDraw. Following sub-sections explain the necessary adaptations according to the selected strategy:
1. Use a bitmap to transfer the graphical outputs
If you have decided for this strategy, you will need to adapt the methods OnUpdate and OnGetBitmap. The job of the method OnUpdate is to ask the external application for eventual awaiting graphical outputs and update the corresponding area in the bitmap shared between the external and the GUI application. In other words, if there are any changes in the state of the external application, OnUpdate should redraw the affected pixel data stored in the bitmap.
When finalizing its job, the method OnUpdate has to return a rect value enclosing all modified bitmap areas. Based on this information the Applet Interface can thereupon schedule the next screen update within the GUI application. If there was no modification, the method should return an empty rectangle <0,0,0,0>. Consequently, no screen update is performed in such case.
Let's assume, you implement an Applet Interface to integrate some external computer game application. At the runtime, such application will perform diverse animations, move the game characters and exchange the contents within the scene. The method OnUpdate should thus trigger the computer game to redraw within the bitmap all areas affected by the animation. Then the method returns a rectangle enclosing all redrawn areas:
var rect area; $if !$prototyper native ( aHandle, area ) { /* Let the external application perform all pending drawing operations and get the affected area within the bitmap. We assume, the function returns XRect value so it can be assigned to 'area'. */ area = Game_Update((Game_Object*)aHandle ); } $endif // Returns the modified area return area;
This example invokes an imaginary C function Game_Update(). This function takes care of all necessary steps to estimate the dirty area, lock this area within the bitmap and fill it with new contents. Following pseudo C code demonstrates the possible implementation of the Game_Update() function. Please note the both functions EwLockBitmap and EwUnlockBitmap used to lock and unlock the bitmap temporarily:
/* ******** Within a H file ******** */ /* Declaration of a data structure representing an instance of the game. */ typedef struct { /* Reference to Embedded Wizard own bitmap. */ XBitmap* Bitmap; /* The area changed since preceding update. This area has to be redrawn within the bitmap. */ int DirtyX; int DirtyY; int DirtyWidth; int DirtyHeight; /* ... other data members ... */ } Game_Object; /* Declaration of a C function to perform an update for the given game instance. The modified area is returned as XRect value. */ XRect Game_Update( Game_Object* aObject );
/* ******** Within a C file ******** */ /* Implementation of a C function to perform an update for the given game instance. The modified area is returned as XRect value. */ XRect Game_Update( Game_Object* aObject ) { /* The 'dirty' area as Embedded Wizard 'rect'. */ XRect area = { aObject->DirtyX, aObject->DirtyY, aObject->DirtyX + aObject->DirtyWidth, aObject->DirtyY + aObject->DirtyHeight }; /* Nothing to redraw? Then leave the function immediately. */ if (( aObject->DirtyWidth == 0 ) || ( aObject->DirtyHeight == 0 )) return area; /* Lock the bitmap for write access. Note, we lock the 'area'. */ XBitmapLock* lock = EwLockBitmap( aObject->Bitmap, 0, area, 0, 1 ); /* From the 'lock' structure get a pointer to the pixel memory of the bitmap and the pitch (distance between two pixel rows). */ void* pixelPtr = lock->Pixel1; int pitch = lock->Pitch1Y; /* Let the game application fill the memory area with new contents. */ RedrawGameScene( pixelPtr, stride, aObject->DirtyX, aObject->DirtyY, aObject->DirtyWidth, aObject->DirtyHeight ); /* Finally unlock the bitmap. */ EwUnlockBitmap( lock ); /* Clear the dirty area */ aObject->DirtyX = 0; aObject->DirtyY = 0; aObject->DirtyWidth = 0; aObject->DirtyHeight = 0; /* Return the redrawn area. */ return area; }
When accessing the bitmap memory, you should always take in account the correct color format how the pixel of the bitmap are stored within its memory. Embedded Wizard supports several formats. More details concerning the direct access to a bitmap and its color formats can be found in the section XBitmapLock. We recommend you also the chapter Extern Bitmap interface. It contains diverse examples how bitmaps are created, locked and filled with contents.
Once you have finalized the adaptation of the OnUpdate method, you implement the method OnGetBitmap. Fortunately, its adaptation is much more easy. The method has to return the Embedded Wizard bitmap used by the external application to store the graphical outputs. The implementation of such method can thus look as follows:
var handle bitmap; $if !$prototyper native ( aHandle, bitmap ) { /* Get the Embedded Wizard bitmap used actually by the external application. */ bitmap = (XHandle)Game_GetBitmap((Game_Object*)aHandle ); } $endif // Returns the bitmap return bitmap;
The implementation of the C function Game_GetBitmap() limits to return the bitmap stored in the external application instance. For example:
/* ******** Within a H file ******** */ /* Declaration of a data structure representing an instance of the game. */ typedef struct { /* Reference to Embedded Wizard own bitmap. */ XBitmap* Bitmap; /* ... other data members ... */ } Game_Object; /* Declaration of a C function to query the bitmap used actually by the external application. */ XBitmap* Game_GetBitmap( Game_Object* aObject );
/* ******** Within a C file ******** */ /* Implementation of a C function to query the bitmap used actually by the external application. */ XBitmap* Game_GetBitmap( Game_Object* aObject ) { return aObject->Bitmap; }
The above examples use external functions and type definitions (e.g. Game_Update, Game_GetBitmap, Game_Object, etc.). When you adapt the Applet Interface for your concrete external application, you will surely implement other functions. Don't forget to add all relevant declarations to Embedded Wizard project. Ignoring this will provoke C compiler or linker errors because of unknown identifiers or unresolved externals. The section Add external application code to the project explains, how this is managed usually.
2. Draw directly into Embedded Wizard framebuffer
If you have decided for this strategy, you will need to adapt the methods OnUpdate and OnDraw. The job of the method OnUpdate is to ask the external application for eventual awaiting graphical outputs. In other words, if there are any changes in the state of the external application, OnUpdate should return the affected screen area without performing any drawing operations. Based on this information the Applet Interface can schedule the next screen update within the GUI application. If there was no modification, the method should return an empty rectangle <0,0,0,0>. Consequently, no screen update is performed in such case.
Let's assume, you implement an Applet Interface to integrate some external computer game application. At the runtime, such application will perform diverse animations, move the game characters and exchange the contents within the scene. The method OnUpdate should in such case ask the computer game for the area affected by the animation:
var rect area; $if !$prototyper native ( aHandle, area ) { /* Ask the external application for the area to redraw during the next screen update. We assume, the function returns XRect value so it can be assigned to 'area'. */ area = Game_GetDirtyArea((Game_Object*)aHandle ); } $endif // Returns the affected area return area;
This example invokes an imaginary C function Game_GetDirtyArea() to estimate the area awaiting the redraw operation during the next screen update. Following pseudo C code demonstrates the possible implementation of the Game_GetDirtyArea() function:
/* ******** Within a H file ******** */ /* Declaration of a data structure representing an instance of the game. */ typedef struct { /* The area changed since preceding update. This area has to be redrawn during next screen update. */ int DirtyX; int DirtyY; int DirtyWidth; int DirtyHeight; /* ... other data members ... */ } Game_Object; /* Declaration of a C function to query the update area for the given game instance. The area is returned as XRect value. */ XRect Game_GetDirtyArea( Game_Object* aObject );
/* ******** Within a C file ******** */ /* Implementation of a C function to query the update area for the given game instance. The area is returned as XRect value. */ XRect Game_GetDirtyArea( Game_Object* aObject ) { /* The 'dirty' area as Embedded Wizard 'rect'. */ XRect area = { aObject->DirtyX, aObject->DirtyY, aObject->DirtyX + aObject->DirtyWidth, aObject->DirtyY + aObject->DirtyHeight }; /* Return the affected area. */ return area; }
After OnUpdate returned a non empty area, the Applet Interface schedules a new screen update. That in turn triggers an invocation of the method OnDraw. Generally, OnDraw will be invoked during each screen update which intersects the area occupied by the Applet view. By adapting this method, you can fill areas within the Embedded Wizard framebuffer, copy bitmaps to it, print text, raster vector graphics and much more. In other words, the entire drawing process of the external application depends on the functionality of the Embedded Wizard own Graphics Engine and it is performed synchronously during the screen update. All relevant drawing functions are documented inline in the module ewgfx.h.
In case of the external application implementing a computer game, the adaptation of the method OnDraw could look as shown below. Please note the usage of the method parameters aClip and aDstRect. The first of them determines the area within the framebuffer allowed to be modified. Drawing outside aClip must be avoided in any case. aDstRect, in turn, corresponds to the area of the Applet view itself. It determines the coordinates in the framebuffer where the external application should display its contents:
// Access the framebuffer. var handle bitmap = aCanvas.GetBitmap(); $if !$prototyper native ( aHandle, bitmap, aClip, aDstRect ) { /* Forward the call to some game C function. 'aHandle' identifies the instance of the external application. 'bitmap' represents the drawing destination (usually the framebuffer). */ Game_Draw((Game_Object*)aHandle, (XBitmap*)bitmap, aClip, aDstRect ); } $endif
Again, this example invokes an imaginary C function Game_Draw() to perform concrete drawing operations within the Embedded wizard own framebuffer. Following pseudo C code demonstrates the possible implementation of such Game_Draw() function. In this very simple example, we limit to fill the area occupied by the external application with some game background color:
/* ******** Within a H file ******** */ /* Declaration of a data structure representing an instance of the game. */ typedef struct { int SomeState; /* ... other data members ... */ } Game_Object; /* Declaration of a C function to perform the drawing operation. */ void Game_Draw( Game_Object* aObject, XBitmap* aBitmap, XRect aClip, XRect aDstRect );
/* ******** Within a C file ******** */ /* Implementation of a C function to perform the drawing operation. */ void Game_Draw( Game_Object* aObject, XBitmap* aBitmap, XRect aClip, XRect aDstRect ); { /* Red and blue colors, each 50% transparent. */ XColor color1 = { 255, 0, 0, 128 }; XColor color2 = { 0, 255, 0, 128 }; /* Depending on the actual state of the computer game, use different colors to fill its background area. */ if ( aObject->SomeState == 1 ) EwFillRectangle( aBitmap, 0, aClip, aDstRect, color1, color1, color1, color1, 1 ); if ( aObject->SomeState == 2 ) EwFillRectangle( aBitmap, 0, aClip, aDstRect, color2, color2, color2, color2, 1 ); /* ... perform further drawing operations ... */ }
The above examples use external functions and type definitions (e.g. Game_GetDirtyArea, Game_Draw, Game_Object, etc.). When you adapt the Applet Interface for your concrete external application, you will surely implement other functions. Don't forget to add all relevant declarations to Embedded Wizard project. Ignoring this will provoke C compiler or linker errors because of unknown identifiers or unresolved externals. The section Add external application code to the project explains, how this is managed usually.
3. Integrate with a separate graphics layer
If you have decided for this strategy, you don't need to adapt any of the above mentioned methods. The entire drawing process is controlled in this case by the external application and the drawing outputs are stored in a separate graphics hardware layer. Just ensure that the size and position of the graphics hardware layer do correspond to the screen area occupied by the Applet view.
Relay touch (or mouse) events to the external application
External applications may respond to touchscreen events. For example, a computer game can move a game piece when the user touches and drags it interactively. Similarly, WebBrowser may use touchscreen inputs to control the navigation between the web pages. In order to handle touchscreen events, the Applet Interface provides the methods OnCursorHitTest, OnCursorEvent and OnDragEvent. These methods are invoked automatically during the user performs a touch interaction. When you plan to support touch events, you will need to adapt all three methods.
As its name indicates, the method OnCursorHitTest is invoked at the beginning of a new interaction, just in the moment when the user hits with a finger the area of the Applet view. The method should pre-evaluate the event and decide whether the external application is interested in it, or not. For example, a game application may ignore the event if the user has not hit any of the game pieces. In such case, OnCursorHitTest should return false. This signals to the Applet Interface that the external application is not interested in handling this event. The event can thereupon be handled by other GUI components lying eventually behind the Applet view.
If the external application is interested in processing the event, the method OnCursorHitTest must return true. This initiates so-called cursor grab cycle. The grab cycle means, that the Applet view becomes the receiver for all subsequent touchscreen events related to the finger causing the event: the Applet view grabs temporarily the touchscreen. Embedded Wizard can handle multi-touch events for up to 10 fingers. Your adaptation can thus track 10 different grab cycles simultaneously and relay the corresponding events to the external application, provided there is a multi-touch capable screen installed in your device, of course.
During the grab cycle the Applet Interface invokes the methods OnCursorEvent and OnDragEvent each time the status of the interaction changes. For example, OnCursorEvent is invoked at the beginning and at the end of the interaction, what corresponds to the press and release events. In turn, OnDragEvent is invoked each time the user moves the finger during an active grab cycle. In this manner your adaptation of these method can simply evaluate the status of the interaction and e.g. track the position of each finger.
When invoking the methods OnCursorEvent and OnDragEvent, the finger numbers, the event status, the position and other relevant information are provided enveloped within objects of the class Core::CursorEvent and Core::DragEvent. You implementation will thus need to take the desired information by evaluating the variables existing in the objects. Following code demonstrates the possible implementation of the three methods OnCursorHitTest, OnCursorEvent and OnDragEvent to drive an external chess game application. This allows the game to move the chess pieces and react to the movement:
/* ******** OnCursorHitTest ******** */ // In our example, we want to receive all touchscreen events if // those occur within the Applet view area. return true;
/* ******** OnCursorEvent ******** */ // From the event extract the provided touch position and a number identifying // the finger. The first finger has the number 0. The second finger has the // number 1. The numbers 2 .. 9 identify events generated by other fingers and // are useful during a multi-touch interaction: var point currentPos = aEvent.CurrentPos - Bounds.origin; var int32 finger = aEvent.Finger; // The value 'down' is 'true' if the user touches the screen. When the user ends // the interaction (lifts the finger) the variable 'down' is 'false': var bool down = aEvent.Down; // While the user continues touching the screen, the Applet view receives // periodically the Cursor Events. 'holdPeriod' stores in such case the time // elapsed since the begin on the interaction. Concrete, 'holdPeriod' is 0 for // the first event generated when the user touched the screen. The value is // expressed in milliseconds: var int32 holdPeriod = aEvent.HoldPeriod; // Ignore repetition events (while the user continues touching the screen). if ( holdPeriod > 0 ) return false; $if !$prototyper native ( aHandle, currentPos, finger, down ) { /* Drive the external application. Note: 'aHandle' refers the concrete instance of the Chess game. */ if ( down ) Game_HandlePressEvent((Game_Object*)aHandle, currentPos, finger ); else Game_HandleReleaseEvent((Game_Object*)aHandle, currentPos, finger ); } $endif return true;
/* ******** OnDragEvent ******** */ // From the event extract the provided touch position and a number identifying // the finger. The first finger has the number 0. The second finger has the // number 1. The numbers 2 .. 9 identify events generated by other fingers and // are useful during a multi-touch interaction: var point currentPos = aEvent.CurrentPos - Bounds.origin; var int32 finger = aEvent.Finger; $if !$prototyper native ( aHandle, currentPos, finger ) { /* Drive the external application. Note: 'aHandle' refers the concrete instance of the Chess game. */ Game_HandleDragEvent((Game_Object*)aHandle, currentPos, finger ); } $endif return true;
The above examples invoke imaginary C functions Game_HandlePressEvent(), Game_HandleReleaseEvent() and Game_HandleDragEvent(). These functions should relay the invocations to the concrete instance of the external Chess game. The following pseudo C++ code demonstrates the possible implementation of such functions:
/* ******** Within a H file ******** */ /* Header file containing the API of some Chess game library. */ #include "chess_game_api.h" /* Declaration of a data structure representing an instance of the external application. */ typedef struct { /* Pointer to an instance of some class from the Chess game library. */ ChessGameClass* ChessGame; /* ... other data members ... */ } Game_Object; /* Declaration of C functions to handle the user interaction. */ void Game_HandlePressEvent ( Game_Object* aObject, XPoint aPosition, XInt32 aFingerNo ); void Game_HandleReleaseEvent( Game_Object* aObject, XPoint aPosition, XInt32 aFingerNo ); void Game_HandleDragEvent ( Game_Object* aObject, XPoint aPosition, XInt32 aFingerNo );
/* ******** Within a C++ file ******** */ /* Implementation of a C function to handle the press event. */ void Game_HandlePressEvent( Game_Object* aObject, XPoint aPosition, XInt32 aFingerNo ) { /* Relay the invocation to some C++ object existing within the external application and representing the Chess game. */ aObject->ChessGame->HandlePressEvent( aFingerNo, aPosition.X, aPosition.Y ); } /* Implementation of a C function to handle the release event. */ void Game_HandlePressEvent( Game_Object* aObject, XPoint aPosition, XInt32 aFingerNo ) { /* Relay the invocation to some C++ object existing within the external application and representing the Chess game. */ aObject->ChessGame->HandleReleaseEvent( aFingerNo, aPosition.X, aPosition.Y ); } /* Implementation of a C function to handle the drag event. */ void Game_HandlePressEvent( Game_Object* aObject, XPoint aPosition, XInt32 aFingerNo ) { /* Relay the invocation to some C++ object existing within the external application and representing the Chess game. */ aObject->ChessGame->HandleDragEvent( aFingerNo, aPosition.X, aPosition.Y ); }
When adapting the methods OnCursorEvent and OnDragEvent, please note their boolean return value. The value informs the Applet Interface about the status of the event. If the event was handled by the external application, the method should return true. This will cause the Applet to schedule all necessary update tasks. In turn, if the method does return false, Applet will assume that the event has no effect on the external application. Consequently no updates are needed. If the external application allows you to query the status of the event processing, you can return this information. For example in case of the OnDragEvent method:
var bool processed; var point currentPos = aEvent.CurrentPos - Bounds.origin; var int32 finger = aEvent.Finger; $if !$prototyper native ( aHandle, currentPos, finger, processed ) { /* Assuming, the function returns != 0 if the event had an effect on the application. */ processed = Game_HandleDragEvent((Game_Object*)aHandle, currentPos, finger ) != 0; } $endif return processed;
The above examples use external functions and type definitions (e.g. Game_HandlePressEvent, Game_HandleDragEvent, Game_Object, etc.). When you adapt the Applet Interface for your concrete external application, you will surely implement other functions. Don't forget to add all relevant declarations to Embedded Wizard project. Ignoring this will provoke C compiler or linker errors because of unknown identifiers or unresolved externals. The section Add external application code to the project explains, how this is managed usually.
Please note, if your device is controlled by a mouse and it does not contain any touchscreen, you can also adapt the above mentioned methods. In this case, however, the finger numbers correspond to the mouse buttons. The left mouse button has the number 0 and the right button 1. Of course, when controlling the application by a mouse, multi-touch functionality does not play a role.
Relay keyboard events to the external application
External applications may respond to user keyboard inputs. For example, a computer game can move a game piece after the user has pressed a particular key. Similarly, WebBrowser may use keyboard inputs to control the navigation between the web pages. If your application case does require the processing of such events, this section explains how to do this.
In order to handle keyboard events, the Applet Interface provides the method OnKeyEvent. This method is invoked automatically when the corresponding Applet view lies on the focus path and the user presses, holds or releases a key. Within the method you can evaluate the code of the key and its status (pressed, released). If the user has pressed a concrete character key (e.g. letter 'X'), this character can be evaluated too. Then you can relay this information to the external application.
When you adapt the method OnKeyEvent please note that all keyboard events are delivered enveloped within an object of the Core::KeyEvent class. You implementation will thus need to take the desired information, e.g, character code, from this object. Following code demonstrates the possible implementation of an OnKeyEvent method to drive some chess computer game. This allows the game to move the chess piece and react to the movement. Please note the usage of the enumeration Core::KeyCode:
// From the event extract the provided key code. Down is 'true' if the user // has pressed (or still holds) the key. When the user releases the key, // Down is 'false': var Core::KeyCode keyCode = aEvent.Code; var bool down = aEvent.Down; var int32 direction; // If not needed, ignore 'release' events. if ( !down ) return false; // Still in Chora syntax, you can translate the Embedded Wizard own code in // some code valid for the external application. For example, you can convert // the key codes Left, Right, Up and Down in some direction values 1..4 to // move the chess piece: switch ( keyCode ) { case Core::KeyCode.Left : direction = 1; case Core::KeyCode.Right : direction = 2; case Core::KeyCode.Up : direction = 3; case Core::KeyCode.Down : direction = 4; default : direction = 0; } $if !$prototyper native ( aHandle, direction ) { /* Drive the external application. Note: 'aHandle' refers the concrete instance of the Chess game. */ Game_MoveInDirection((Game_Object*)aHandle, direction ); } $endif // Return 'true' if the event processed. return true;
The above example invokes an imaginary C function Game_MoveInDirection(). This function should relay the invocation to the concrete instance of the external Chess game. The following pseudo C++ code demonstrates the possible implementation of such function:
/* ******** Within a H file ******** */ /* Header file containing the API of some Chess game library. */ #include "chess_game_api.h" /* Declaration of a data structure representing an instance of the external application. */ typedef struct { /* Pointer to an instance of some class from the Chess game library. */ ChessGameClass* ChessGame; /* ... other data members ... */ } Game_Object; /* Declaration of a C function to handle the user interaction. */ void Game_MoveInDirection( Game_Object* aObject, int aDirection );
/* ******** Within a C++ file ******** */ /* Implementation of a C function to handle the user interaction. */ void Game_MoveInDirection( Game_Object* aObject, int aDirection ) { /* Relay the invocation to some C++ object existing within the external application and representing the Chess game. */ aObject->ChessGame->MoveCurrentPiece( aDirection ); }
When adapting the method OnKeyEvent, please note its boolean return value. The value informs the Applet Interface about the status of the event. If the event was handled by the external application, the method should return true. This will cause the Applet to schedule all necessary update tasks. In turn, if OnKeyEvent does return false, Applet will assume that the event has no effect on the external application. Consequently no updates are needed. The following version returns true only, if the user has pressed the keys Left, Right, Up or Down only:
var Core::KeyCode keyCode = aEvent.Code; var bool down = aEvent.Down; var int32 direction; ... switch ( keyCode ) { case Core::KeyCode.Left : direction = 1; case Core::KeyCode.Right : direction = 2; case Core::KeyCode.Up : direction = 3; case Core::KeyCode.Down : direction = 4; default : direction = 0; } // The user has not pressed any of the Left, Right, Up, Down keys. // Nothing to do in the external application. if ( direction == 0 ) return false; $if !$prototyper native ( aHandle, direction ) { ... } $endif // Return 'true' if the event processed. return true;
The above examples evaluated the key code directly within the implementation of the OnKeyEvent method. This is not necessarily always the case. If desired you can pass the raw key code (or character code) to the application and let the application evaluate the passed value. For example:
var bool processed; var char charCode = aEvent.CharCode; var bool down = aEvent.Down; $if !$prototyper native ( aHandle, charCode, down, processed ) { /* Let the external application process the key event. If the event had an effect, the function should return a value != 0. */ processed = Game_HandleCharEvent((Game_Object*)aHandle, charCode, down ) != 0; } $endif return processed;
The above examples use external functions and type definitions (e.g. Game_MoveInDirection, Game_HandleCharEvent, Game_Object, etc.). When you adapt the Applet Interface for your concrete external application, you will surely implement other functions. Don't forget to add all relevant declarations to Embedded Wizard project. Ignoring this will provoke C compiler or linker errors because of unknown identifiers or unresolved externals. The section Add external application code to the project explains, how this is managed usually.
Keep the external application alive
External applications may perform diverse background activities. Video decoders, for example, may need to load and decode video frames and computer games may need to calculate the next following animation step. Since the external applications are intended to run in context of the GUI application (for example, in context of the GUI thread), the respective background activities should be consequently triggered by the GUI application.
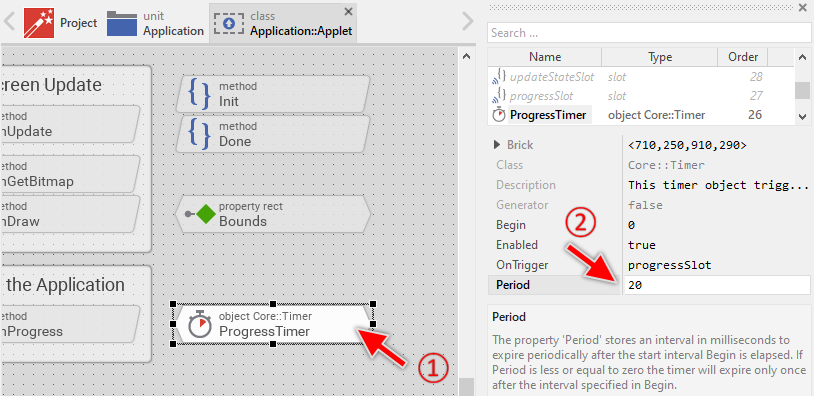
The Applet Interface provides for such purpose the method OnProgress. This method is invoked periodically and as such it is well suitable to trigger background operations necessary within the external application. The frequency with which the method is invoked is determined by the embedded timer object ProgressTimer. The timer is per default configured to expire 10 times per second. To change this frequency, select the ProgressTimer member and in Inspector window adapt its property Period. For example, you can change it to expire approximately every 20 milliseconds (~50 Hz):
The method OnProgress provides two parameters. aHandle contains the value returned by the preceding OnCreate invocation. This parameter identifies thus the concrete instance of the external application permitting OnProgress to access it. The parameter aTime determines the uptime of the GUI application expressed in milliseconds. If the external application doesn't have its own timer, your implementation can evaluate aTime and use it within the external application to e.g. calculate animations.
Following code demonstrates the possible implementation of an OnProgress method to drive the message loop within some external WebBrowser library. This allows the WebBrowser to continue loading files, drive animations, execute JavaScript code, etc.:
$if !$prototyper native ( aHandle, aTime ) { /* Drive the external application. Note: 'aHandle' refers the concrete instance of the WebBrowser. */ WebBrowser_Progress((WebBrowser_Object*)aHandle, aTime ); } $endif return false;
The above example invokes an imaginary C function WebBrowser_Progress(). This function should relay the invocation to the concrete instance of the external WebBrowser. The following pseudo C++ code demonstrates the possible implementation of such function:
/* ******** Within a H file ******** */ /* Header file containing the API of some WebBrowser library. */ #include "browser_api.h" /* Declaration of a data structure representing an instance of the external application. */ typedef struct { /* Pointer to an instance of some class from the WebBrowser library. */ BrowserClass* Browser; /* ... other data members ... */ } WebBrowser_Object; /* Declaration of a C function to perform the background operations for the given external application instance. */ void WebBrowser_Progress( WebBrowser_Object* aObject, unsigned int aTime );
/* ******** Within a C++ file ******** */ /* Implementation of a C function to perform the background operations for the given external application instance. */ void WebBrowser_Progress( WebBrowser_Object* aObject, unsigned int aTime ) { /* Relay the invocation to some C++ object existing within the external application and representing the WebBrowser. Provide the current time to it. */ aObject->Browser->DoMessageLoopWork( aTime ); }
When adapting the method OnProgress, please note its boolean return value. Returning here the value false results in the above explained behavior of the method being triggered periodically by the ProgressTimer. The method is invoked not before the timer is expired again. Should the external application, however, require more activity, your adaptation may return true. For example, if the there are too many pending operations in the external application:
var bool repeat; $if !$prototyper native ( aHandle, aTime, repeat ) { /* Drive the external application. Note: 'aHandle' refers the concrete instance of the WebBrowser. */ WebBrowser_Progress((WebBrowser_Object*)aHandle, aTime ); /* If there are more operations pending in the external application, request an imminent repetition of the OnProgress invocation. */ repeat = WebBrowser_AnyPendingTasks((WebBrowser_Object*)aHandle ) != 0; } $endif return repeat;
In such case the method OnProgress will be invoked again as soon as possible, however, no more than once per screen update. Such method can then perform progressive decoding of large image contents or drive file download operations in the background. In this manner, with each invocation of OnProgress the external application performs a small step of the entire operation. Following this approach you should ensure that the execution time of the single step will not take too long. Otherwise the GUI application will stall and it will not feel smoothly anymore for the user.
Please note, the Applet Interface will invoke the method OnProgress also if there was a preceding touchscreen or keyboard event delivered to the external application. In this manner, the external application is able to finalize eventual operations resulting from previous user inputs. It can, for example, calculate the next animation state within a computer game just after the user has moved a game piece, etc.
The above examples use external functions and type definitions (e.g. WebBrowser_Progress, WebBrowser_AnyPendingTasks, WebBrowser_Object, etc.). When you adapt the Applet Interface for your concrete external application, you will surely implement other functions. Don't forget to add all relevant declarations to Embedded Wizard project. Ignoring this will provoke C compiler or linker errors because of unknown identifiers or unresolved externals. The section Add external application code to the project explains, how this is managed usually.
Enhance the Applet Interface
In particular cases the external application may require more of is own functionality to be exposed by the Applet Interface. In case of a WebBrowser, for example, this can be a property to specify the URL (the web address) the WebBrowser should load or a method to force the WebBrowser to abort active loading. In this manner the GUI application can control the external application. Usually, each individual setting and operation, the external application implements, can or should be exposed by a corresponding method or property in the Applet Interface.
For this purpose, when editing the Applet Interface, you can add as many new properties and new methods as necessary. Methods are more suitable to represent concrete operations like StopLoading, Reload, etc. Properties, in turn, can be seen as variables the GUI application can read and modify. Each access to the property causes its associated onget or onset method to be invoked. By adapting all the methods you can trigger the concrete function within the external application. For example, in order to enhance the Applet Interface by a new URL property, following steps are needed:
★First switch to the Applet Interface class.
★Follow the instruction to add a new property.
★Rename the just added property to e.g. URL.
★Since URLs are strings, adapt the data type of the property to be string.
★Open the onset method for editing and enter following code to it:
// Get the handle representing the instance of the external application. var handle theHandle = GetHandle(); var string url = value; $if !$prototyper native ( theHandle, url ) { /* Relay the invocation to the external application. Note: 'theHandle' refers the concrete instance of the WebBrowser. 'url', in turn, is a zero terminated wchar_t string. */ WebBrowser_LoadURL((WebBrowser_Object*)theHandle, url ); } $endif
★As next open the onget method for editing and enter following code to it:
// Get the handle representing the instance of the external application. var handle theHandle = GetHandle(); var string url; $if !$prototyper native ( theHandle, url ) { /* Relay the invocation to the external application. Note: 'theHandle' refers the concrete instance of the WebBrowser. We assume, the invoked function returns the URL stored within an Embedded Wizard string. */ url = WebBrowser_GetURL((WebBrowser_Object*)theHandle ); } $endif return url;
The above onegt/onset methods invoke imaginary C functions WebBrowser_LoadURL() and WebBrowser_GetURL. These functions take care then of all relevant operations to change the URL (e.g. start loading the new page) and to query the actually loaded URL. Following pseudo C++ code demonstrates the possible implementation of such functions. Please note the division in the H (header) and C (code) file as it is usual for target systems using natively the programming language C++:
/* ******** Within a H file ******** */ /* Header file containing the API of some WebBrowser library. */ #include "browser_api.h" /* Declaration of a data structure representing an instance of the external application. */ typedef struct { /* Pointer to an instance of some class from the WebBrowser library. */ BrowserClass* Browser; /* ... other data members ... */ } WebBrowser_Object; /* Declaration of a C functions to set/query the URL used in the WebBrowser actually. */ void WebBrowser_LoadURL( WebBrowser_Object* aObject, XString aURL ); XString WebBrowser_GetURL ( WebBrowser_Object* aObject );
/* ******** Within a C++ file ******** */ /* Implementation of a C function to change the URL in the WebBrowser. */ void WebBrowser_LoadURL( WebBrowser_Object* aObject, XString aURL ) { /* In fact, Embedded Wizard strings are zero-terminated 'wchar_t' strings. */ const wchar_t* url = (const wchar_t*)aURL; /* Trigger the external WebBrowser application to load the given URL. */ aObject->Browser->LoadURL( url ); } /* Implementation of a C function to query the URL in the WebBrowser. */ XString WebBrowser_GetURL( WebBrowser_Object* aObject ) { wchar_t url[2048]; /* Copy the URL into the 'wchar_t' buffer. */ aObject->Browser->CopyURL( url, 2048 ); /* Return Embedded Wizard string containing the URL. */ return EwNewString( url ); }
Now, wherever you use the WebBrowser Applet in the GUI application, you can access its property URL to specify which web page should be loaded and to query the URL of the actually loaded page. You can even configure the property directly in Inspector window after selecting an instance of the Applet view.
React to notifications from the external application
In particular cases the Applet Interface will need to handle notifications generated by the external application. For example, the WebBrowser may need to notify the Applet Interface when it has finalized the loading of a web page. The Applet Interface can thereupon handle the notification or relay it to other GUI components interested in such event.
The simplest approach to solve this demand consists in polling the respective state of the external application each time the OnProgress method is executed. In such case OnProgress queries the actual loading state and as soon as it detects that the state changed to finished, posts a signal to a slot method connected to the Applet Interface:
var bool loadingFinished; $if !$prototyper native ( aHandle, aTime, loadingFinished ) { /* Is the loading of the web page finished? We assume, the function returns a value != 0 in such case. Note: 'aHandle' refers the concrete instance of the WebBrowser. */ loadingFinished = WebBrowser_LoadingFinished((WebBrowser_Object*)aHandle ) != 0; /* Perform other background activities in the external application. */ WebBrowser_Progress((WebBrowser_Object*)aHandle, aTime ); } $endif // If loading is finished, post a signal to a slot method stored in the property // 'OnLoadingFinished'. if ( loadingFinished ) postsignal OnLoadingFinished;
The above example posts a signal to a slot method stored in the property OnLoadingFinished. Such property does not exist per default. You will thus need to add it to the Applet Interface implementation:
★Follow the instruction to add a new property.
★Rename the just added property to e.g. OnLoadingFinished.
★Since we want the property to store a reference to a slot method, adapt the data type of the property to be slot.
★The onget and onset methods associated per default to the property are in this application case not needed and can be deleted.
Now, wherever you use the WebBrowser Applet in the GUI application, you can connect its property OnLoadingFinished to a slot method, which thereupon will be invoked when the WebBrowser has finalized the web page loading. The slot method corresponds thus to a on loading finished event. For more details concerning the signal-slot approach, please see the section Slot methods.
Control the visibility of the Applet view
The visibility of the Applet view is controlled primarily by the property Visible. Consequently, setting this property to the value false causes the contents of the external application to disappear from the screen. This is true also in case of the external application using a separate graphics hardware layer (see the third screen update strategy in the above section). In such case, setting Visible to the value false prevents the Applet view from displaying a transparent gap where the contents of the separate layer can shine through.
By using the property Opacity you can modulate the opacity of the external application, so that it appears semi-transparent even if the original contents were opaque. The valid values for the property Opacity are 0 .. 255, whereby the smaller the value the more transparent the resulting image. For more advanced application cases the appearance of the external application can also be controlled by the properties Color, ColorTL, ColorTR, ColorBL and ColorBR.
These properties allow you to specify for every corner of the Applet view (top-left, top-right, bottom-right and bottom-left) an individual opacity value resulting in the contents of the external application being modulated by some opacity gradient. If the external application provides monochrome contents (e.g. stored within an Alpha8 bitmap), the contents can even be colorized by the values specified in the ColorXX properties. This is similar to how you can colorize an ordinary image.
Per default the contents displayed in the Applet view appear alpha-blended over the contents lying behind them unless you explicitly disable this mode by setting the property AlphaBlended to the value false. In such case, the contents of the external application will overwrite the contents existing already in the background.
Please note, the effect of the above mentioned properties to control the alpha-blending mode, the opacity and colors of the external application depends on the selected screen update mode. Concrete, if the external application uses a separate graphics hardware layer to display its contents (see the third screen update strategy in the above section), the properties will not have any effect. In such case the Applet view limits to punch out a transparent gap within the foreground layer used by the GUI application through which the contents of the background layer can be seen on the screen.
If you decided to draw directly into Embedded Wizard framebuffer (see the second screen update strategy in the above section), the values of the properties are passed in parameters to the OnDraw method. Your implementation may thereupon evaluate the values and modulate the opacity/colors or determine the alpha-blended mode for the displayed contents. It is finally up to you whether and how the values are used. In turn, if the external application uses a bitmap to exchange its graphical outputs with the remaining GUI application (the first screen update strategy in the above section), the properties affect the screen update automatically and you don't need to worry about it.
TIP
In the complete GUI application an individual view is visible on the screen only when all of its superior Owner components are visible too, the view itself does lie within the visible area of the superior components and the view is not covered by other sibling views nor components.
JavaScript
In the above code samples we focused on the use case with C and C++ compatible target system. In principle, the explained rules are also true for JavaScript targets. However, in case of JavaScript you don't need to implement H (header) and C (code) files. The external application is in such case itself implemented in JavaScript. Your adaptation has thus to take care of the proper integration with the external JavaScript code.
Prototyping
The above sections explained the integration with external application code existing in the target system. Consequently, the external functionality is not available during prototyping. This can be solved by enveloping the external code within an intrinsics module. Since intrinsics are Windows specific, this approach assumes that the external application code can be compiled and run on a Windows system.
In such case, the intrinsics module does expose all the functions intended to be invoked from the Applet Interface methods. For example, an intrinsics module containing the code of an external video player will expose a function to create a new instance of the video player. Assuming such function is named VideoPlayer_NewObject (similarly to our example from the section Initialize and shutdown the external application), the Applet Interface can thereupon use the function even during the prototyping:
var handle result; // Code section intended to invoke a function implemented within an intrinsic // module. $if $prototyping result = VideoPlayer_NewObject(); $endif // Code section intended to be generated for the target system. $if !$prototyper native ( result ) { result = (XHandle)VideoPlayer_NewObject(); } $endif
Example
If you are looking for an example demonstrating the integration of external code, please take a look at the project Applet from the examples provided per default with Embedded Wizard setup. The corresponding external code (the H and C files) as well as an intrinsic module are found in the folder Embedded Wizard <version>\Examples\Applet just below your documents folder. This example integrates a simple computer game where the user moves a red game piece by using keyboard while another green piece tries to reach it autonomously:
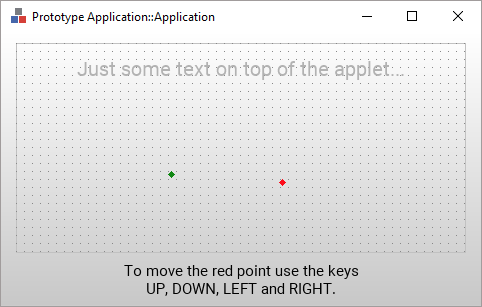
Granted, this example is very primitive. In fact, this simple game functionality could be implemented natively in Embedded Wizard Studio without depending on the Applet Interface. The example, however, demonstrates very well how to manage an instance of the external application, perform screen updates by using a bitmap, handle user inputs and perform animations. It is thus a good starting point for your own adaptations.
Nevertheless, each application case is particular and different. Once you have understood the concepts of Applet Interface and analyzed the provided example, you will need to reflect about your own concrete application case and find out the best approach to bring the external code and Embedded Wizard GUI together.