Embedded Wizard Studio: Create new project dialog
With this dialog you can create new projects. The project creation is based on configuration templates, you select from a list and adjust their parameters if necessary. This dialog appears when activating the command New ...:
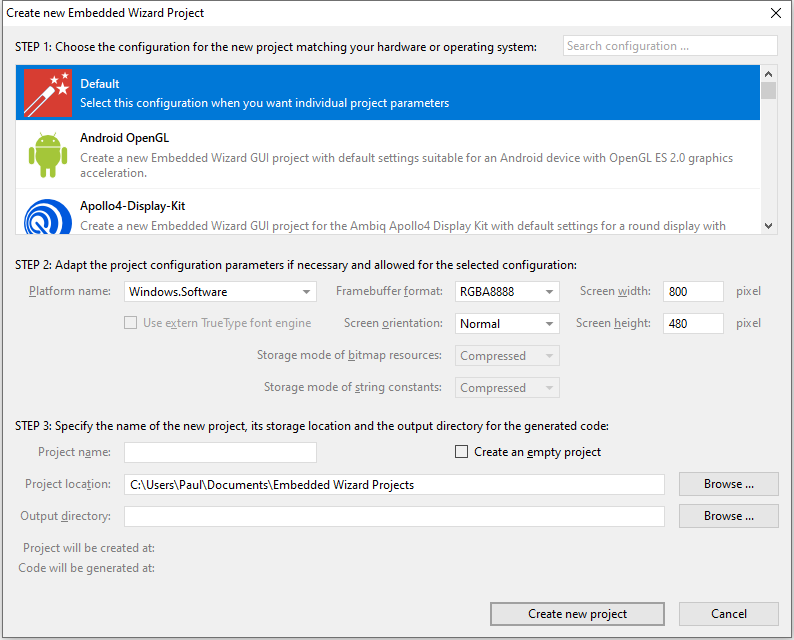
Create new Embedded Wizard Project dialog
Select the configuration template
The upper area of the dialog displays a list of available configuration templates. Scroll the list and select the best suitable configuration for your target or operating system. Please note the short description provided with each configuration. Most of the configurations correspond to existing development or evaluation boards. For example, if you are working with the i.MX RT1060 Evaluation Kit then select the configuration IMXRT1060-EVK. Usually no further configuration adjustments are necessary in such case. See also the chapter Build Environments for further information concerning the supported target systems.
If you have developed your own hardware or you are using a variant of a development board not listed in this dialog, select the next appropriate configuration. For example, if your hardware is based on the STM32H750 MCU then select the configuration STM32H750-Discovery. Then in the second step you can adjust the configuration parameters to correspond to whatever is particular in your own system, e.g. you can adjust the screen resolution.
The list includes also few generic configurations detached from a dedicated MCU or MPU but restricted to a concrete operating system. For example, when you develop the GUI application for a Linux system, you can select between Linux OpenGL or Linux Software. The most generic configuration, however, is the first one in the list called Default. You select this configuration when you intend to address an MCU/MPU architecture and operating system not listed in the dialog. Selecting Default implies that you want to adjust all configuration parameters manually.
Filter the configuration templates
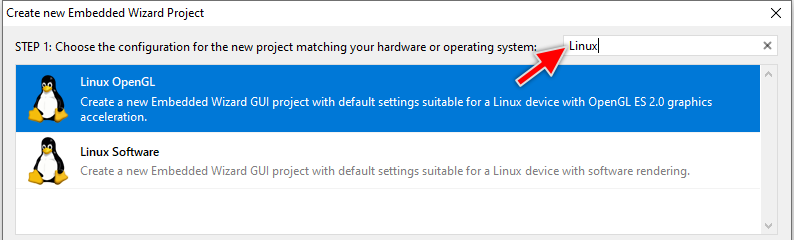
You can apply a filter pattern to the list and thus find the desired configuration template in a more convenient way. For this purpose the dialog provides in its upper right area the Search ... edit field. With the active filter function, the dialog displays only those configurations, which in fact do match the specified filter pattern. Other examples are hidden:
★Click on the Search ... edit field.
★In the edit field enter the text you want to use as filter pattern:
Adjust the configuration parameters
Each time you select a configuration, the control elements found below the list are loaded with corresponding values. Depending on the selected configuration, some of the parameters will be fixed while other can be adjusted. Control elements for parameters which can't be changed appear consequently grayed out. The following figure demonstrates it:
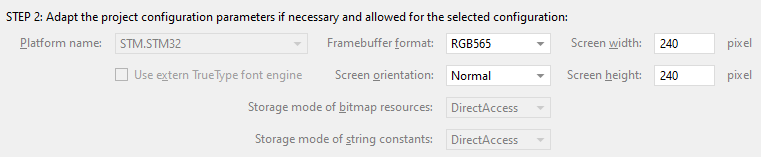
By modifying the parameters you adapt the project configuration to correspond to your hardware system as good as possible. The parameters are then taken over into the attributes of the profile member. The table below describes the existing parameters, their function and the correspond profile attributes:
Parameter |
Description |
|---|---|
Platform name |
Determines the Platform Package to use when prototyping or generating code. The value selected in this parameter should correspond to the MCU, MPU or operating system you plan to use in your system. When creating the project, this parameter is taken over into the attribute PlatformPackage of the profile member. |
Use extern TrueType font engine |
This parameter controls whether the GUI application should use a TrueType font engine or not. Without a TrueType engine, the font metric conversion and glyph rasterization are performed at the code generation time. The results are so more suitabe for low-end systems. When you plan to support many languages (especially Chinese, Japanese or Korean) with multiple different fonts, then TrueType engine would be more adequate. In this case, the font metric calculation and the glyph rasterization will be performed at the runtime of the application using TTF or OTF files. Note, TrueType engines are RAM and CPU intensive. When creating the project, this parameter is taken over into the attribute PlatformPackage of the profile member. |
Framebuffer format |
This parameter determines the color format to store the pixel in the framebuffer. The value selected in this parameter affects directly the amount of RAM needed to store the framebuffer content as well as the resulting color space. When creating the project, this parameter is taken over into the attribute PlatformPackage of the profile member. |
Screen width, Screen height |
The both parameters determine the size (the resolution) of the framebuffer in pixel. If the GUI application is intended to run within a window (e.g. under Microsoft Windows), the parameters also determine the size of the window. The values also affect the amount of RAM needed to store the framebuffer. When creating the project, the parameters are taken over into the attribute ScreenSize of the profile member. |
Screen orientation |
This parameter determines the planed installation orientation of the display in your target device. When creating the project, this parameter is taken over into the attribute ScreenOrientation of the profile member. |
Storage mode of bitmap resources |
This parameter controls the conversion of bitmap resources when generating code. Bitmaps stored in Compressed format occupy less code space but they require additional RAM where the content of the bitmap can be decompressed. Storing the bitmap in DirectAccess mode is suitable for low-end target system with few RAM but sufficient flash. When creating the project, this parameter is taken over into the attribute ModeOfBitmapResources of the profile member. |
Storage mode of string constants |
This parameter controls the conversion of string literals when generating code. Strings stored in Compressed format occupy less code space but they require additional RAM where the content of the string can be decompressed. Storing the strings in DirectAccess mode is suitable for low-end target system with few RAM but sufficient flash. When creating the project, this parameter is taken over into the attribute ModeOfStringConstants of the profile member. |
After creating the project, you can modify the parameters by editing the corresponding attributes of the profile member.
Name the new project
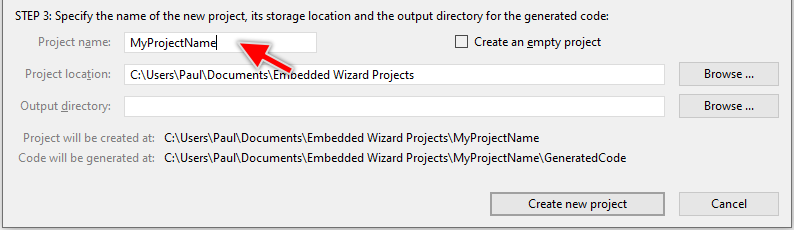
You have to specify a name for the new project. Please note, that the project name can't contain any of the following signs .<>:\"/\|?*:
★Click on the edit field and enter the name.
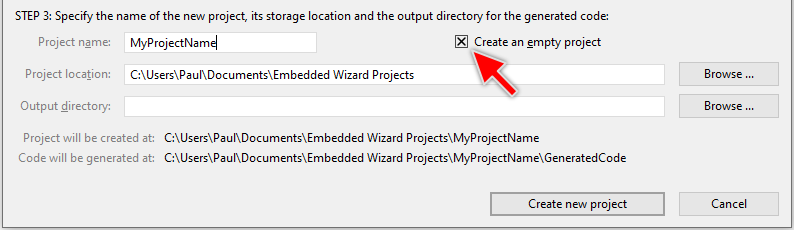
Configure the project content
Per default new created projects contain a mini Hello World application. By activating the checkbox the new created project will be empty:
Select the project storage location
Per default new projects are created in the Embedded Wizard Projects sub-directory of your documents folder. You can however specify another location where to store the new project:
★Click on the edit field and enter the path to the directory where to store the new project
★or click on the corresponding button to open a directory selection dialog.

IMPORTANT
The location has to be an absolute path starting with the drive letter (e.g. C:\). Selecting a network path will not work. In such case you have to configure the MS-Windows to assign to the network path a drive letter and use this letter in the location.
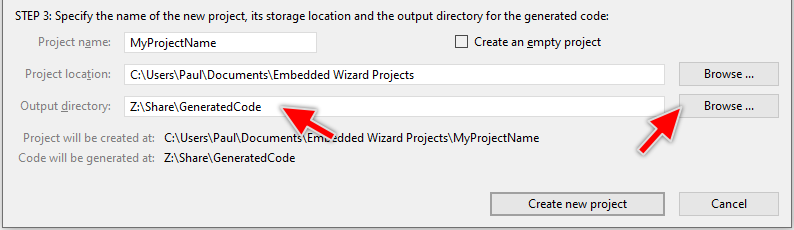
Select the location for the generated code
Per default the new created project will generate code in the directory GeneratedCode found just below of the directory containing the project. You can however specify another location where to store the generated code. This configuration will then be stored in the attribute OutputDirectory of the profile member:
★Click on the edit field and enter the path to the directory where to generate the code
★or click on the corresponding button to open a directory selection dialog.
IMPORTANT
The location has to be an absolute path starting with the drive letter (e.g. C:\). Selecting a network path will not work. In such case you have to configure the MS-Windows to assign to the network path a drive letter and use this letter in the location.
Create the project
Once all parameters are configured, the project name and its location are specified, click on the button . If you forgot to enter a setting or an entered value is invalid, a dedicated error message is displayed.
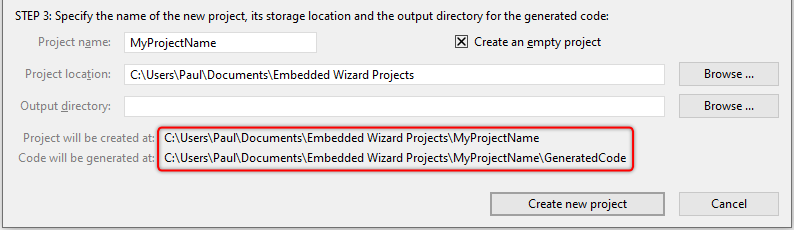
Please note, Embedded Wizard creates for the project a new sub-directory named after the project name. For example, when the project name is MyProjectName, Embedded Wizard will create within the location directory a new sub-directory also called MyProjectName and store there all project files. For your convenience the complete path to the new directory is displayed in the bottom area of the dialog. Similarly, the dialog displays the path to the directory where the code is generated:
Edit project parameters afterwards
Once the project has been created you can still modify all project related parameters. For this purpose you edit the attributes PlatformPackage, ScreenSize, ScreenOrientation, ModeOfBitmapResources, ModeOfStringConstants and OutputDirectory of the profile member.